Enable Customer Journey Data Services (CJDS)
Note:Please refer to Webex CC Labs for better understanding of CJDS feature in Webex Contact Center.
Quick Links
Control Hub: https://admin.webex.com
Portal: https://portal.wxcc-us1.cisco.com/
Agent Desktop: https://desktop.wxcc-us1.cisco.com
Developer Portal: https://developer.webex-cx.com/documentation/getting-started
Feature Overview: https://app.vidcast.io/share/889c2cbf-51b2-4cc9-94f8-9143078dca83
Example Use Case: https://app.vidcast.io/share/b90e50f4-d085-416c-9aae-29426fa18f53
Readme: https://github.com/CiscoDevNet/cjaas-widgets/blob/main/CustomerJourney/README_VERSION_10.0.0.md
JDS API Reference: https://developer.webex-cx.com/documentation/journey
Adding Customer Identities: https://app.vidcast.io/share/4c4a5909-7770-4662-b25e-2f31b34f9c63
JDS Contact Resolver Subflow: https://app.vidcast.io/share/cab5b686-9745-4394-98d4-b8b58c45f1a3
Oauth Token Creation for Postman:https://app.vidcast.io/share/6b54f08d-0cd2-481f-979b-c8643c1d6a13\
JDS Feature Overview
CJDS is an API-first service that enables organizations to:
Listen: Integrate with any data source or third-party applications to listen to disparate data sources (e.g. customer called Support).Identify: Create a dynamic customer profile capturing propensity drivers, such as a customer’s preferred mode of communication or preferred language (e.g. how many times has the customer contacted us in the last week in each channel?).Analyze: Apply different aggregation techniques to all customer data collected (e.g. What is the CSAT score of the customer interaction? Is he using telephony,chat or other channel to contact?).Act: Use the data and insights within CJDS to dynamically change the flow within Webex Contact Center Flow Control and personalize the customer experience at a granular level. These insights are visible to customer-facing teams in real time through Agent Desktop. (e.g. bypass normal queue when customer calls for the third time in 24 hours and offer premium support).
A comprehensive summary of the feature is available in the Developer Portal, where you can find all the vital information & step-by-step guide to enable JDS for the first time in your own tenant.
Provision JDS
-
Fill out this form to have CJDS provisioned for your tenant enabled, as it not enabled by default. If applicable, please work together with your Customer Success Manager (CSM) to ensure a smooth process and enablement. Post the initial request, the Cisco team will provision the CJDS instance within 72 hours.
-
When JDS is provisioned for the tenant,
Customer Journey Datatab appears in the Control Hub. It will only be visible to full customer admins. Partner admins will not see this tab. -
You can set how long to retain data that’s captured for CJDS. We recommend that you keep a minimum of 180 days to make sure that there are sufficient end-user journey data. By default, data is retained for 365 days.
a. Sign in to Control Hub and go to
Customer Journey Data>Settings.b. Enter the number of days that you want to retain data in CJDS.
-
Click
Save.
Note:JDS is already provisioned in the provided lab tenant, so you do not need to perform them. You may follow the above steps when provisioning for your own tenant.
Setup Desktop Customer Journey Widget
The customer Journey widget provides a single pane of glass view to the customer’s journey across all channels and applications, giving you the necessary contextual data for a more personalized customer experience and reducing average handling time.
Create a journey project and Activate Webex Contact Center connector
Journey projects help organizations manage multiple data sources. Each journey project has a unique identifier which is required to leverage CJDS APIs payloads. Note that project IDs in Control Hub are referred to as workspace IDs in APIs.
Jouney project may be activated with the Webex Contact Center connector. This allows the journey project to capture all customer events and send it to CJDS from Contact Center. Once the connector is activated in one project, it cannot be activated in another. At any point in time, it can be enabled for only one project. If you wish to create another project in addition to the default one, follow the steps below.
-
Sign in to Control Hub and go to
Customer Journey Data > Journey projects. -
You can use the default Sandbox Project or click
Create a Journey Project. -
Enter a name and a description for the journey project.
-
Select the journey
projectthat you created in previous step. -
Toggle the
Activateconnector in the Webex Contact Center section to ON.
Add User Identities to a Journey Project
Identities are used as a unique identifier for a customer contact across all contact methods. We would tie a users email address, phone numbers, social ID’s etc back to a single unique identifier, so no matter what method they use to contact the contact centre, historical interactions across all the different channels are visible to the agent.
You can create identities using Control Hub, or via API.
Via Control Hub
-
Select the journey
projectfor which connector was activated. -
Select
Identities. Click onAdd identities. -
Download the sample template.
-
In the downloaded CSV file, add the Customer identities [First Name,Last Name,Email Addresses,Phone Numbers,Customers Ids].
- Each customer identity must have at least an email address, phone number, or customer ID or else the CSV file will return an error.
-
If you want to add multiple email addresses, phone numbers or customer IDs, you need to **use the pipe “ ” delimiter** between them. For example, try to add your phone number both with and without a plus sign. - For the Id column, make sure to leave each row
empty. When you upload the CSV file, this field will auto-generate.

-
Upload the CSV file that you created for customer identities, and then click
Next. -
If the CSV file is valid, a window appears to show you if the import was successful. Once you’re done, select
Close. You should see a list of all the uploaded customer identities.
Via API
-
Download the JDS Postman Collection
-
Import into Postman or Bruno. Create a new token for use with the collection. Oauth Token Creation for Postman
-
Navigate to the “Create Identity” request and fill out your own details in the body.
curl --location --request POST 'https://api-jds.wxdap-produs1.webex.com/admin/v1/api/person/workspace-id/64da3f9d21a4034e04bc54c8'
--header 'Content-Type: application/json' \
--header 'Authorization: Bearer REMOVED FOR SECURITY' \
--data-raw '{
"firstName": "Carl",
"lastName": "Newton",
"phone": [
"+44123456789",
"+440987864521"
],
"email": [
"canewton_test@cisco.com"
],
"customerId": [
"1472589"
],
"temporaryId": [
"temp14725"
],
 "socialId": [
 "social123"
 ]
}'
- The above request results in the following response, indicating the record has been created.
{
    "meta": {
        "organizationId": "77dbece8-9e08-4e32-acd2-2f1a89c50d9a"
    },
    "data": {
        "id": "686ce1d55d9f906d1950c7b1",
        "firstName": "Carl",
        "lastName": "Newton",
        "phone": [
            "+44123456789",
            "+440987864521"
        ],
        "email": [
            "canewton_test@cisco.com"
        ],
        "temporaryId": [
            "temp14725"
        ],
        "customerId": [
            "1472589"
        ],
        "socialId": [
            "social123"
        ],
        "aliases": [
            "+44123456789",
            "1472589",
            "canewton_test@cisco.com",
            "+440987864521",
            "temp14725",
            "social123"
        ]
    }
}
Enable Customer Journey Widget on an Agent Desktop
- We recommend adding JDS to your existing desktop layout using a code snippet. You can get the relevant code here.
Here is a screenshot of the block in place (notice it is after IVR_TRASNCRIPT and before WXM_JOURNEY_TAB).
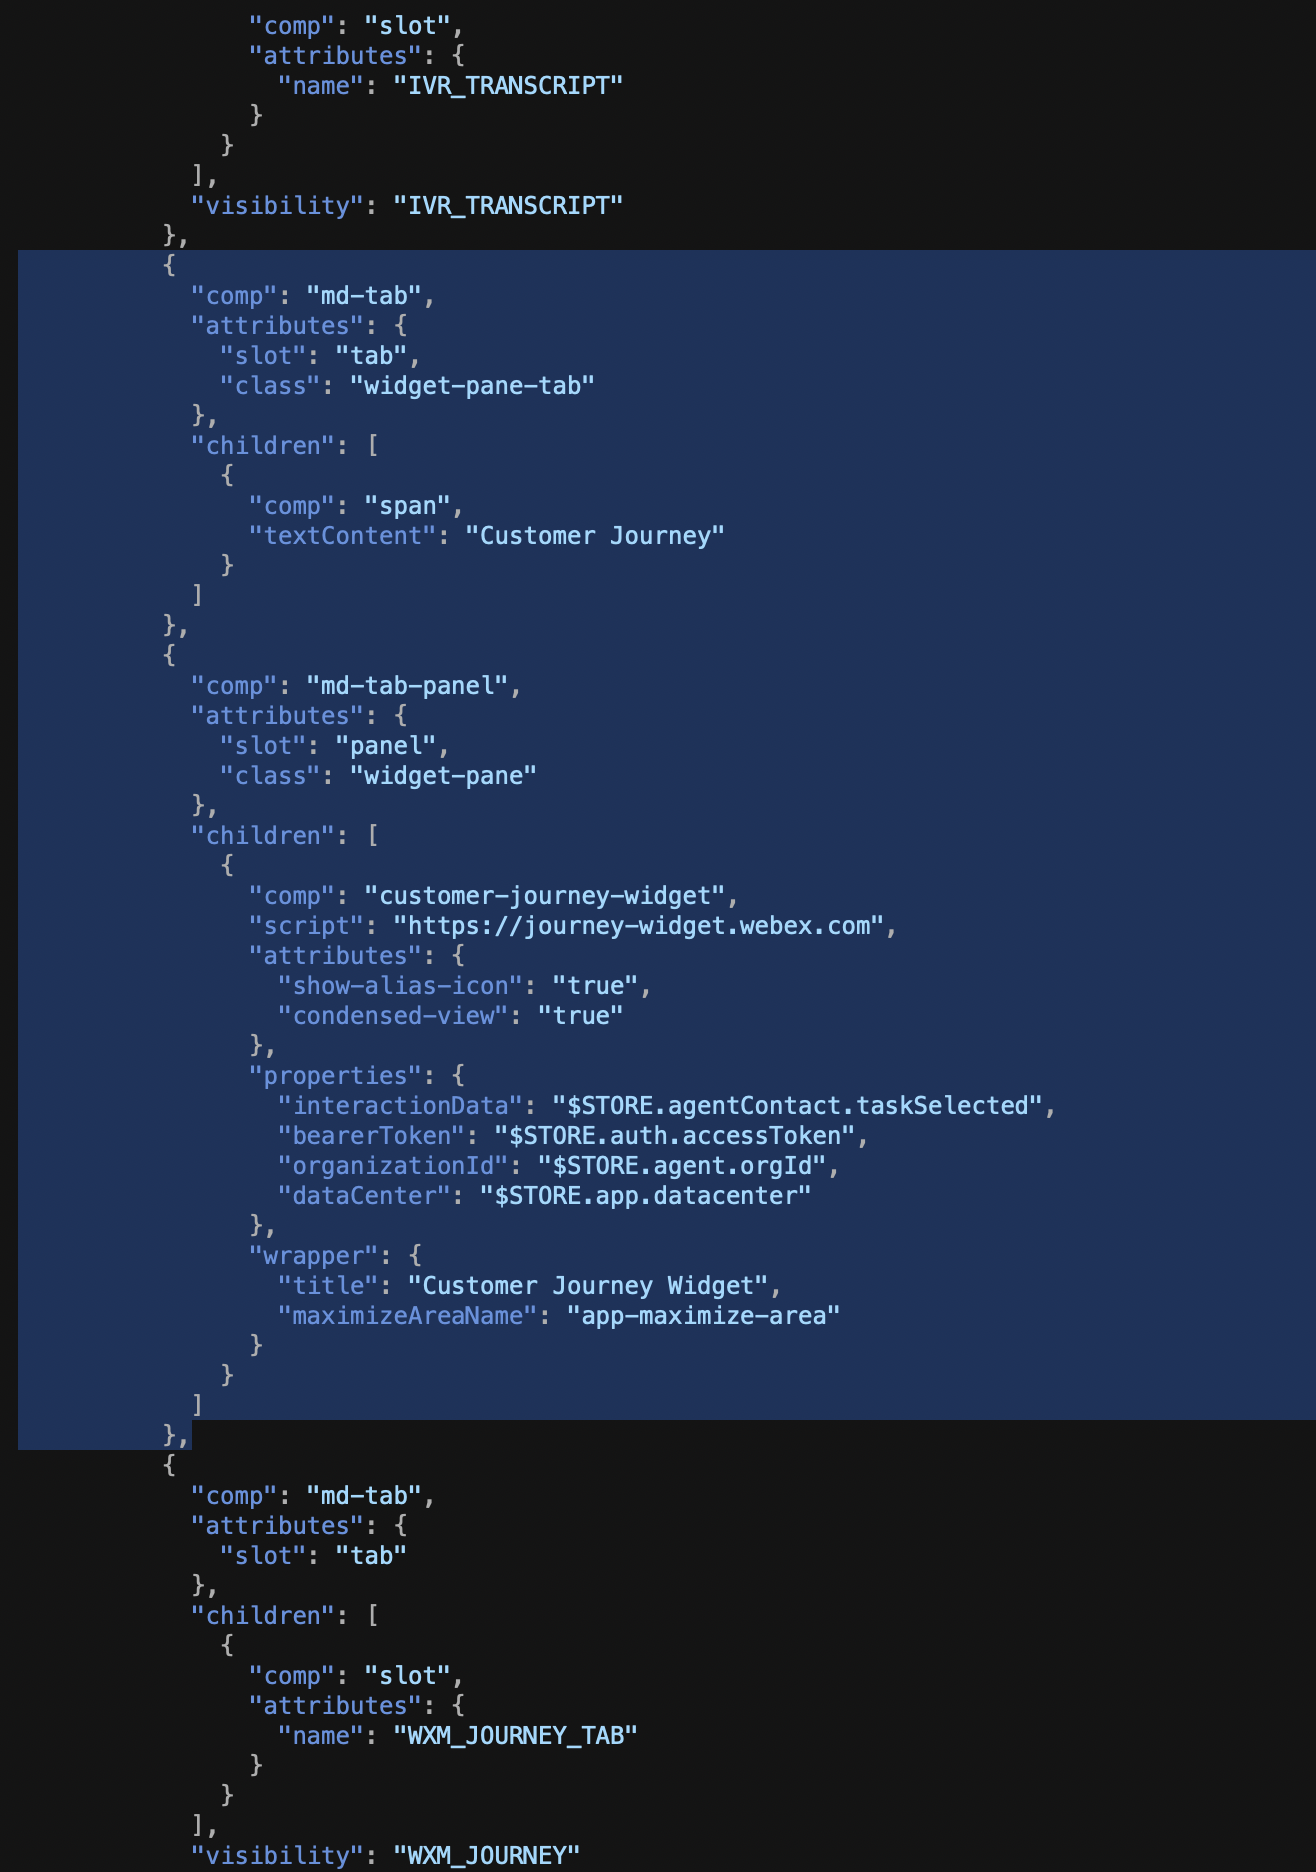
Alternatively, Download this Desktop Layout JSON file which includes the JDS widget and AI Assistant.
-
Sign in to Control Hub and go to
Contact Center > Desktop Layouts. -
Create a
New Layout. -
Assign an
Agent Team. -
Upload the Desktop Layout JSON file that you downloaded or created in step 1.
-
Click
Save.
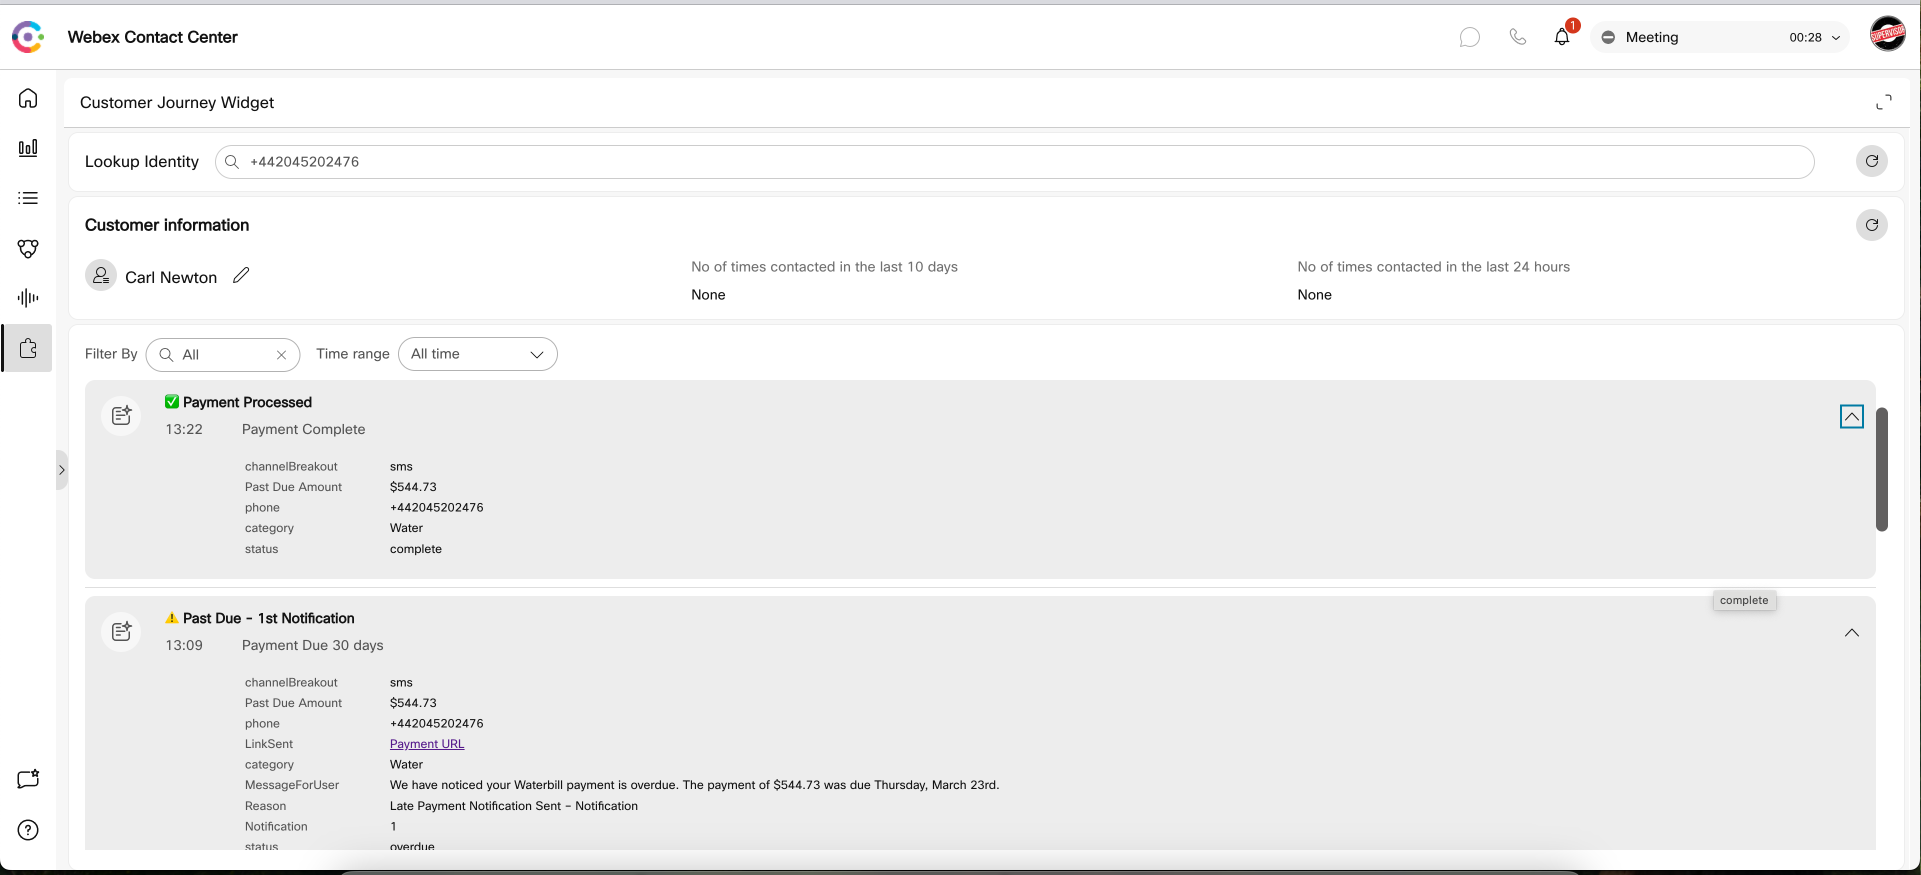
View Customer Journey Widget on an Agent desktop
-
Login as an Agent into
Agent Desktop. Ensure that the desktop layout of the Agent’s Team has the JDS widget configured as per the previous steps. -
On Accepting an incoming request, the
CJDS Widgetwill appear in the desktop. If you are using AI Agent, it may load the IVR Transcript by default. Navigate to the ‘Customer Journey’ tab to see it.
The widget displays insights such as the number of times the customer has called or was contacted across all channels during a given duration. It also displays the journey history with default information such as wrap-up code, queue name, agent ID etc., and also allows to customize the event history with options such as third-party (non Webex CC) events and custom icons.
The progressive profile allows for alignment of different phone numbers and emails under one profile, ensuring accurate and comprehensive interaction data.

Once JDS is set up and configured, we recommend using the contact resolver subflow to retrieve customer details into variables in existing flows. This allows you to do things like greet callers by name, channel switch to Email, SMS etc, and a variety of other activities based around knowing your customer.
There is a great Postman Collection available that gives many API’s that you can use to show examples of overdue payment notifications in WxCC Agent desktop. You will need to set up postman with the relevant OAuth token using this guide