Functions
Functions are a feature of Webex CC, which allows for custom Javascript or Python code blocks to be added into Flows, much like how Subflows work. E.g., Input and Output variables. Except that, Subflows can interact with the caller (e.g., Play Message), whereas a Function cannot. A Function serves to handle data for you, and that’s about it.
The Basics of a Function
Below I will make the most basic function I can come up with, and I will explain the pieces and parts.
The Function
In the below screenshot, I have created a function and have chosen the following attributes:
- Name = Parrot
- Description = Parrots back to you
- Language = Javascript
I did not pick the Runtime, which states “Node.js 22.x”, nor is there a way to even pick that value as of today’s writing, so we can largely ignore that.
Also, I picked Javascript, and I will not be talking about Python in this article, as I feel Javascript is the better of the two languages to learn, as it can be used natively in Webex and on Webex Devices. Feel free to experiment with Python as you see fit.
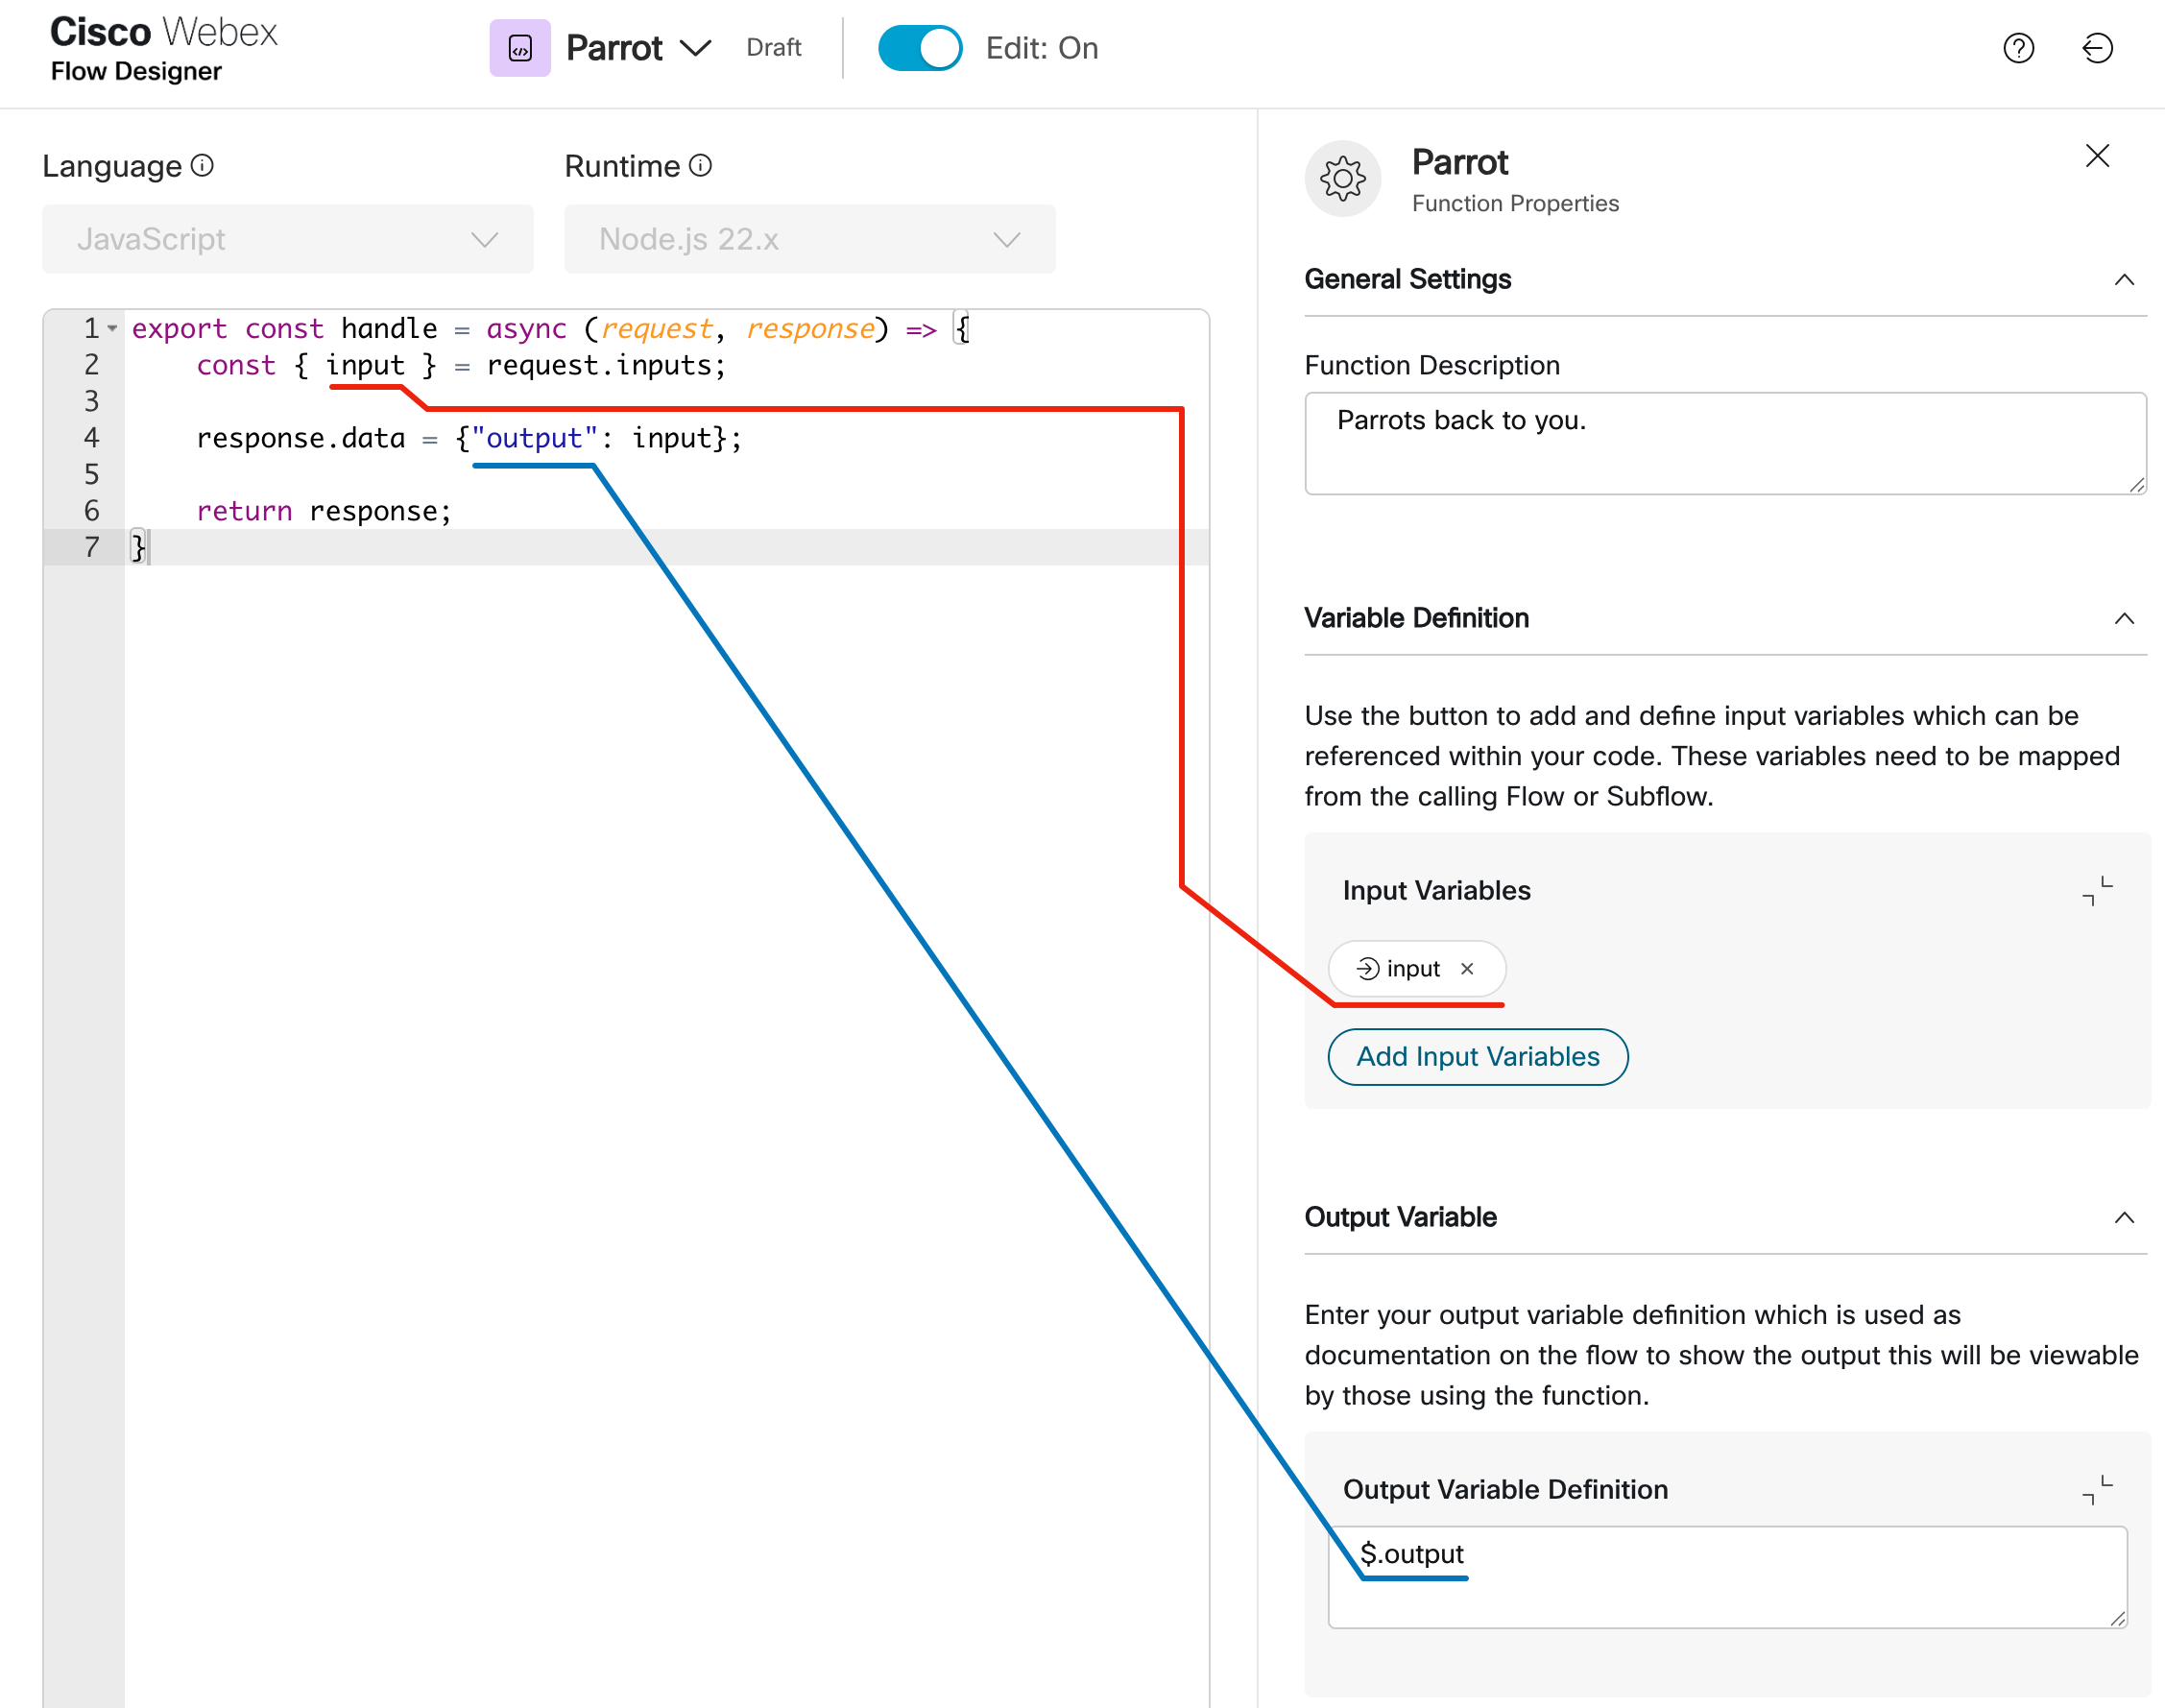
From the screenshot, I drew two connecting lines, one in red for the input and one in blue for the output.
Input Variables
You first start by clicking the “Add Input Variable” button, and just like in a Subflow, you define your local variables, for which your Webex CC Flow will pass data into at runtime. Here, I have created a single input variable of type String (type is not that important right now), and called it, very creatively I might add, “input.” On line 2, and connected via the red line to the input variable itself, you can see how my Javascript code gains access to this variable, which is through a Javascript method called destructuring.
Output Variables
You first start by writing the code as seen on line 4 above, which defines the Javascript object that will be passed back to the calling Webex CC Flow. In my case, I simply pass back a simple object with one key named, again, very creatively, “output,” with its value set to my variable called “input.”
Now, the blue line is connecting this line 4, to the output area over on the right, where you see JSONPath like syntax, however, this input field is nothing more than a description box, where you can type in whatever you want. Think of it like a hint field, to remind you how to obtain the output data you need. Since, over in the Webex CC Flow calling this function, we must read the output data by way of JSONPath, to me, it makes the most sense to put helpful JSONPath information in this box.
The Javascript Code
I have pasted the code below for your convenience, just in case you wish to copy and paste it. Note that lines 1, 6 & 7 are static and should not be altered, but lines 2 & 4 are my customizations, and you don’t even need them, technically, or instead of 2 lines, this could be up to ~5,000 lines of code (the current maximum).
export const handle = async (request, response) => {
    const { input } = request.inputs;

    response.data = {"output": input};

    return response;
}
Testing the Function
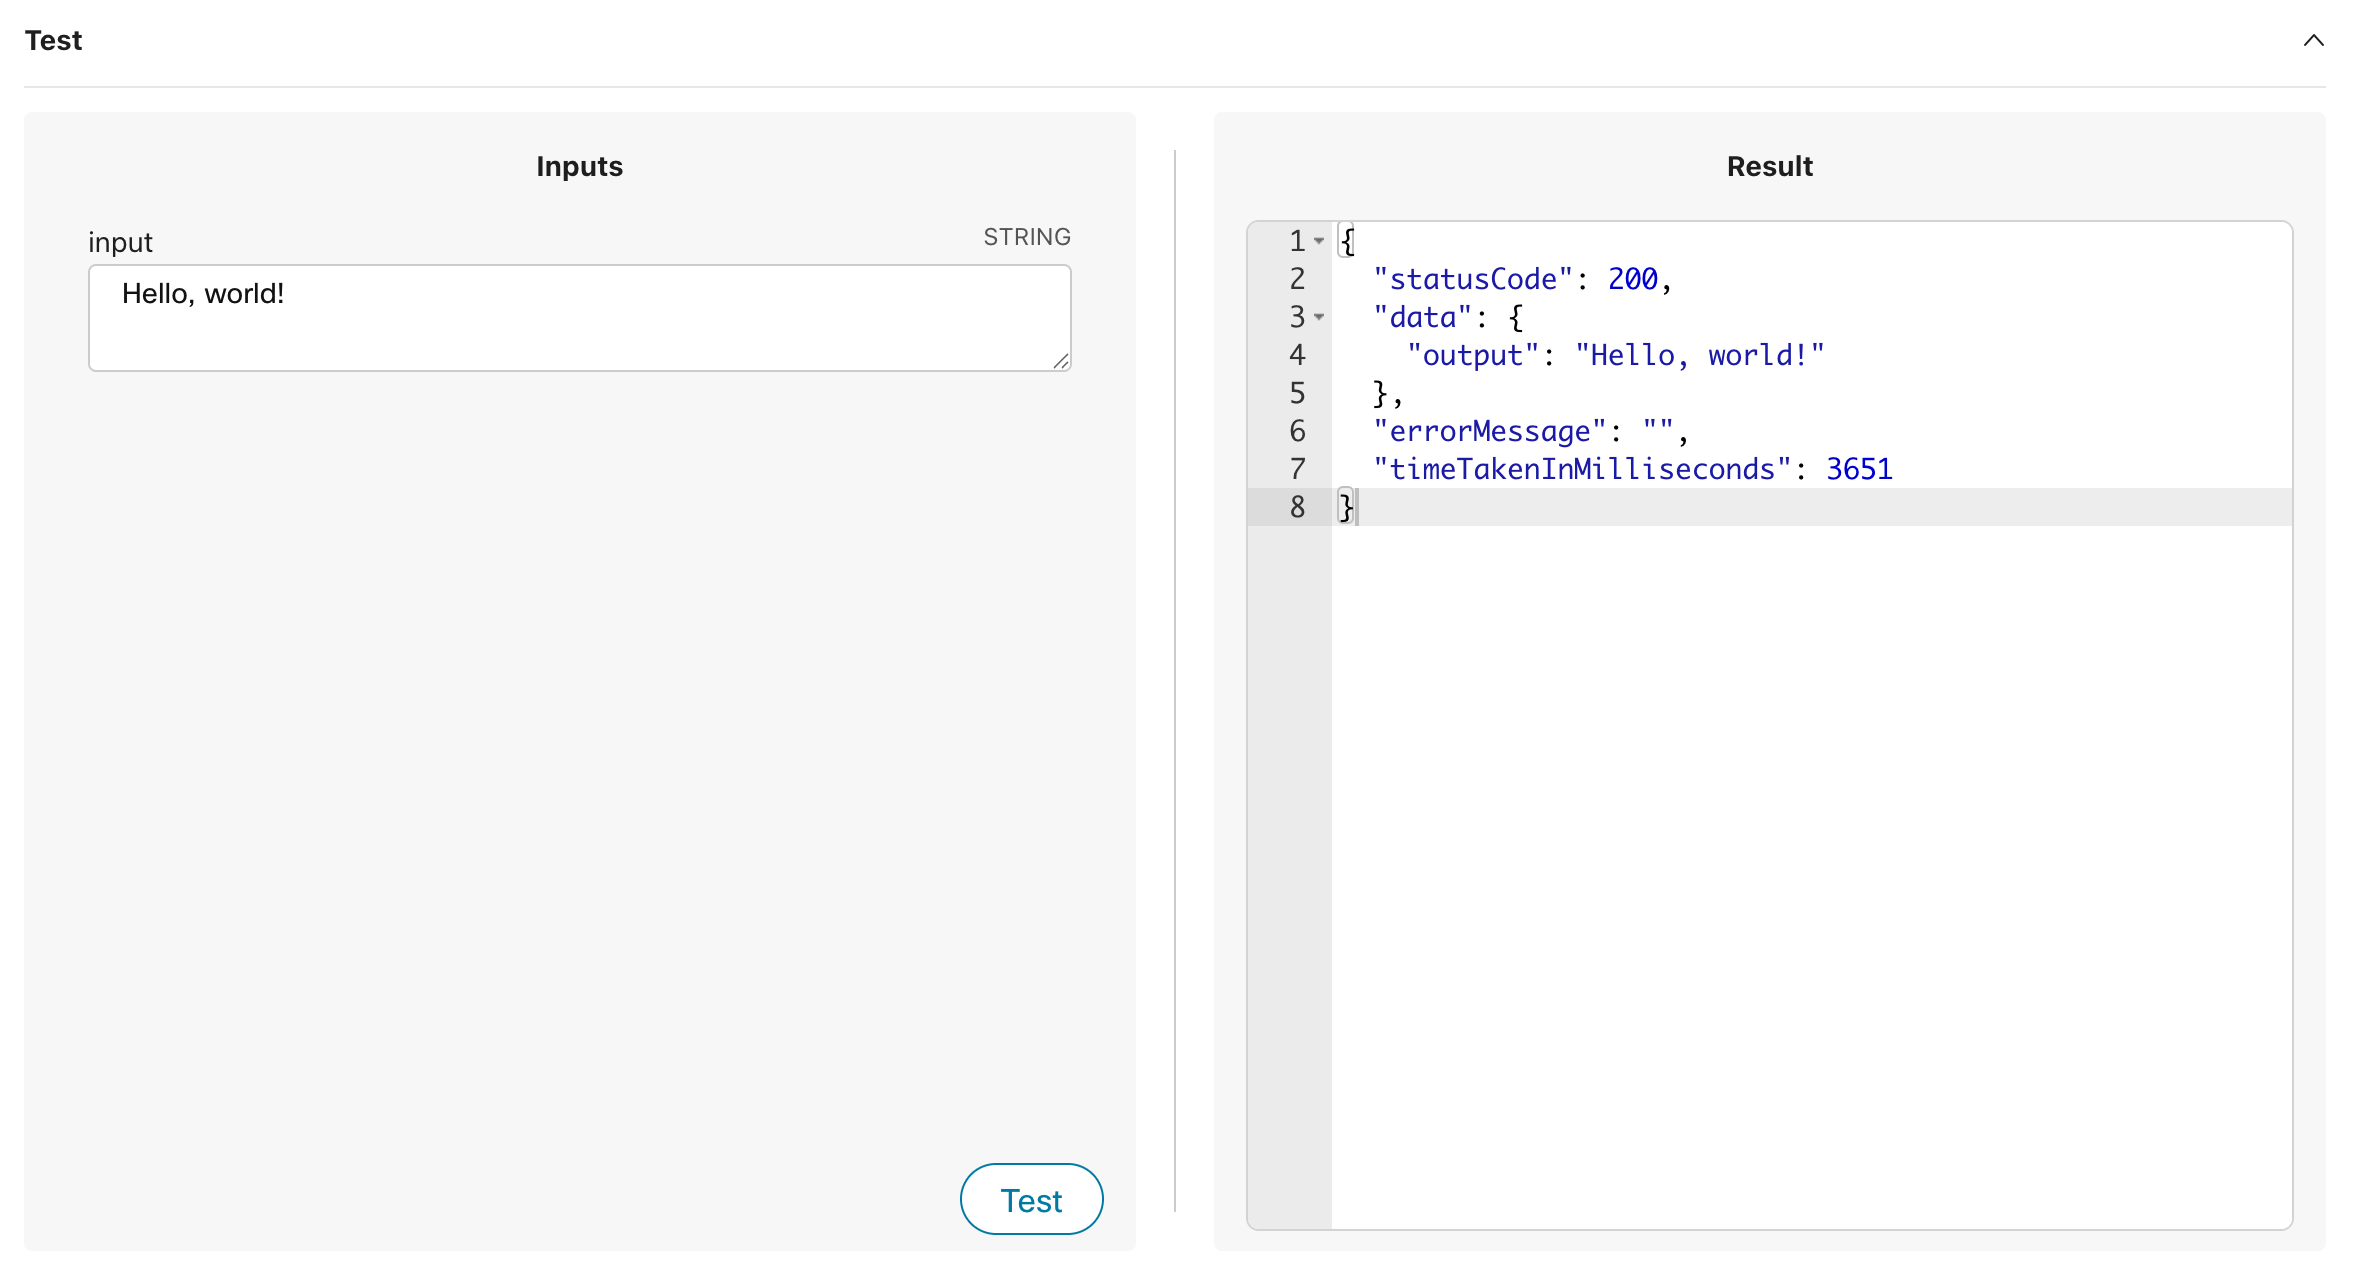
When in editing mode, there is a small test section at the bottom of the window. Any input variables you have already defined over on the right of the page, will show up down here under inputs.
You simply enter the input test data you wish to run your code against, and press the Test button.
The output will show a few things, but your main concern is line 2, where the key is called “data.” This is your output object that your Webex CC Flow will need to leverage JSONPath to parse the returned object for it’s individual pieces and parts. In my screenshot below, my test was successful, and my output matches my input, just like a Parrot.
Using the Function
In Webex CC Flow Designer, you can find your functions right next to Subflows, and in fact, you use them very much the same, by clicking and dragging your Function on to the canvas and connecting it up to your flow. You will need to specify the following:
- Version Label
- Input Mappings
- Output JSONPath
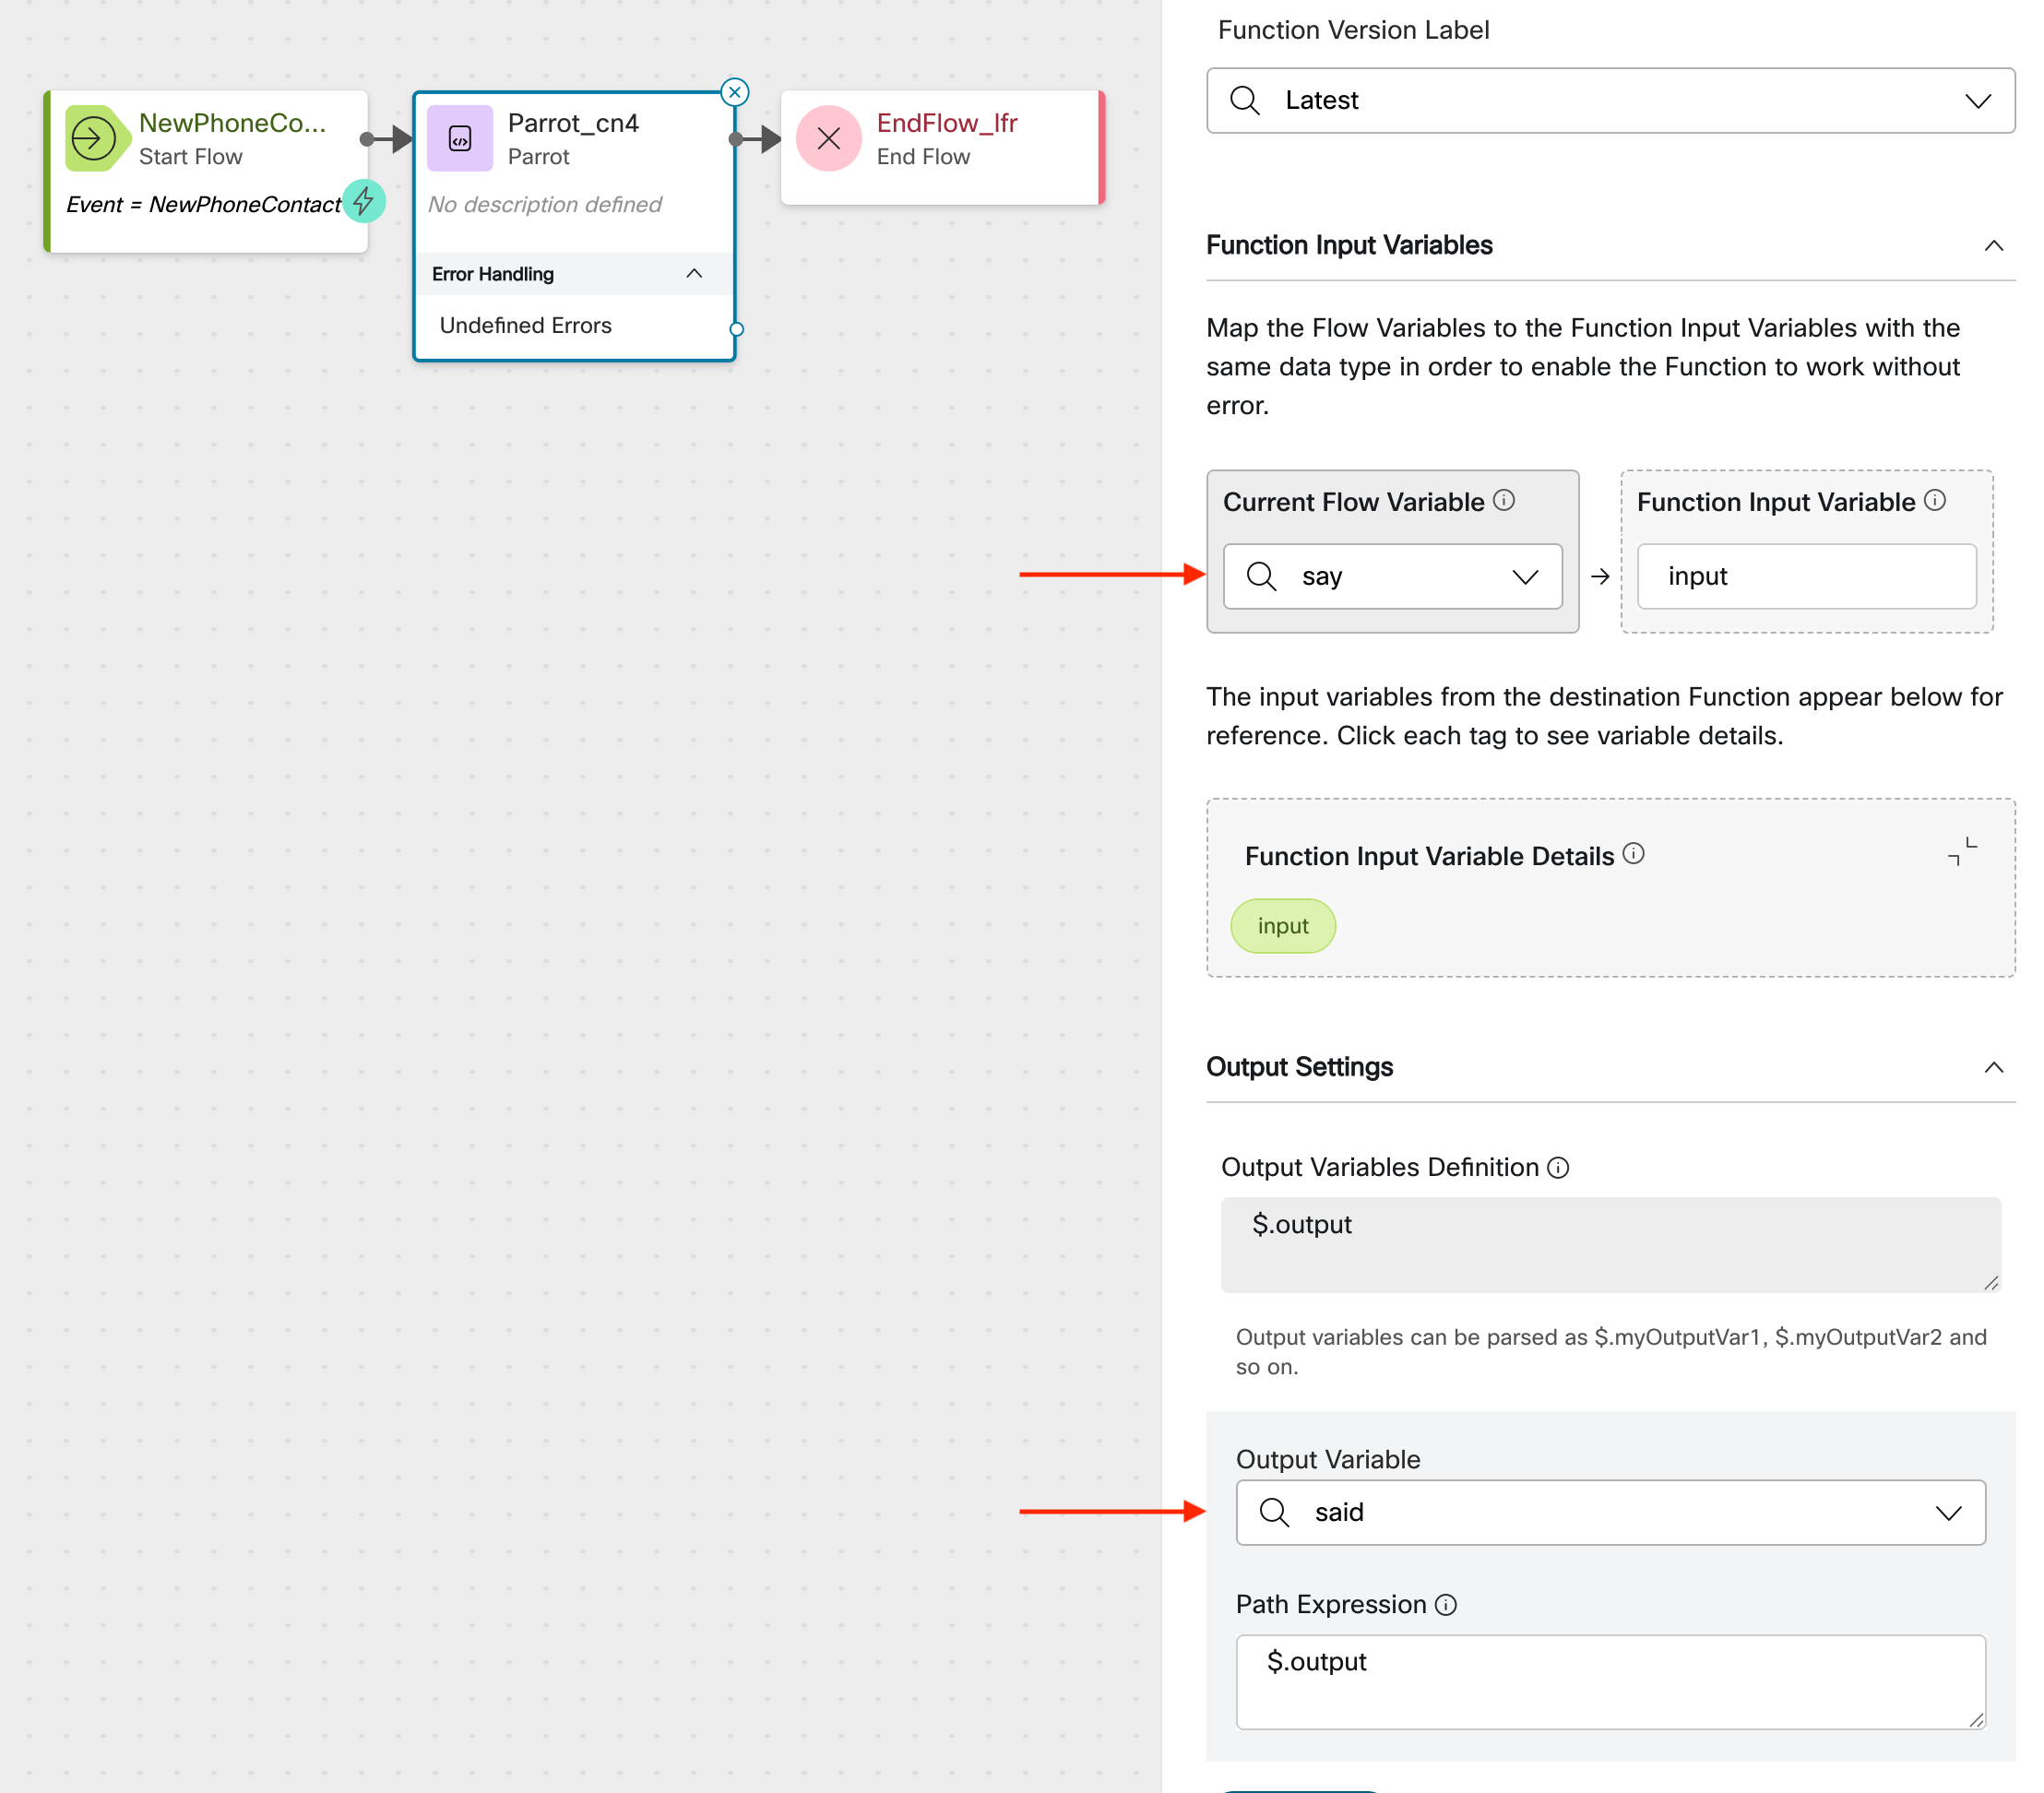
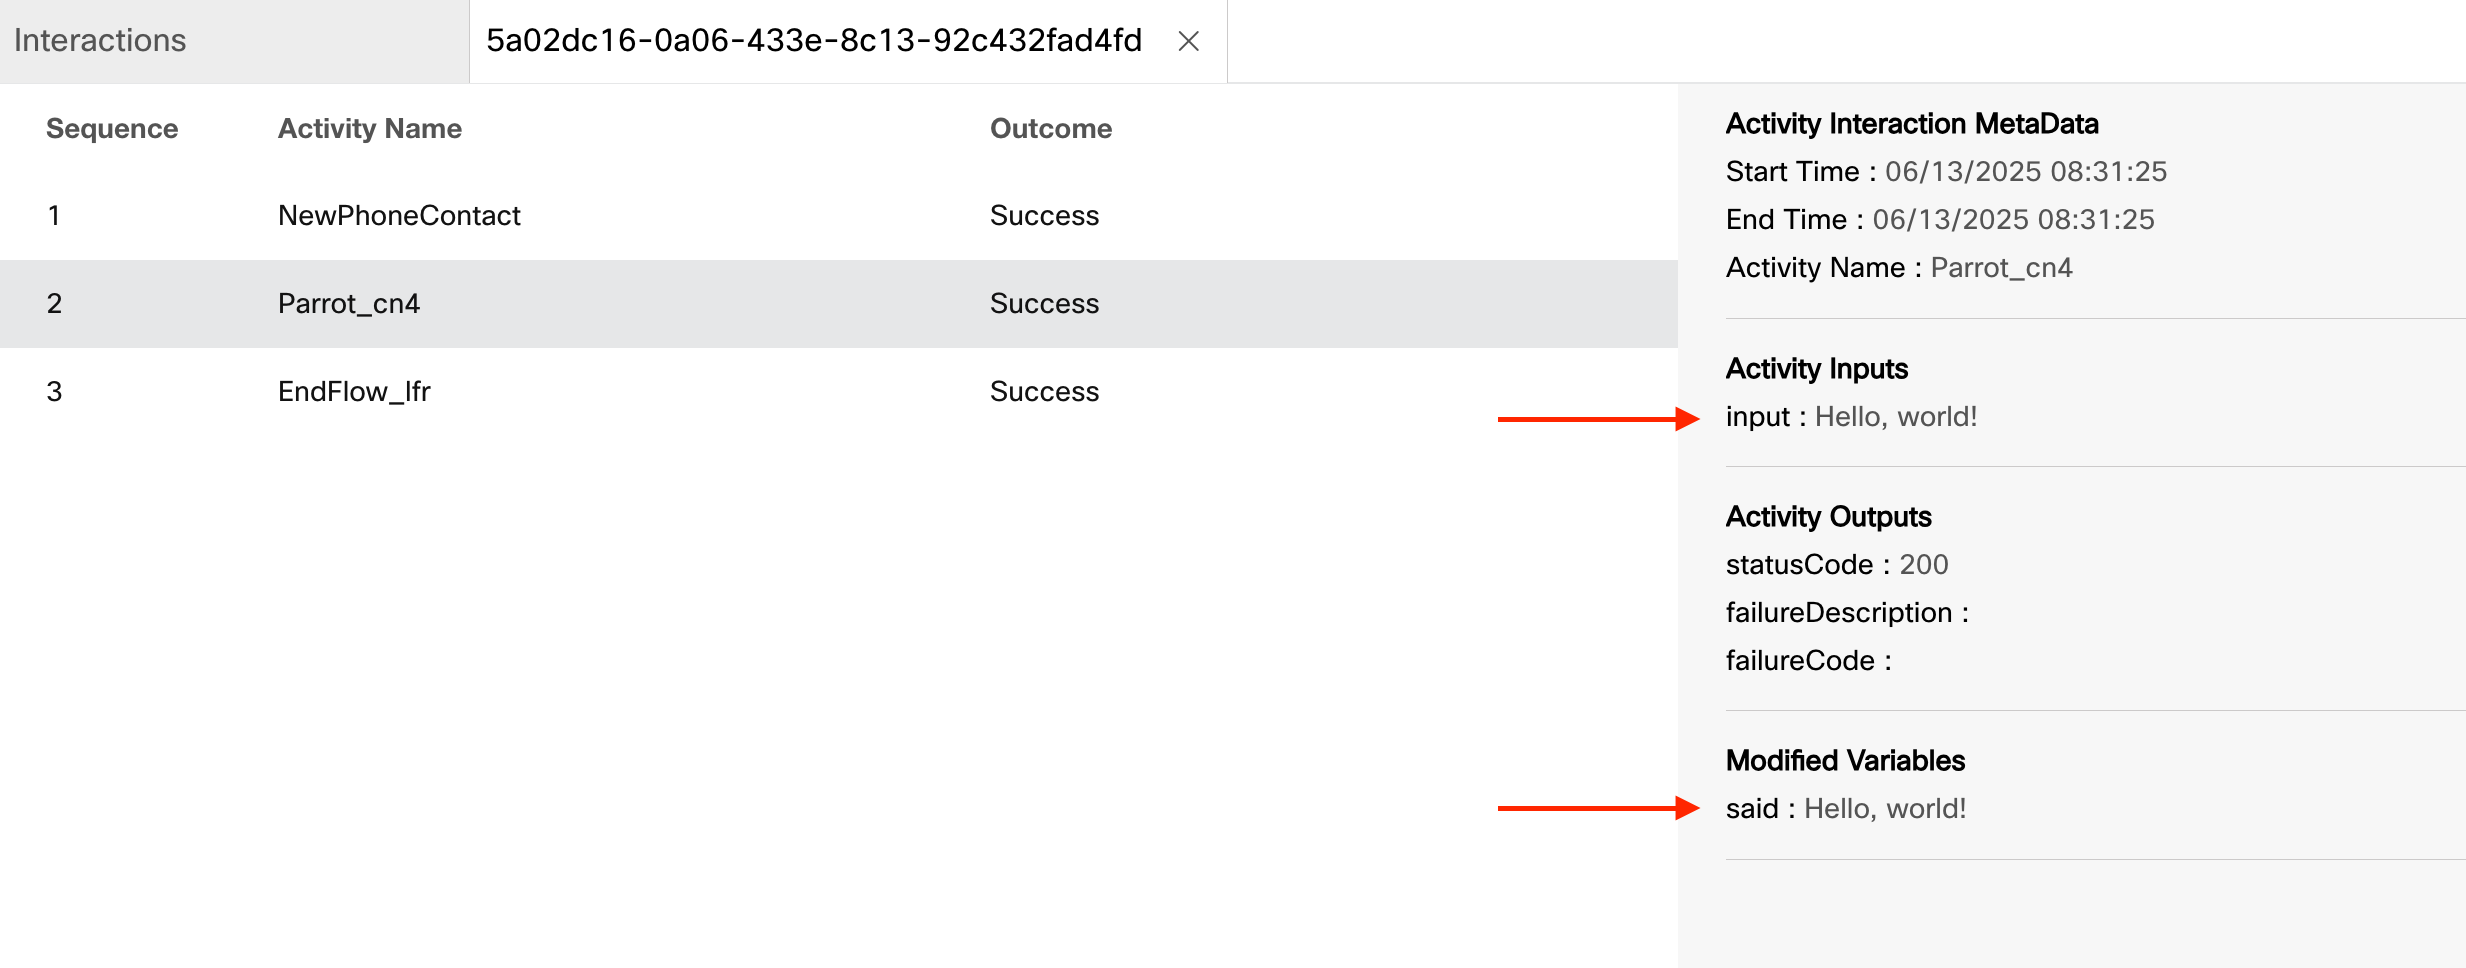
When I debug this flow, we can see that my input (a String variable called “say”), is passed into the Function, and that my output (a String variable called “said”), is used to hold the results of my JSONPath expression.
And that’s it for the basics, now let’s look at a few practical examples.
DNIS Data Map
If you have ever used a Case activity on the NewPhoneContact.DNIS, to then set starting variables for things like: which queue to send the call to, which voicemail extension to divert the call to, etc., then this function could replace your Case activity, and save you quite a few Set Variable activities, streamlining your Flow.
In the example below, I am only mapping three DNIS, but you can map several thousand DNIS, and within each DNIS mapping, I am only storing a Queue ID, and a Priority, but you can store so much more data, to include: Business Hours ID, Skill Names, TTS Messages, etc.
Input Variables:
- input (String), e.g.,
NewPhoneContact.DNIS
Output:
- output (JSON), via
$.outpute.g.,{"queue_id": "some queue id here", ...}
Javascript:
export const handle = async (request, response) => {
    const { input } = request.inputs;

    const data = {
        "+16125551000": {"queue_id": "7ab606fe-0443-42db-9013-2e9e87edfeed", "priority": 1},
        "+16125551001": {"queue_id": "7ab606fe-0443-42db-9013-2e9e87edfeed", "priority": 10},
        "+17635552000": {"queue_id": "467eae08-261d-4f32-b49b-2f1ae5d02cbe"}
    };

    response.data = {"output": data[input] || ""};

    return response;
}
Random Number Generator
If you need a random number generated in your Flow, you could use the following Function to pick a random number between two bounds: a lower bound, and an upper bound (e.g., a number between 1 and 10).
Input Variables:
- lower_bound (integer), e.g., 1
- upper_bound (integer), e.g., 10
Output:
- random_number (integer) via
$.random_number, e.g., 7
Javascript:
export const handle = async (request, response) => {
    const { lower_bound, upper_bound } = request.inputs;

    let random_number = -1;
    if (lower_bound >= 0 && upper_bound > lower_bound) {
        random_number = Math.floor(Math.random() * (upper_bound - lower_bound + 1) + lower_bound);
    }

    response.data = {"random_number": random_number};

    return response;
}
Regex Pattern Matcher
If you need to see if some input from the caller matches a specific pattern, like when the caller inputs an extension or phone number via Collect Digits, and you want to make sure it’s within a valid input range, you could use this “needle in the haystack” search feature, to validate good input.
Input Variables:
- needle (String), e.g., 6125551212
- haystack (String), e.g., [2-9]..[2-9]……
Output:
- match (boolean) via
$.match, e.g., True
Javascript:
export const handle = async (request, response) => {
    const { needle, haystack } = request.inputs;
    try {
        const regex = new RegExp(haystack);
        response.data = {"match": regex.test(needle)};
    } catch (error) {
        response.data = {"match": false};
    }
    return response;
}