Evaluate
Evaluate is a node within a Webex Connect flow, which allows you to execute Javascript code.
While similar to Functions in WxCC Flow Designer, the Evaluate node runs on the Rhino JS Engine, and therefore, is not compatible with more common Javascript programming features and concepts.
With this in mind, you likely cannot use typical AI code generation tools, even the built-in one inside of Webex Connect, as-is. You might have success with the bare results, but you also might need to massage the output, or use prompt engineering to get working results. I touch on this later in the article.
In this article, I aim to make you an Evaluate node expert, but not make you a Javascript expert.
What is the Evaluate Node?
Simply put, the Evaluate node executes Javascript code, while optionally working with input and output variables, and then returning to flow execution through branching. For an example of why you might use the Evaluate node, look no further than the sample webex connect flows on github. Specifically, at the time of this writing, the v3.3 Live Chat flow uses the Evalute node quite heavily to process inbound messages, their attachments, all while caring for PCI data, etc.
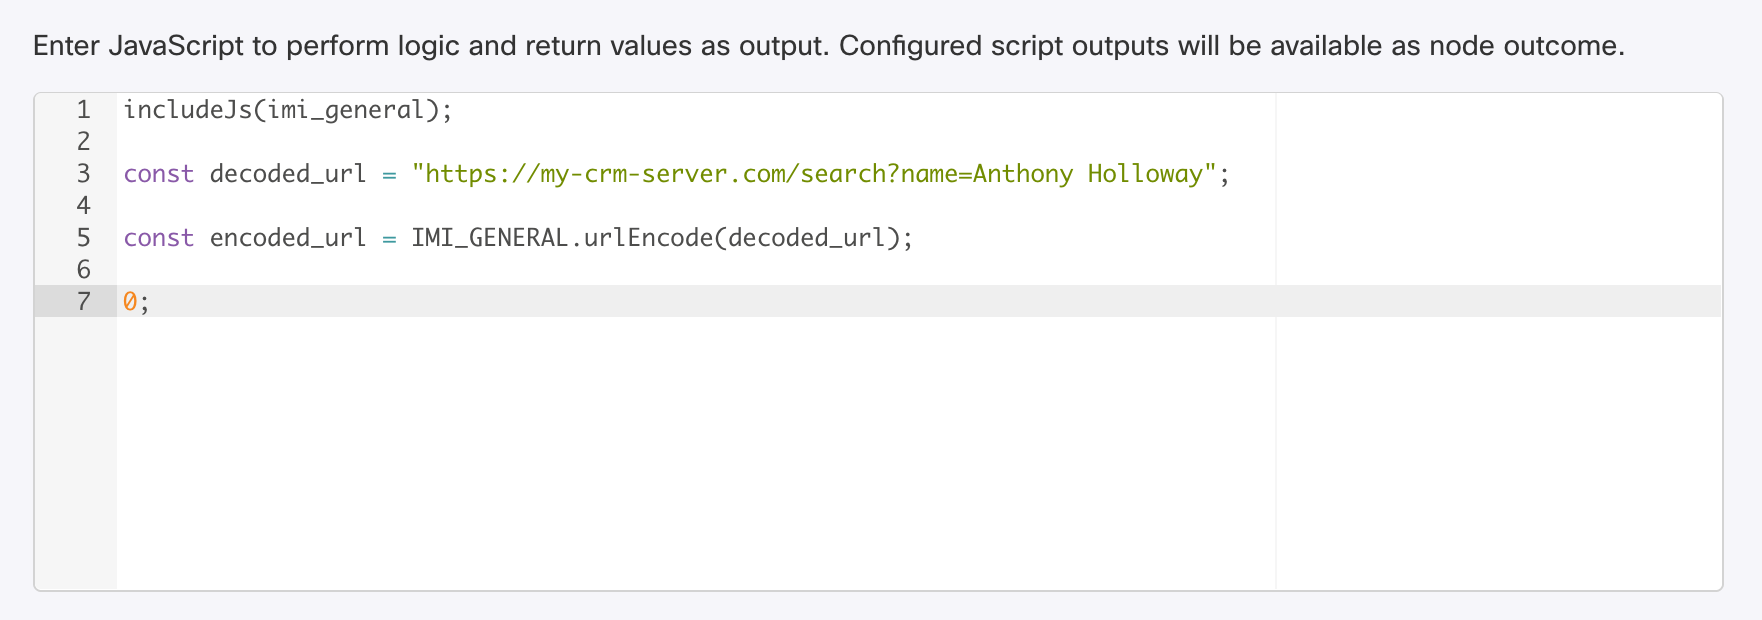
Bare-Bones Script
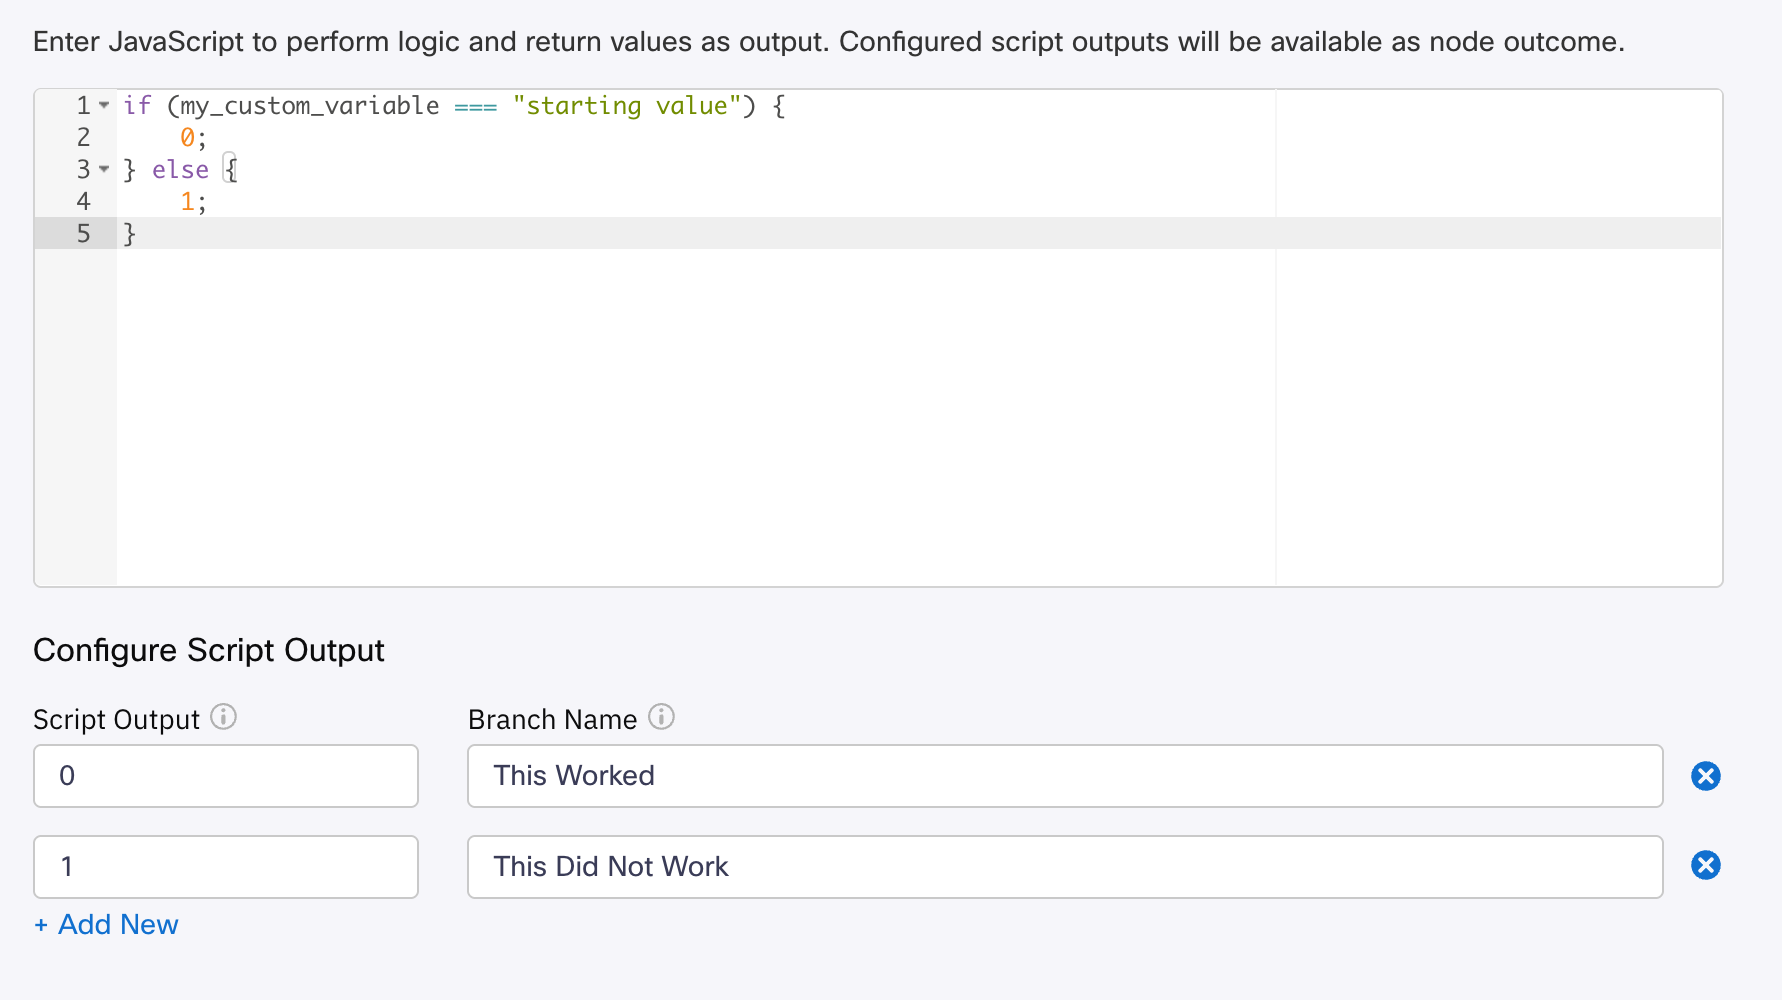
The most basic script you could possibly write, returns a value of any type, and also has one output branch, which matches your return value, and is given some kind of label.
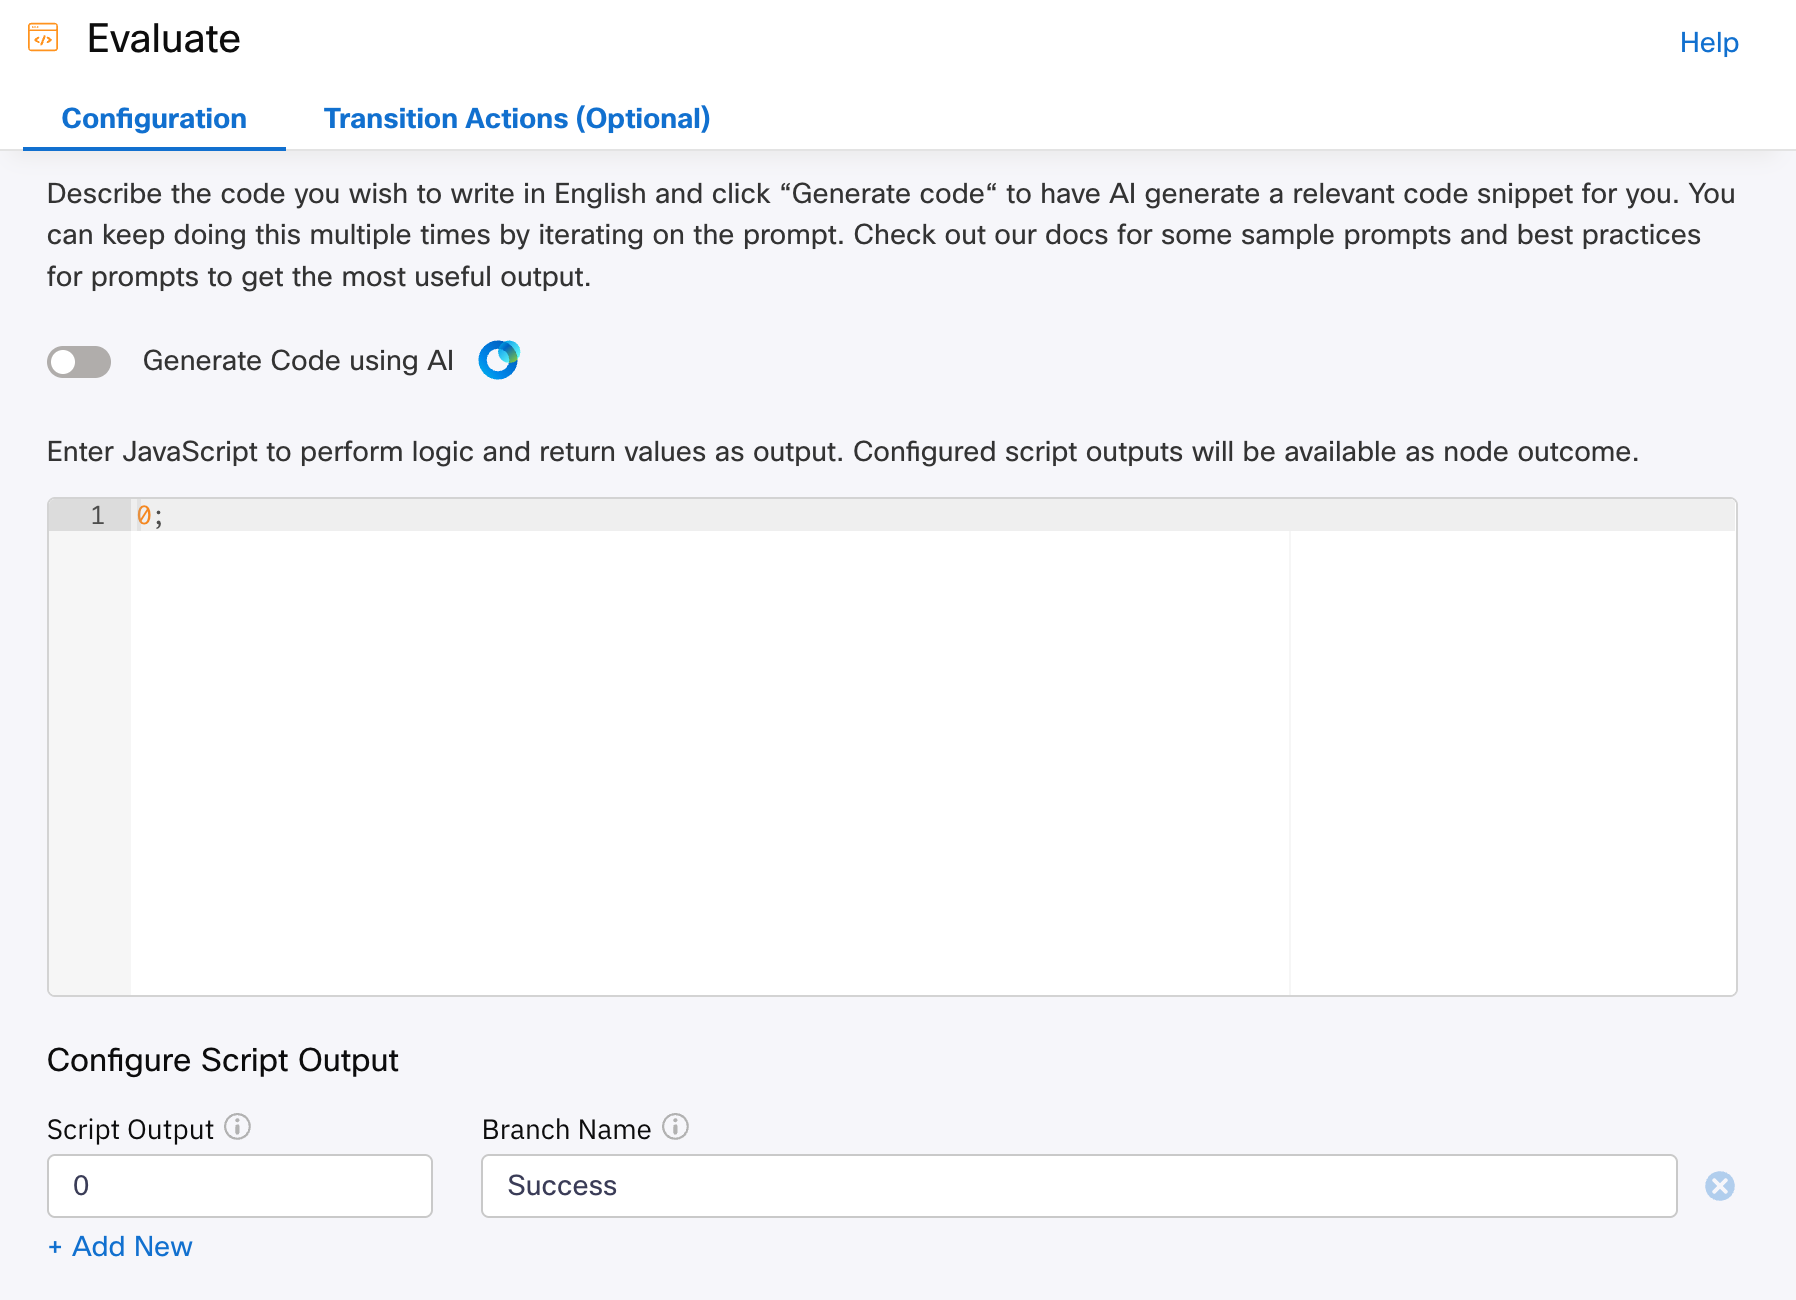
As you can see in the above example:
- I am typing
0;as the script itself, which, is how you indicate your return code. You do not need the keywordreturnas you might be used to in vanilla JS. - I have one branch created called “Success” (the name is up to you)
- I set the output value for that branch to match what the script is outputing
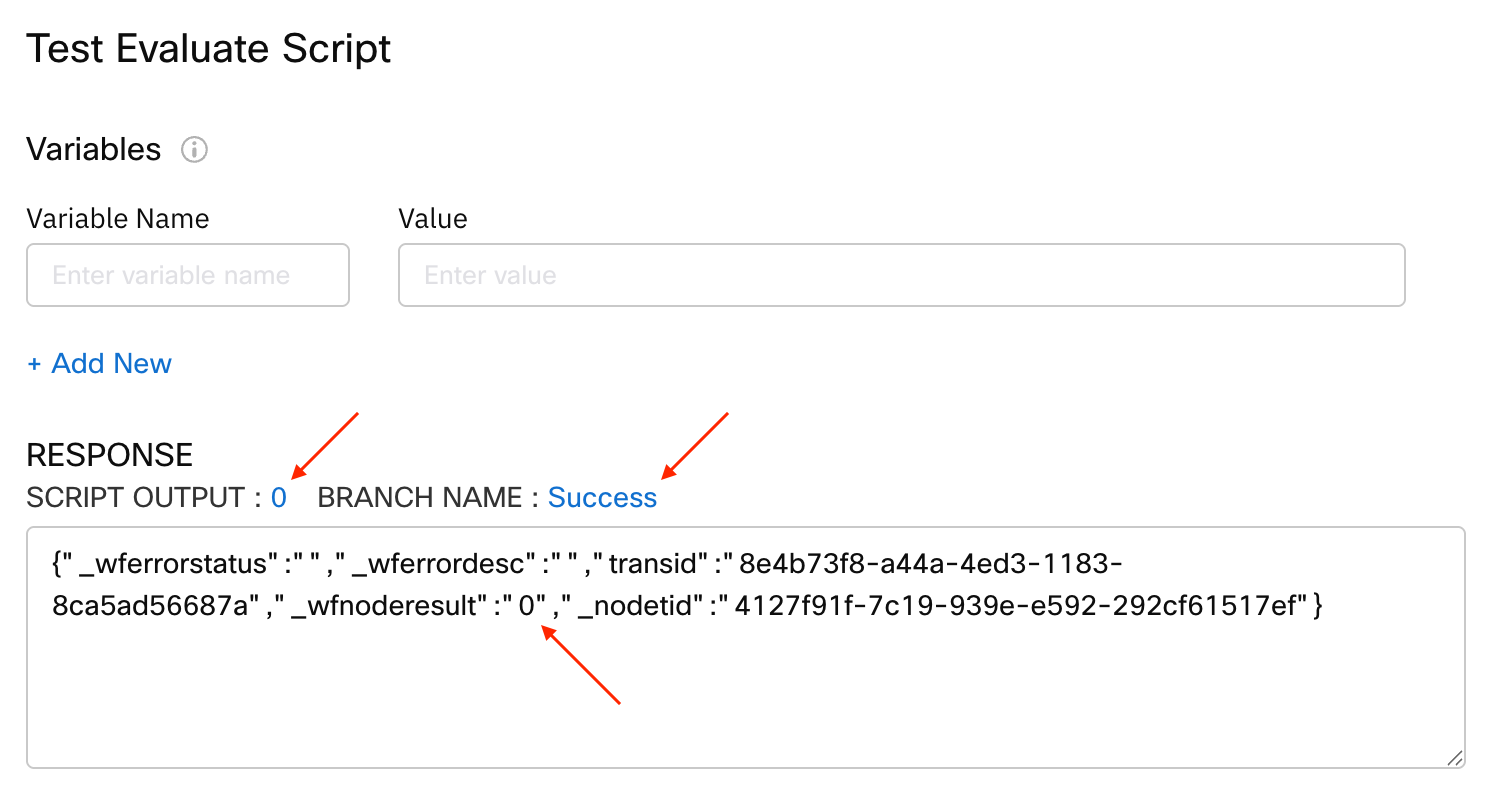
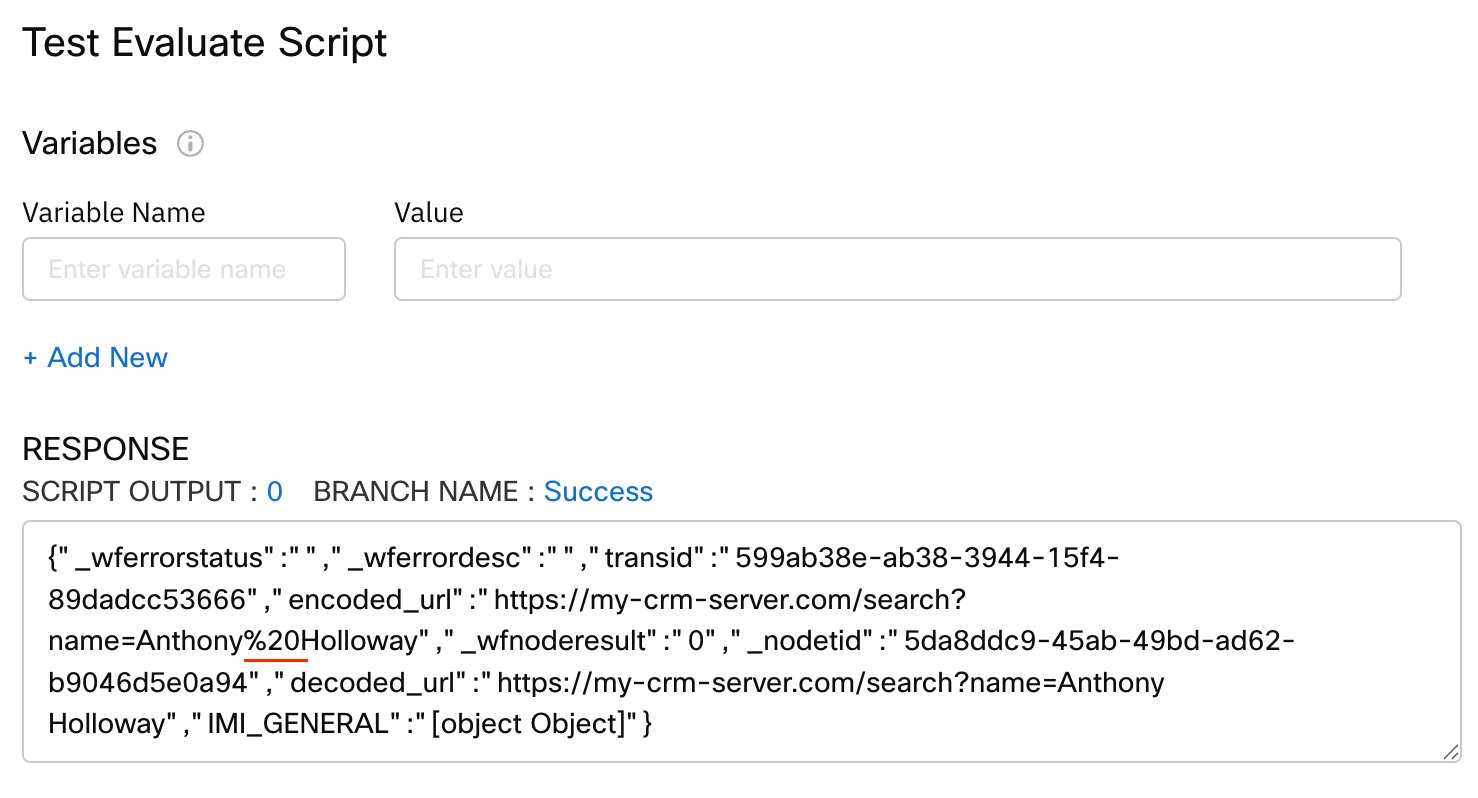
Bare-Bones Testing
There is a code testing function within the node, and if you click test, then click test again, it will either show you some output, or an error.
In my case, if I test the bare bones script, I can see that the output is 0 and the matched branch is “Success”.
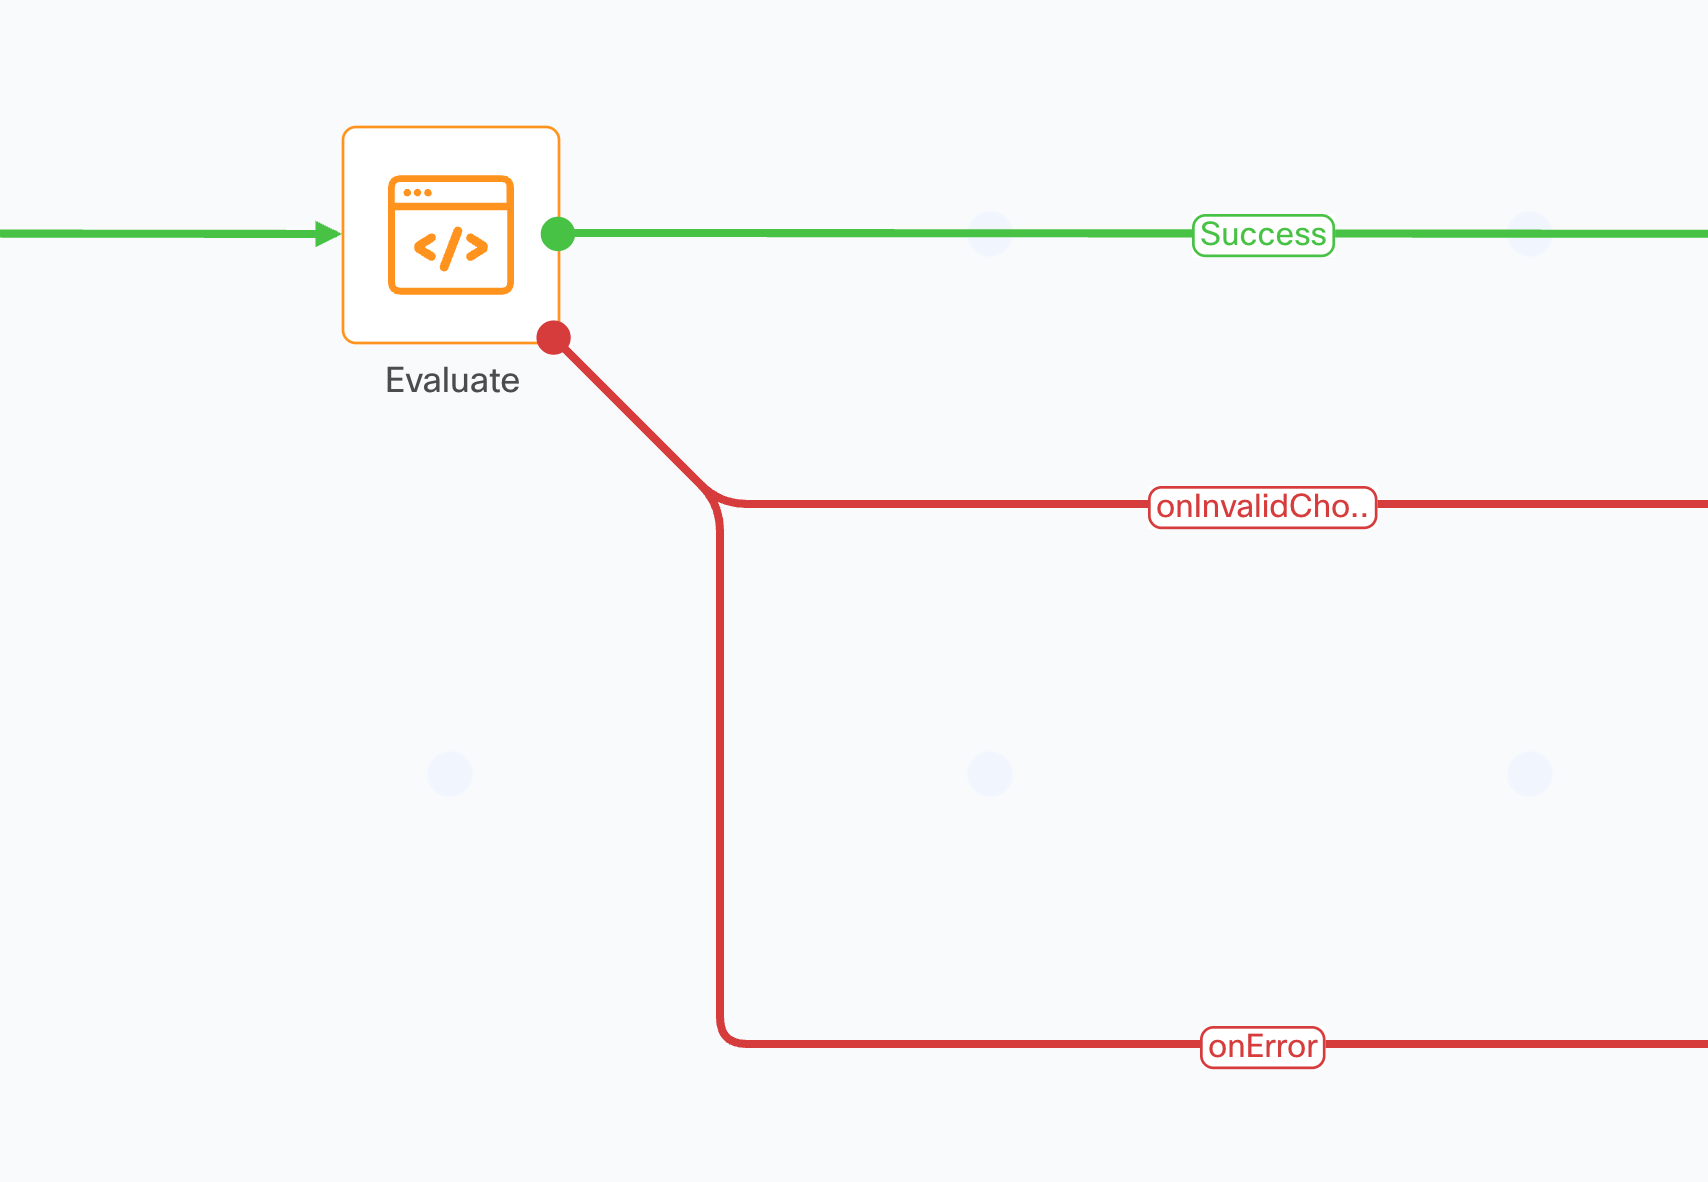
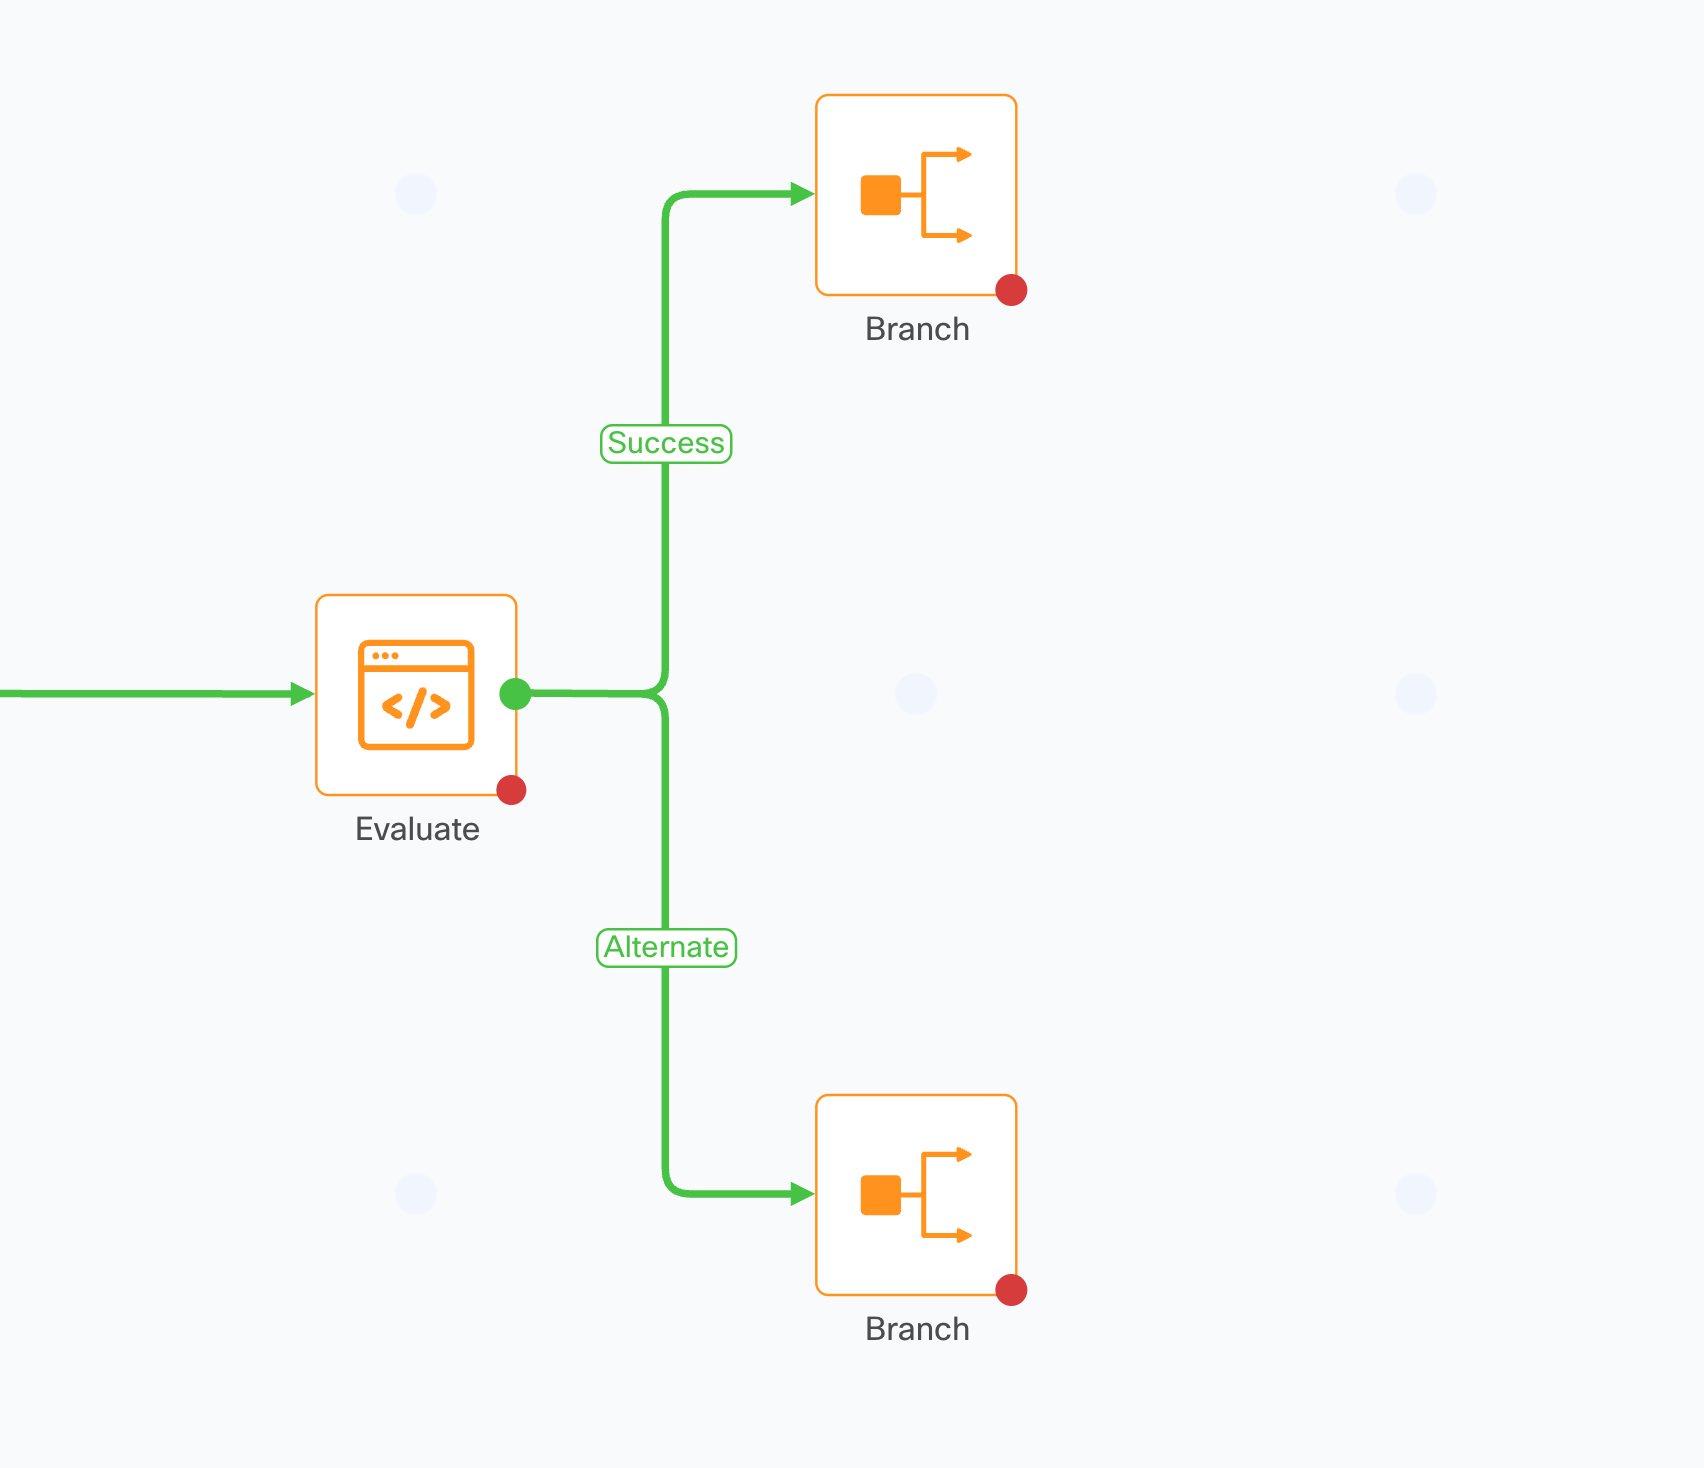
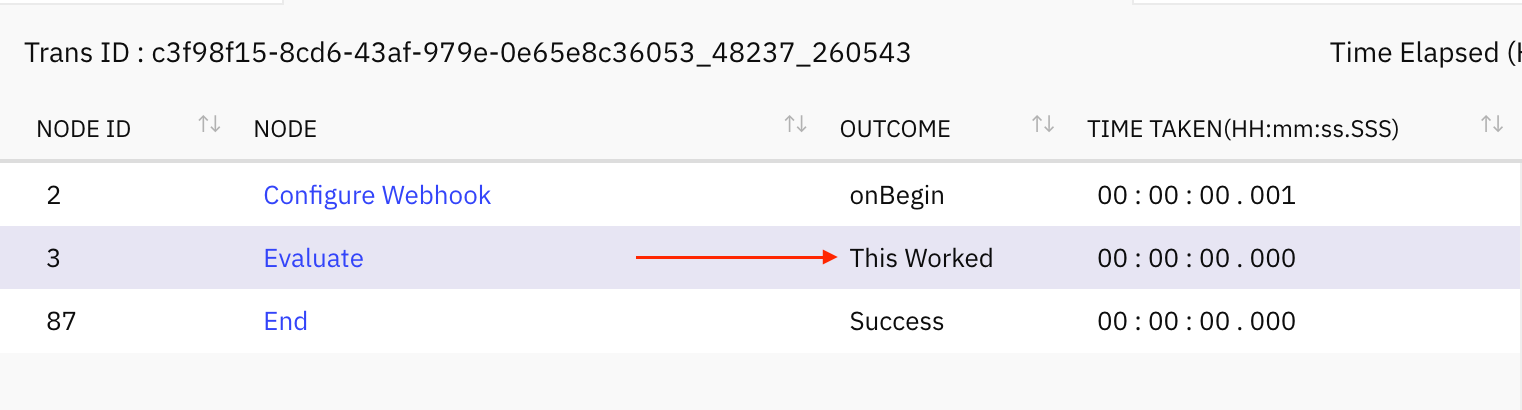
Bare-Bones Outcomes
As you can see in this sample flow, the green line represents the name of the branch you created, and then there’s two additional error handling outcomes:
onInvalidChoiceis for when there is no error in your code, but the output the script gave, did not match any of your branches. E.g., You ended the script with1;but only built the “0 = Success” branch (as I showed above)onErroris for when your code threw an error, and therefore failed to finish executing
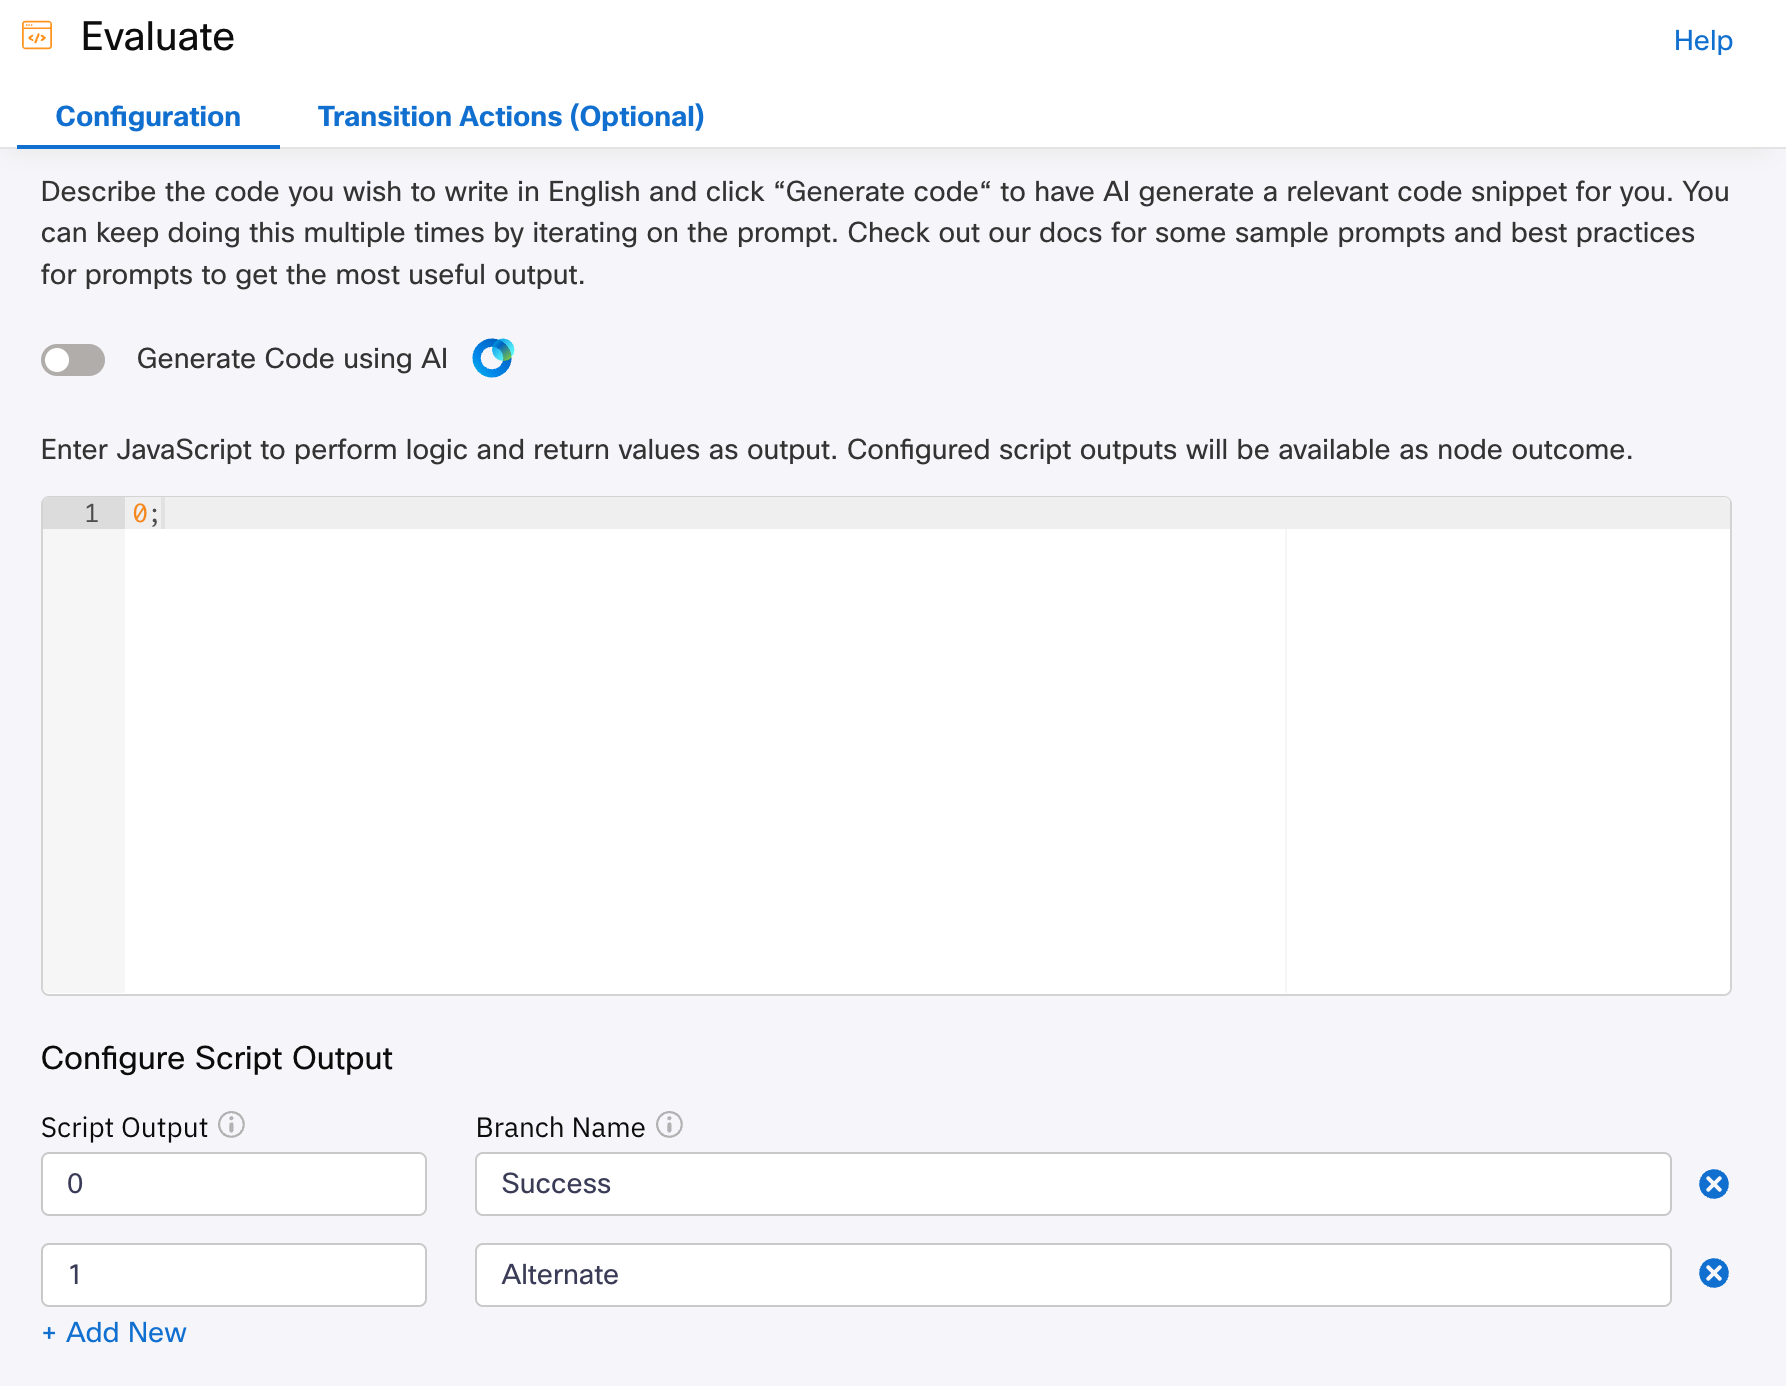
Branching with Your Outcomes
The Evaluate node has a built in branching mechanism, such that you do not need to connect the success output(s) of the Evaluate node to the input of a Branch node.
In the following screenshot, I have created an additional branch: “1 = Alternate,” and I am connecting each success branch to its own path for further processing.
Note: You cannot connect two success branches to the same next node, they must connect to unique nodes. This is not specific to Evaluate node, and is a Webex Connect general behavior.
Handling Input and Output
Moving beyond a bare bones script, you might want to work with input data, and output data. Below we will cover the details of input and output data handling.
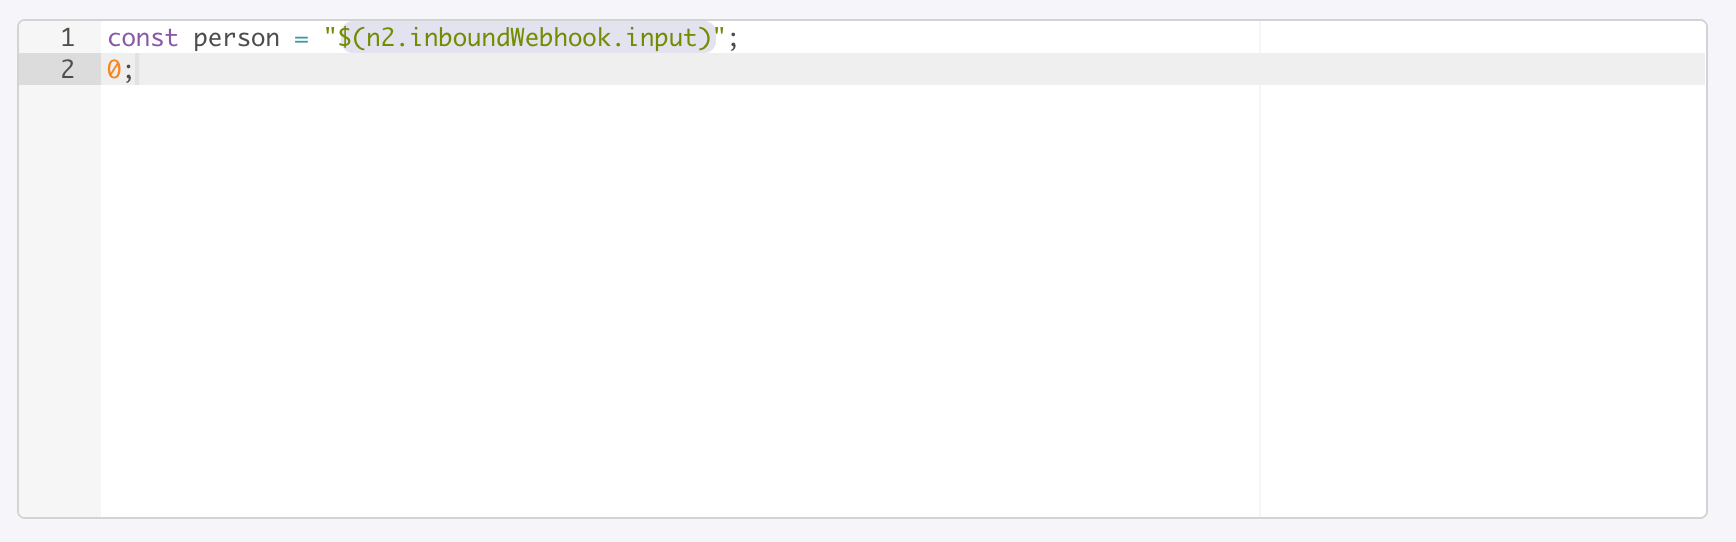
Input Data
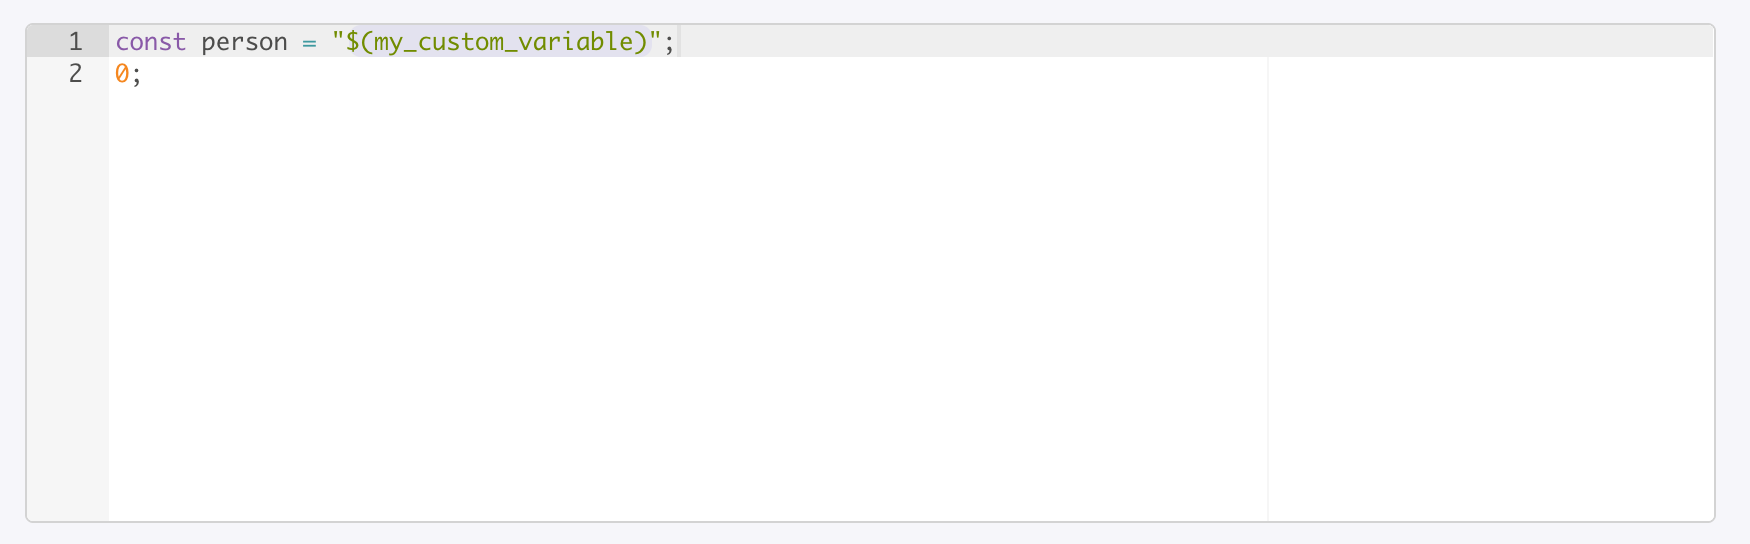
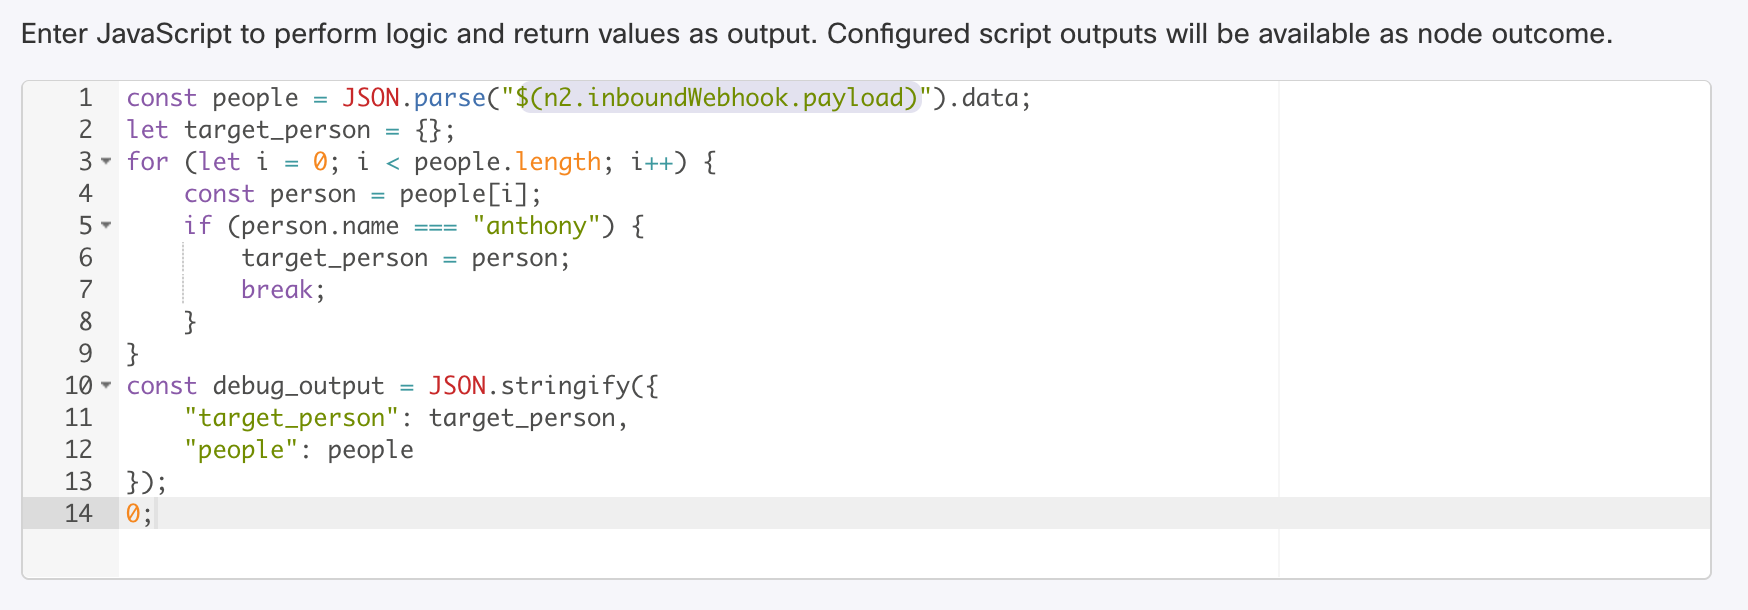
By default, and as you might imagine, you can use another node’s output variables, just like you do in most other nodes (e.g., $(variable)). In the below example, my inbound webhook is looking for a JSON payload with a key named “input” in it, and my Evaluate node can reference it as follows:
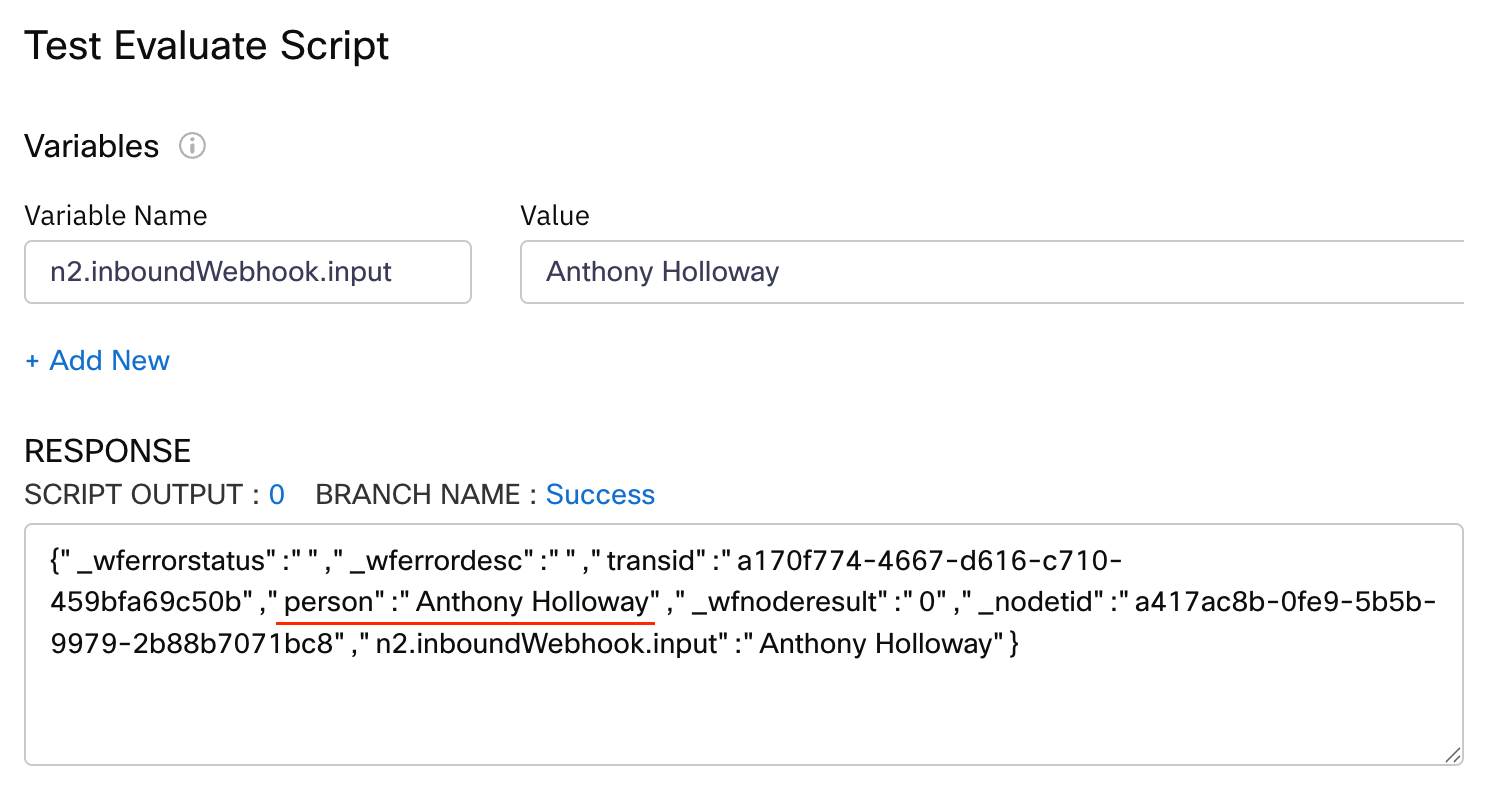
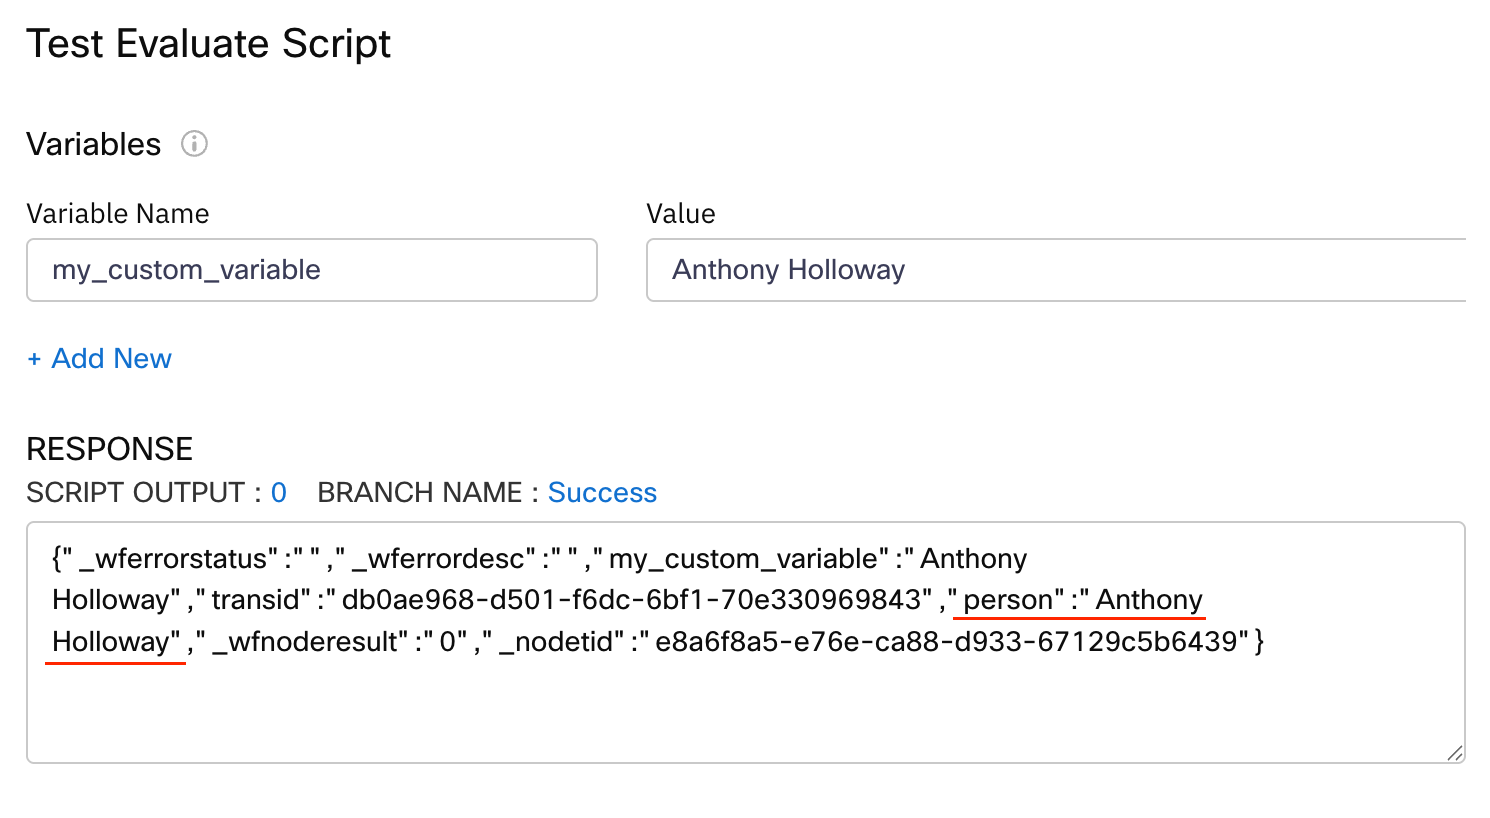
If I want to test my code, and provide a sample input data, I can do that like this, and notice how my person variable now contains the input value:
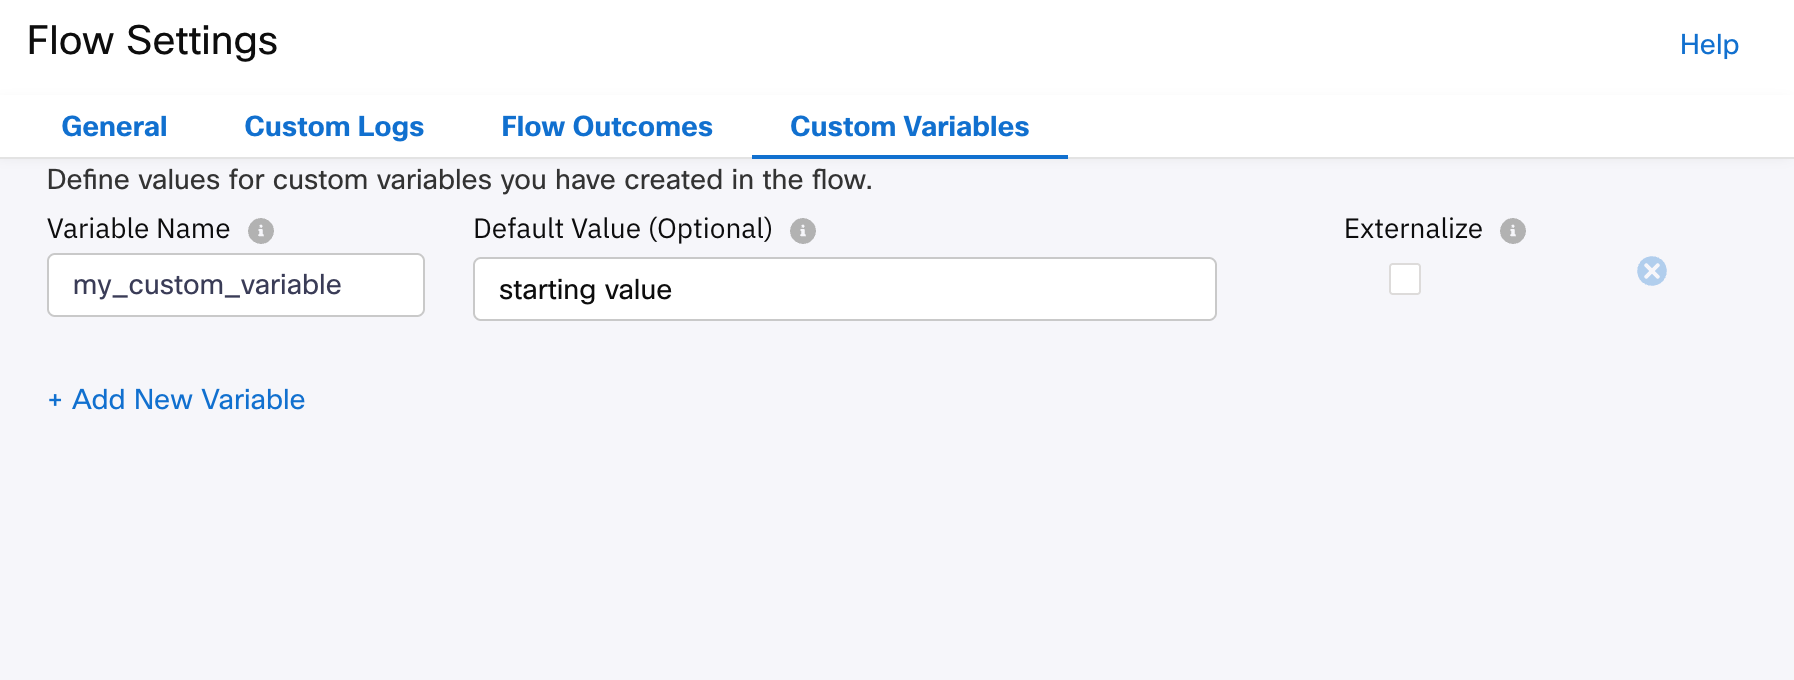
I can also reference Custom Variable in the same way. Here is my custom variable definition:
Here I am using the custom variable in my Evaluate node:
Unfortuntely, that’s just the tip of the iceberg, and I have a supplementary section at the end of this article, on more complex input concepts.
Output Data
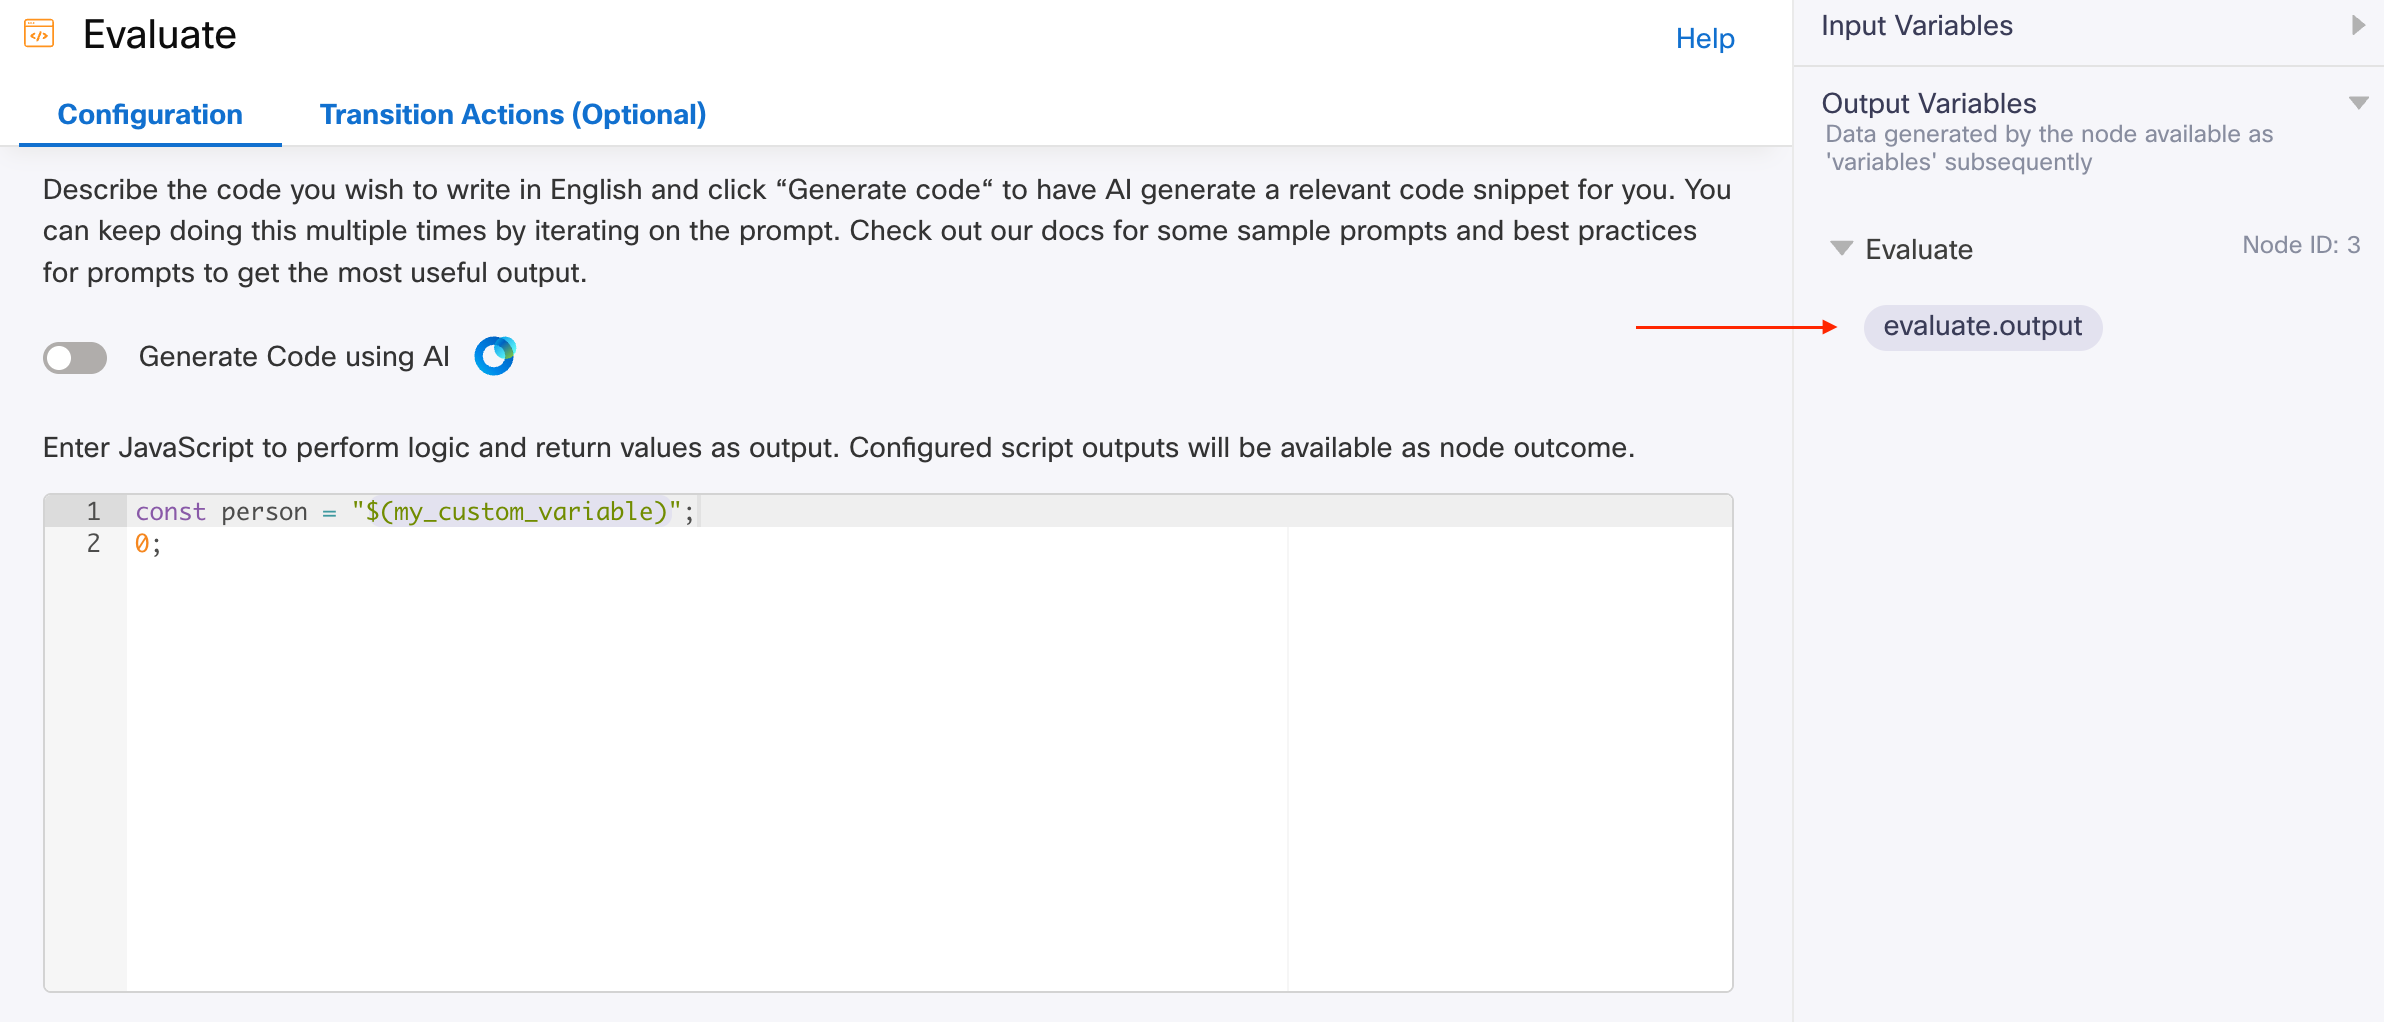
While the result of the outcome from the Evaluate step (e.g., 0 = Success), is natively available by way of the Node’s Output Variables:
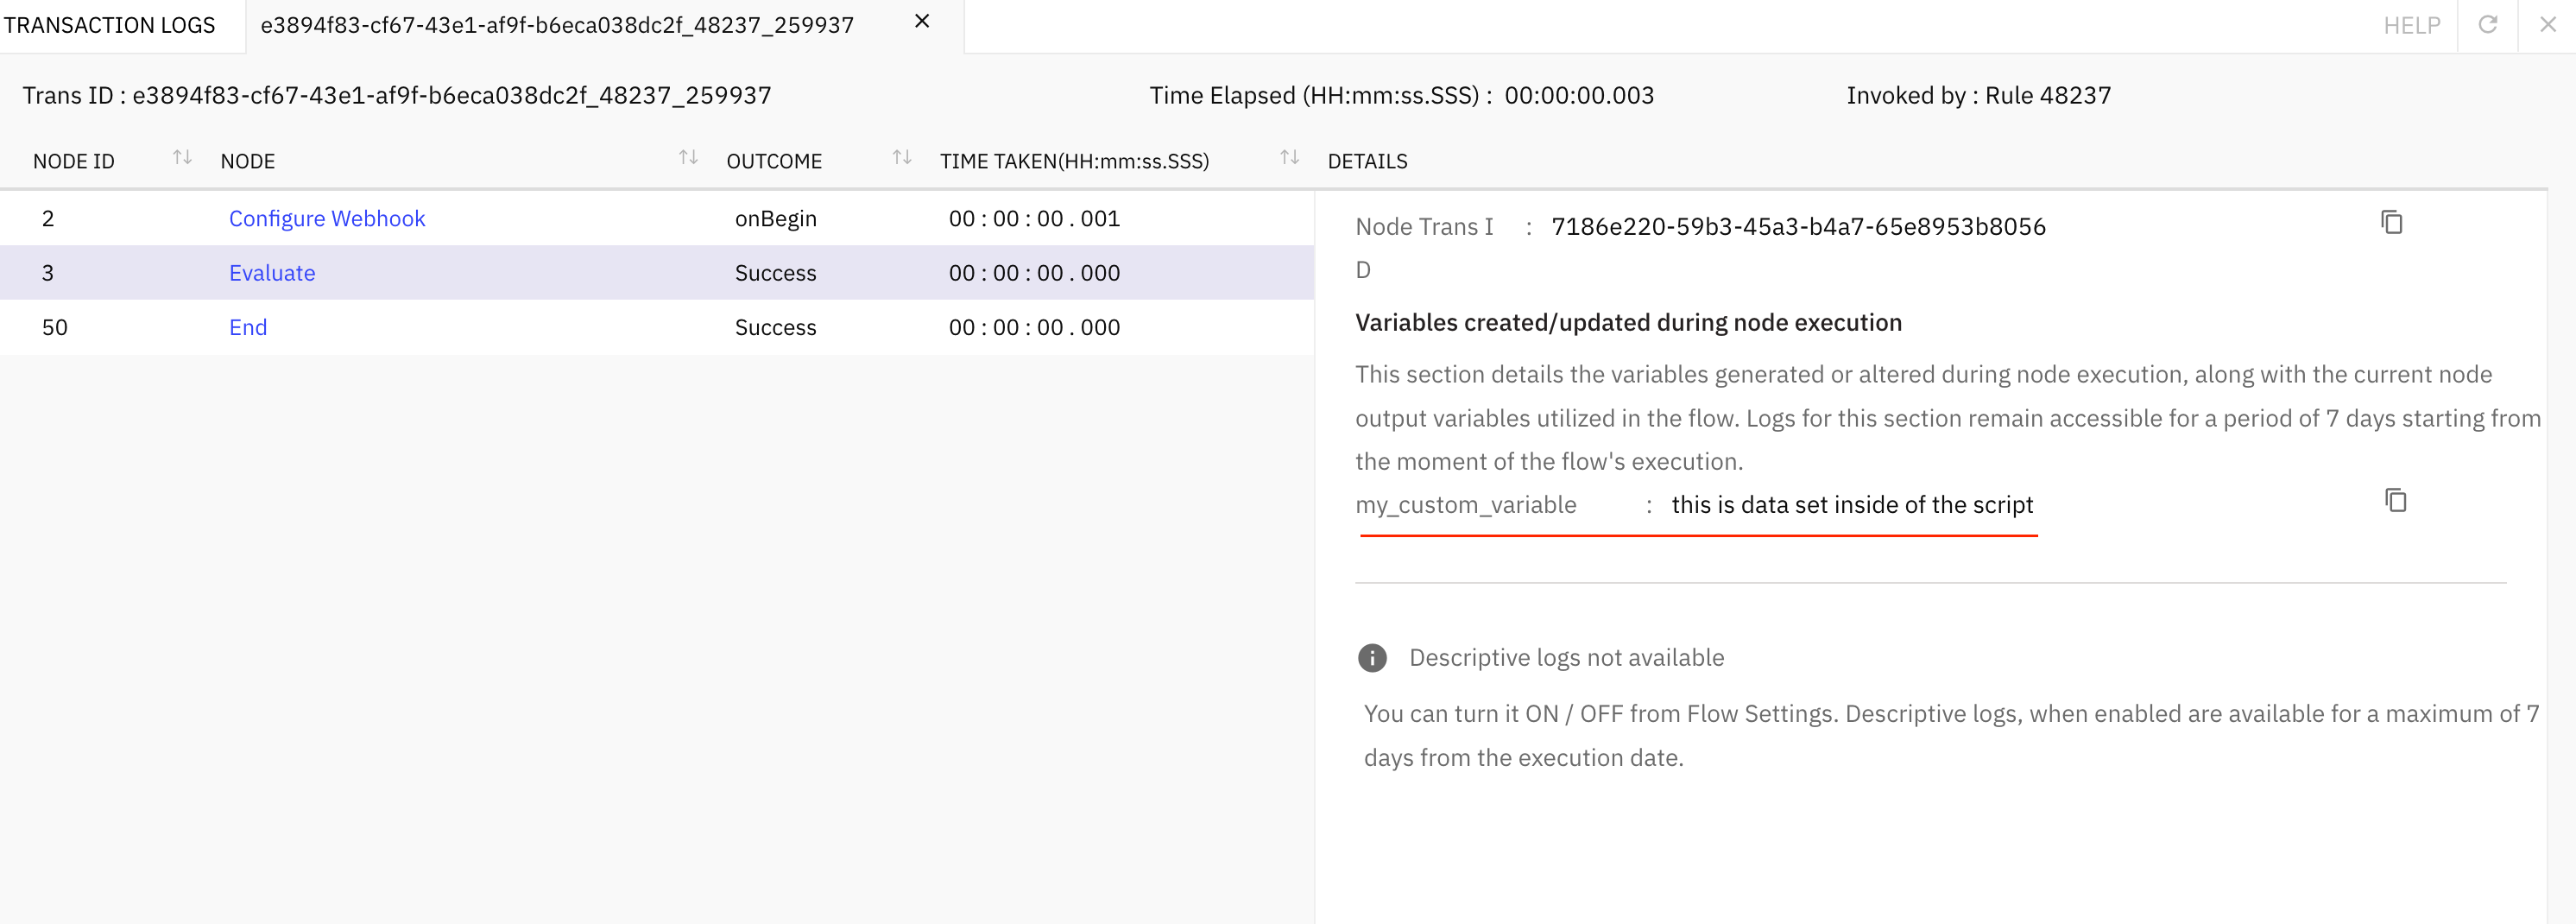
It’s not an easy place to pass anything meaningful, or more than a simple piece of data; therefore, the use of Custom Variabes (for those of you coming from WxCC Flow Designer, these are like Flow Variables), is a great place to store just about anything you want, regardless of the overall outcome of the script (e.g., 0 = Success).
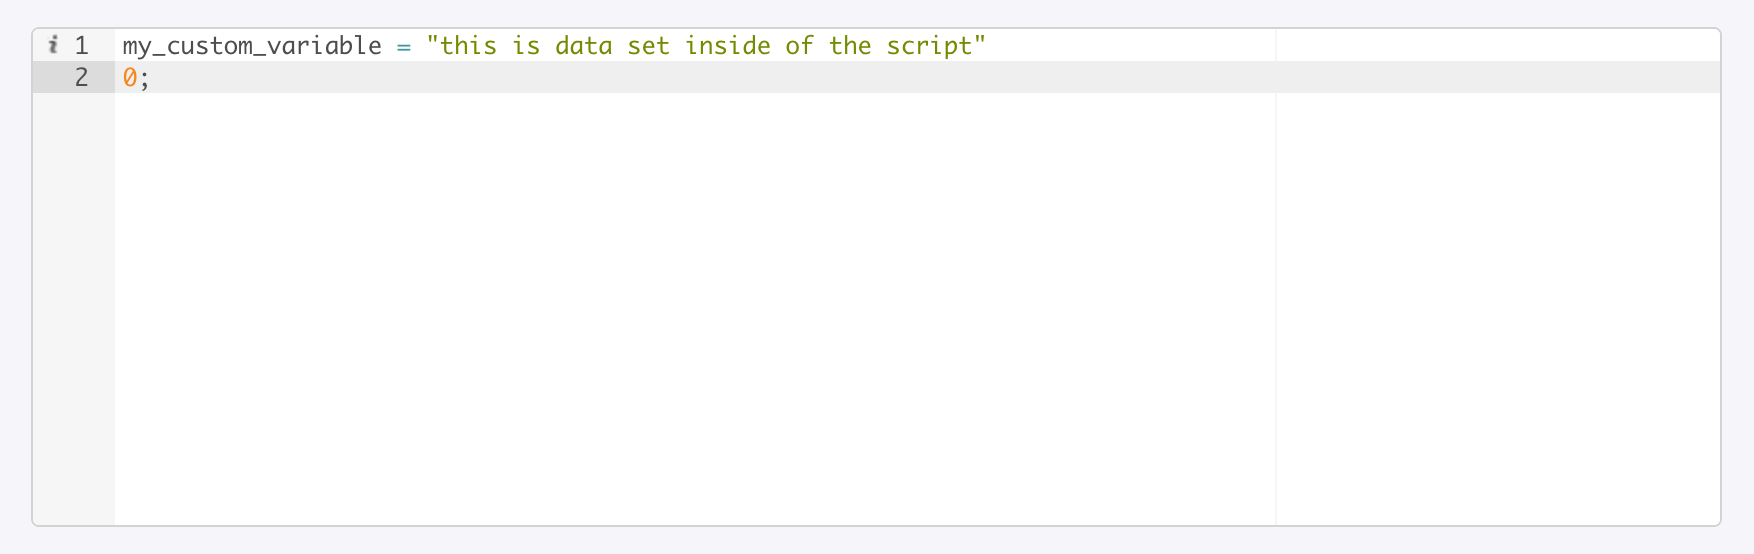
For example, the custom variable I show just above, I can use it in the script, as follows:
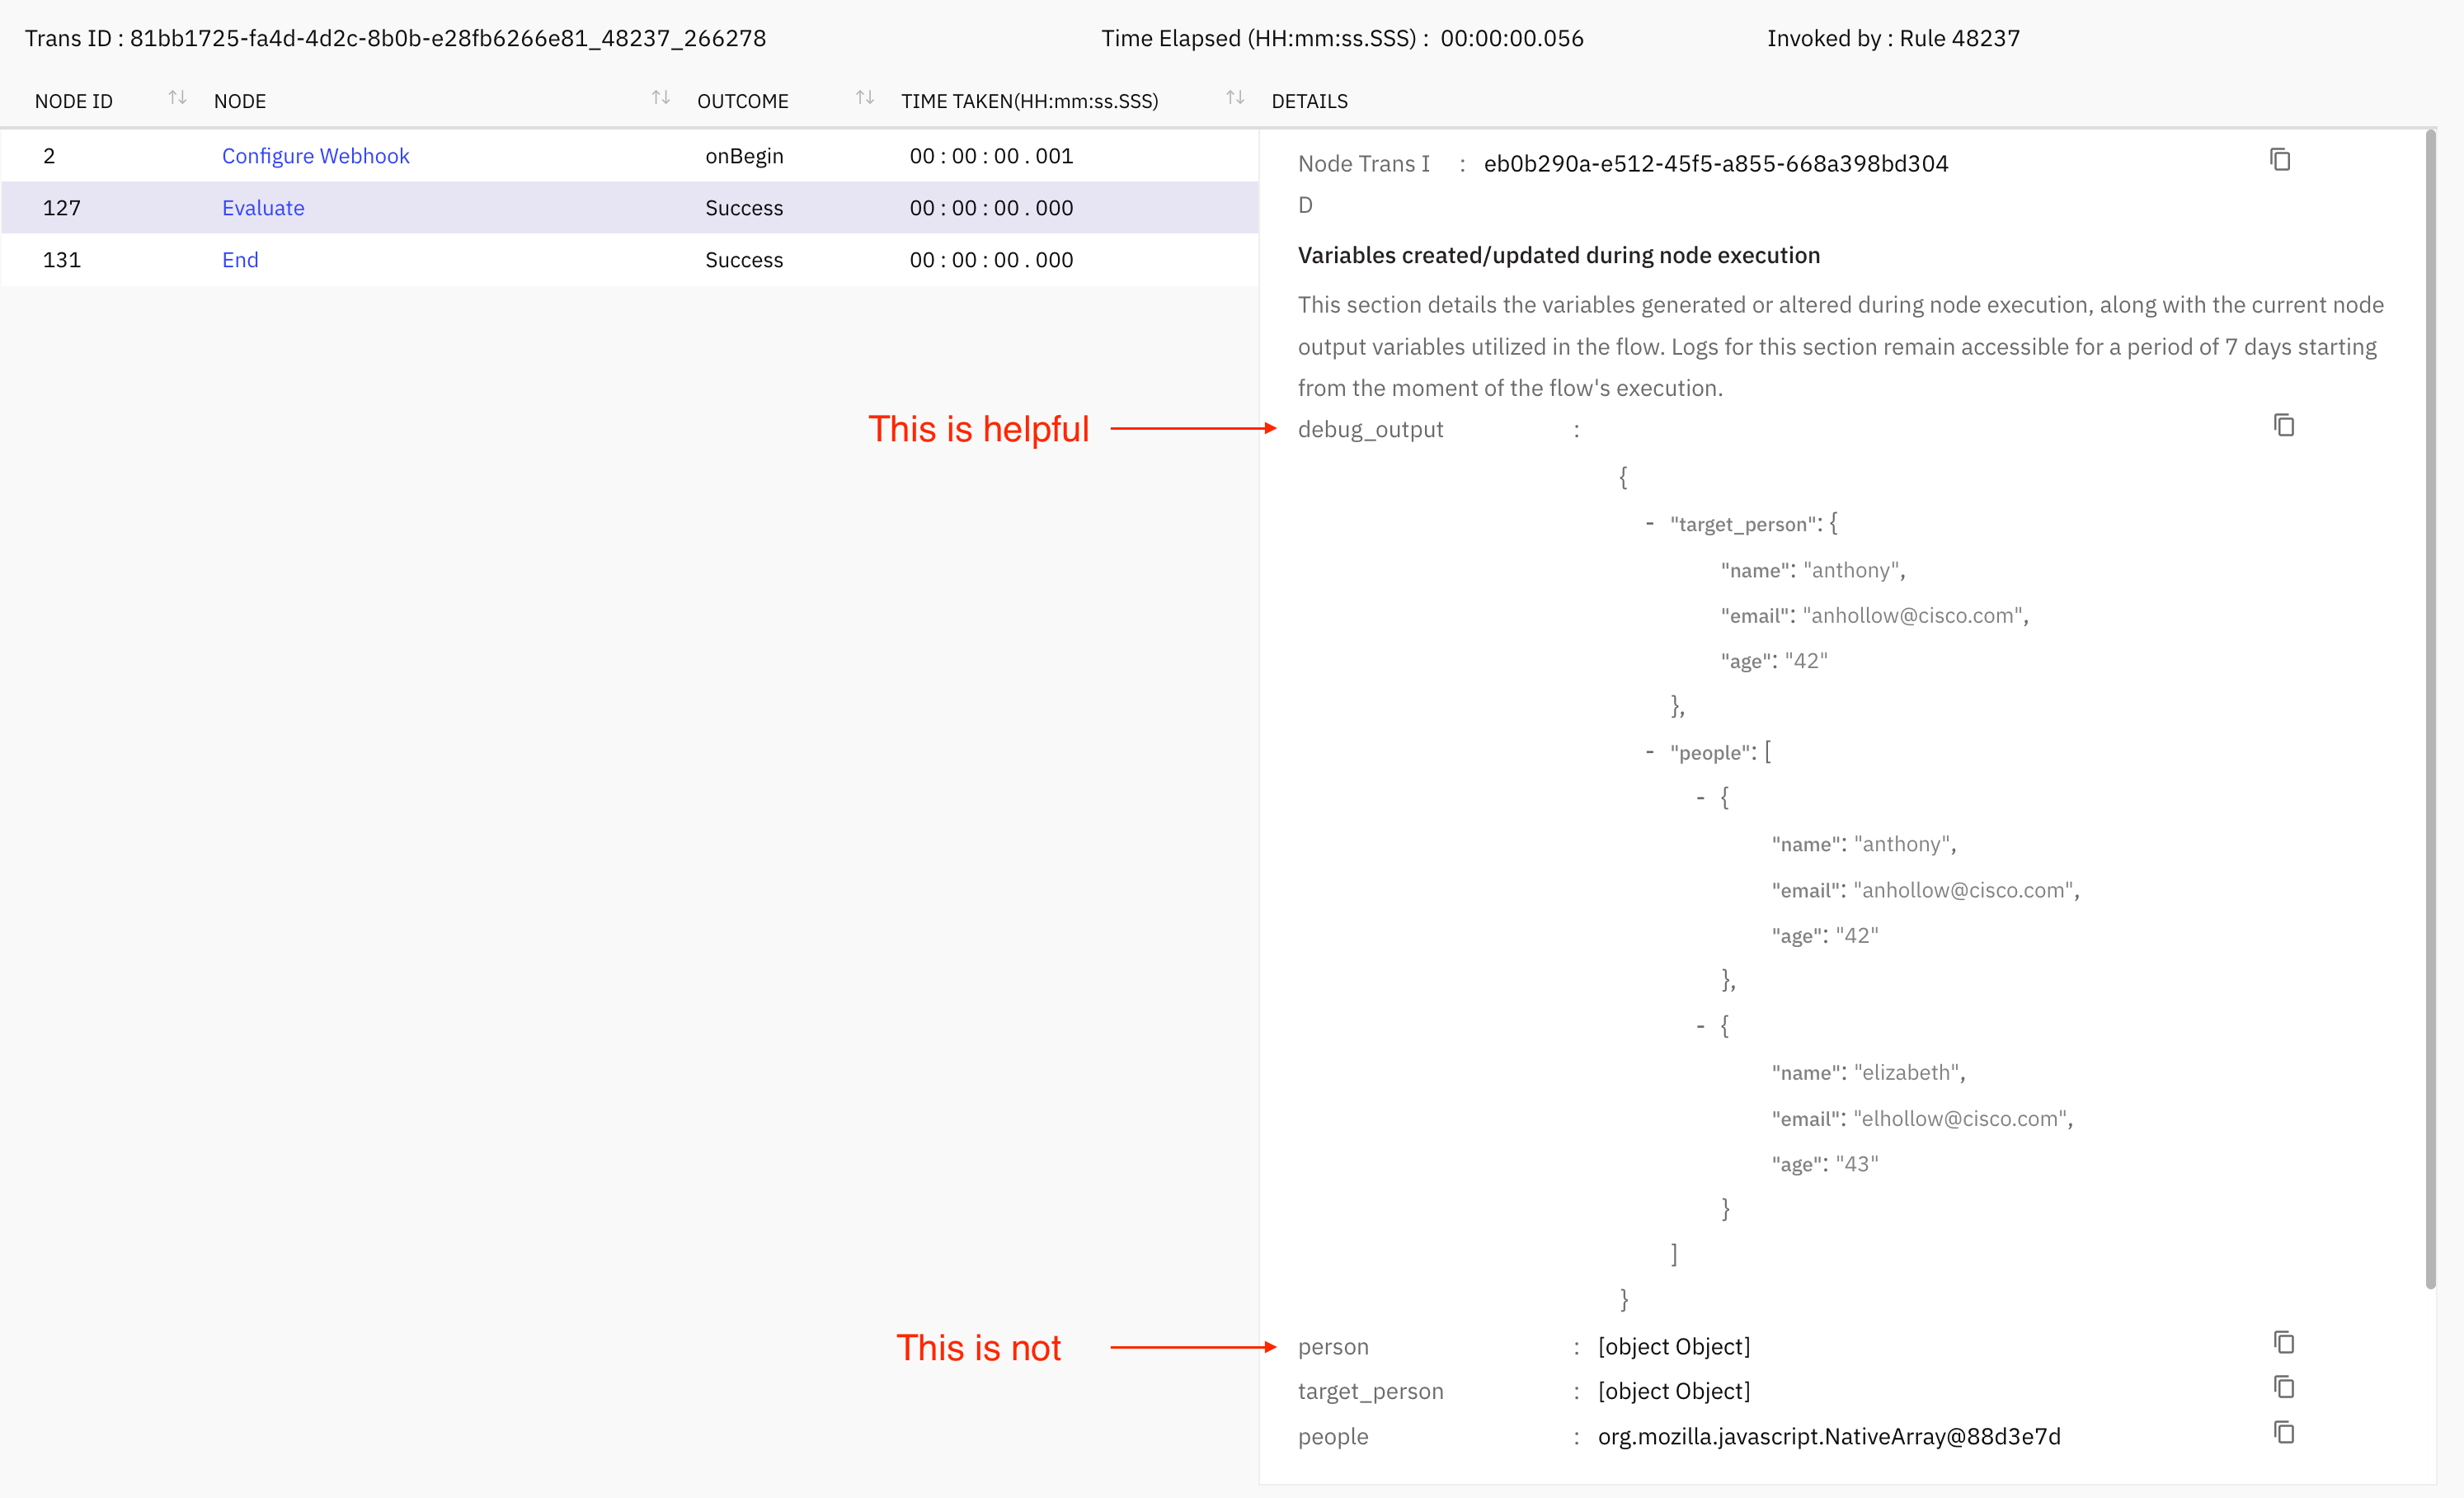
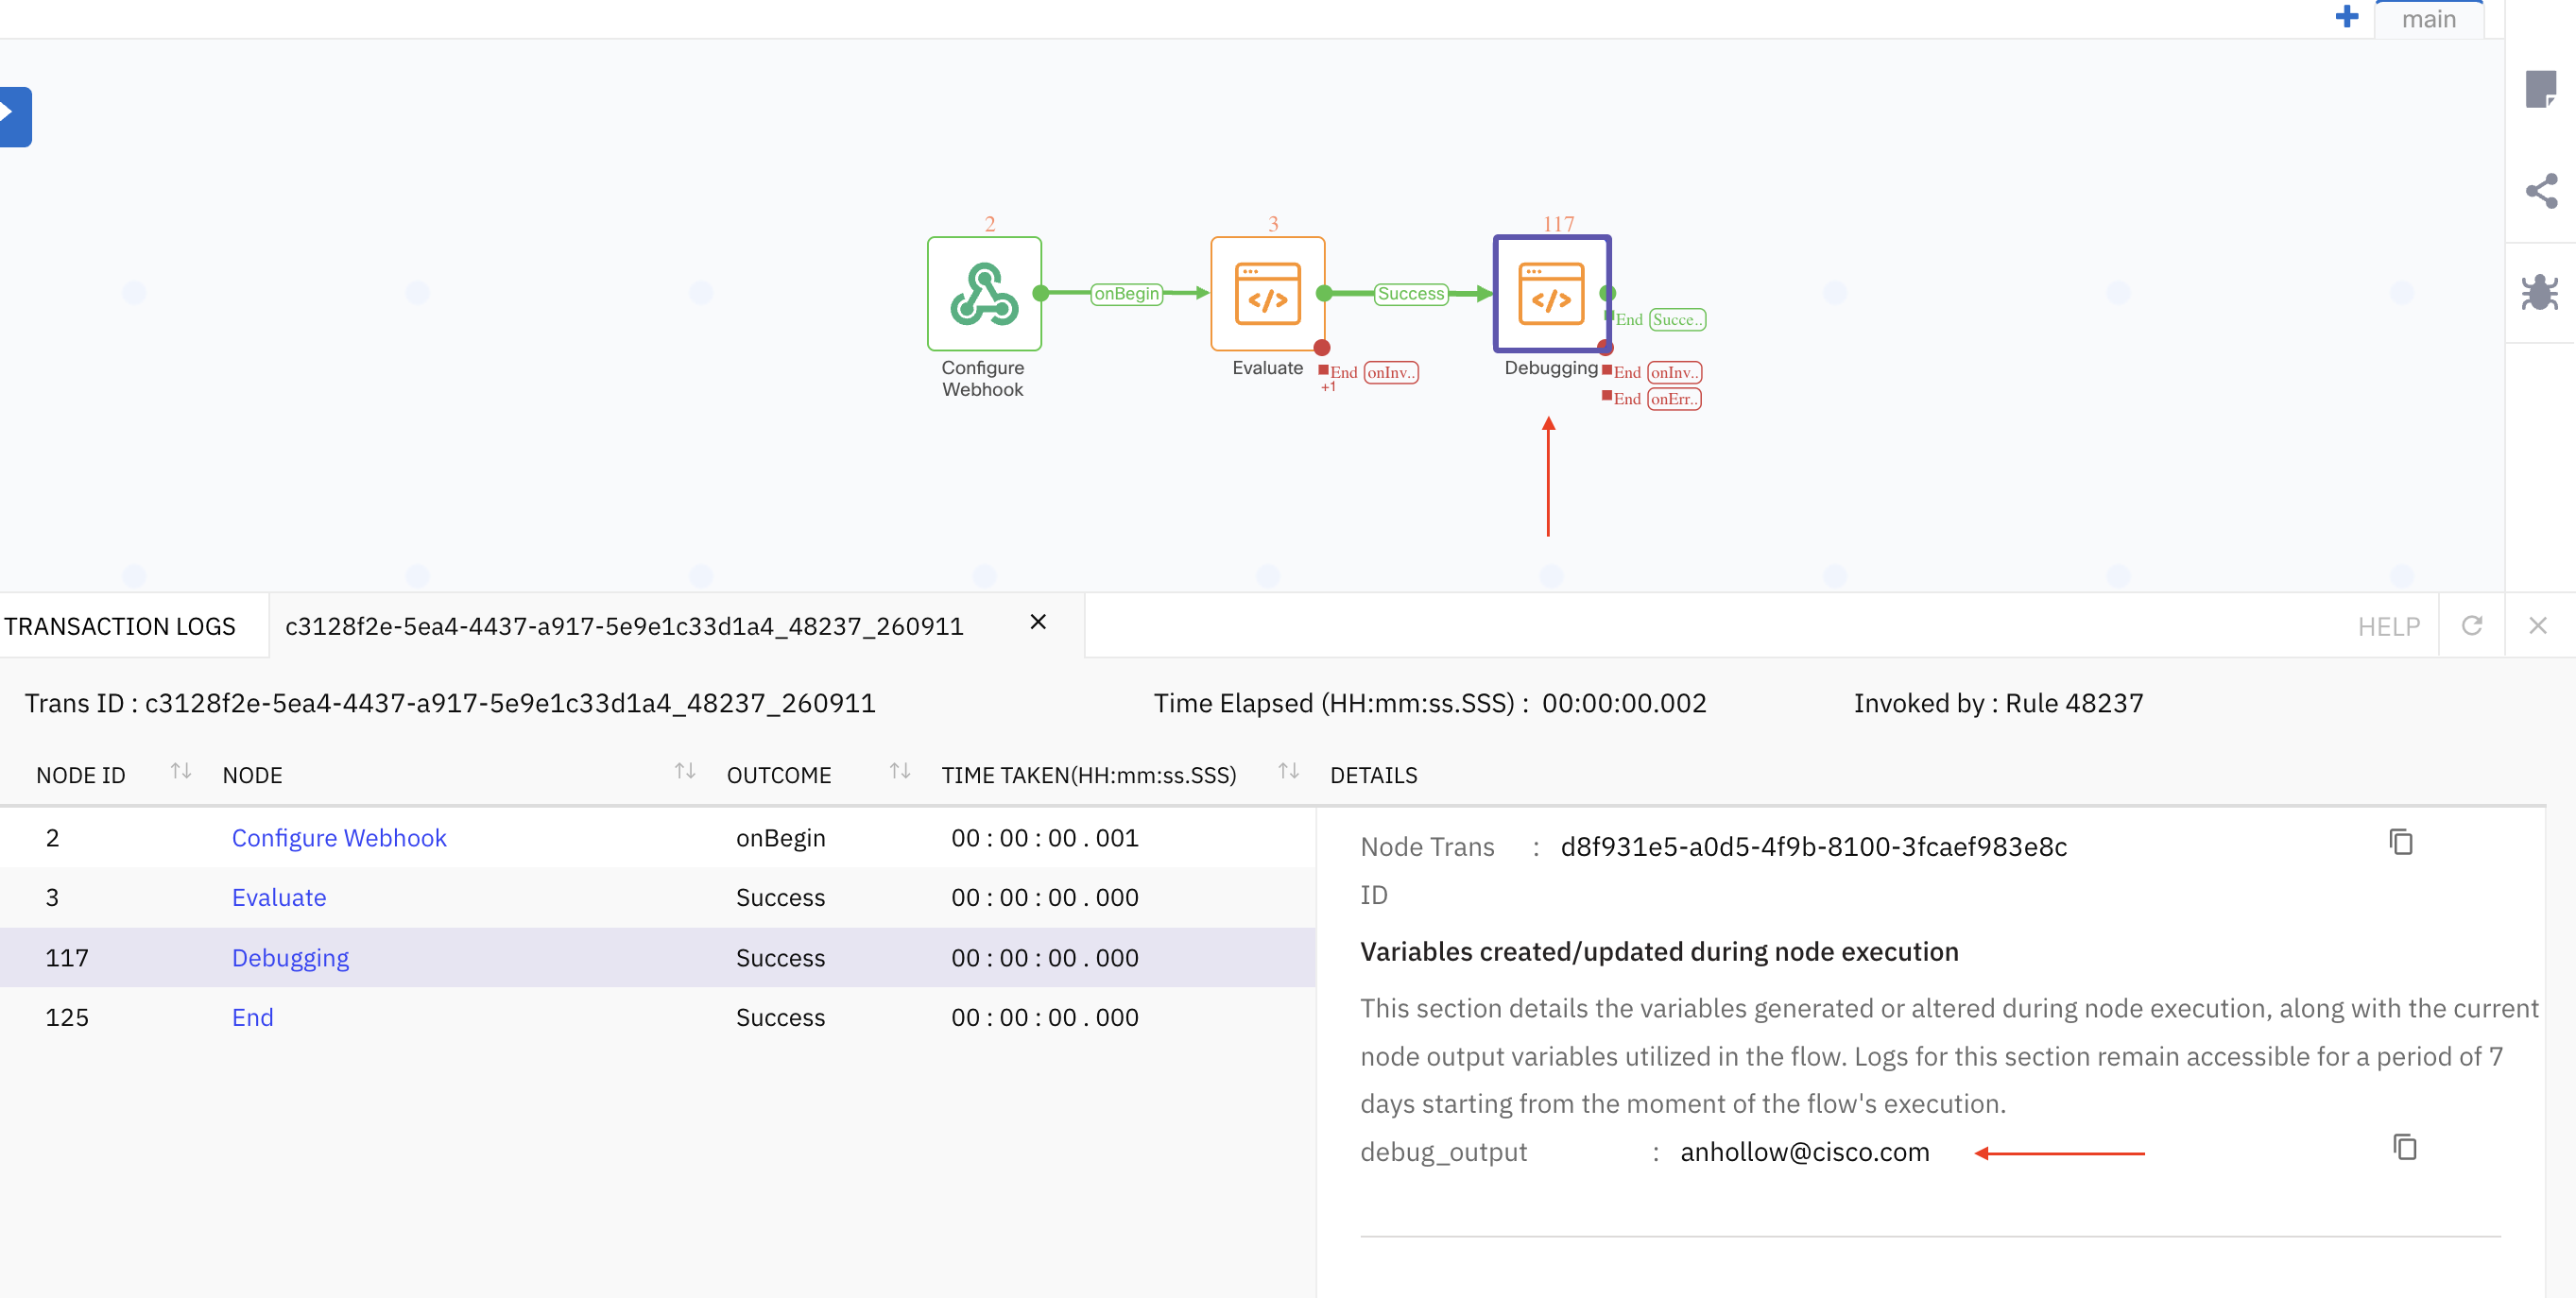
I felt the best way to show you that the custom variable was actually modified, would be to show you the node execution in the debugger:
Local Variables
Now that we’ve looked at how to read in data from outside of the Evaluate step, and to store data which persists after the Evaluate step executes, we should look at another useful feature: local variables. You can think of a local variable as data created and/or used within the Evaluate node, so it’s naturally self-contained. In vanilla Javascript, there are two main ways to create a local variable:
constis a keyword which creates a local variable whose value should never changeletis a keyword which creates a local variable whose value can change over time
Here is an example of both:
You can see these local variables in the test output. They will also be visible in debug output, but as mentioned earlier, not available to other nodes in the flow.
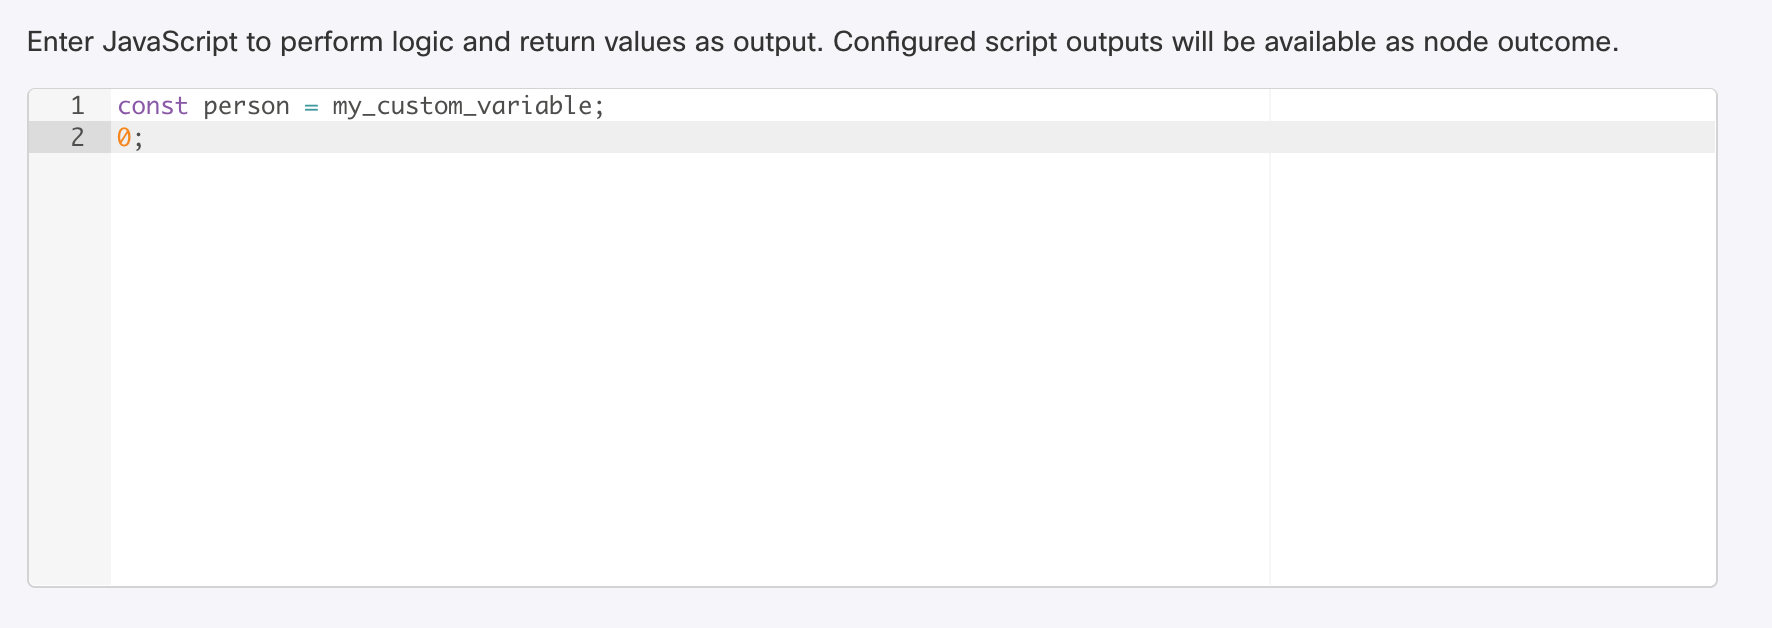
If you want to work with a custom variable, as if it was a local variable, you can do this natively, you just don’t delcare it with let or const first:
IMI Helper Libraries
Since Rhino is limited in its capabilities, the IMI team has created some custom libraries which contain helper functions that are typically native in vanilla Javascript.
This is how you use them, it’s pretty straight forward, just note the following:
- When importing the library, its name is lower case and not meant to be quoted like a string would be
- When using the library, its name is UPPER CASE
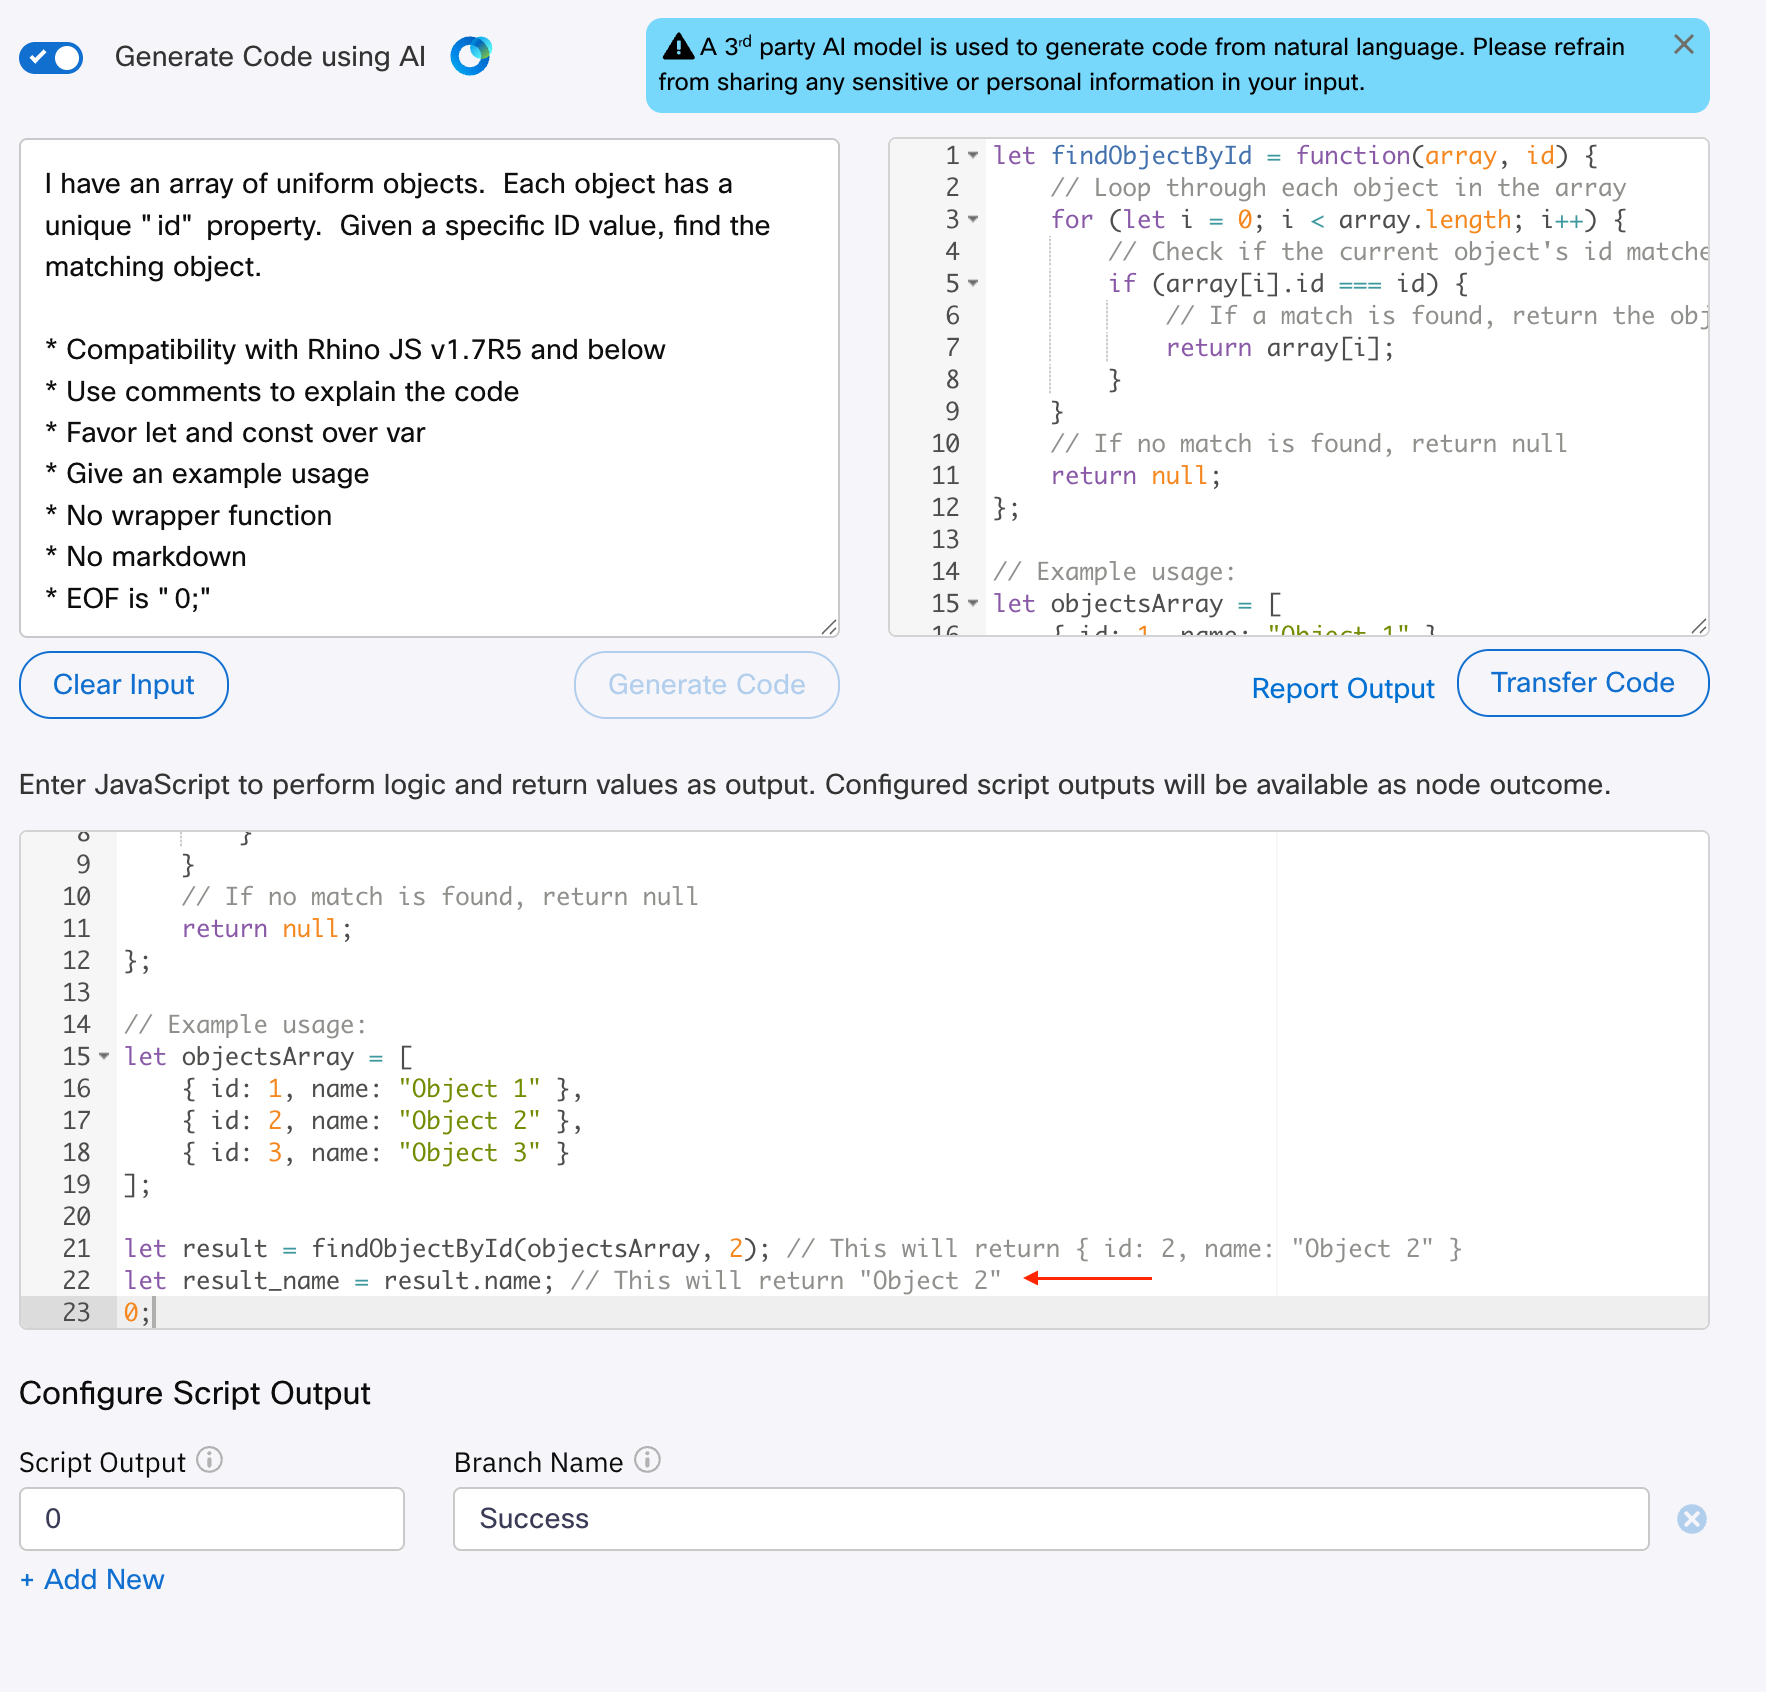
AI Code Generation
You can use code generation tools, like the one built into Webex Connect, but you might have to massage the output, or do a little prompt engineering, in order for the code to work for you.
Here’s an example of some prompt engineering I did, in order to get a code sample to work for me; although, I did have to add one line (line 22) of code to store the “name”, so that I can see it in the Test output. As the test output doesn’t print objects out, just “[object Object]”.
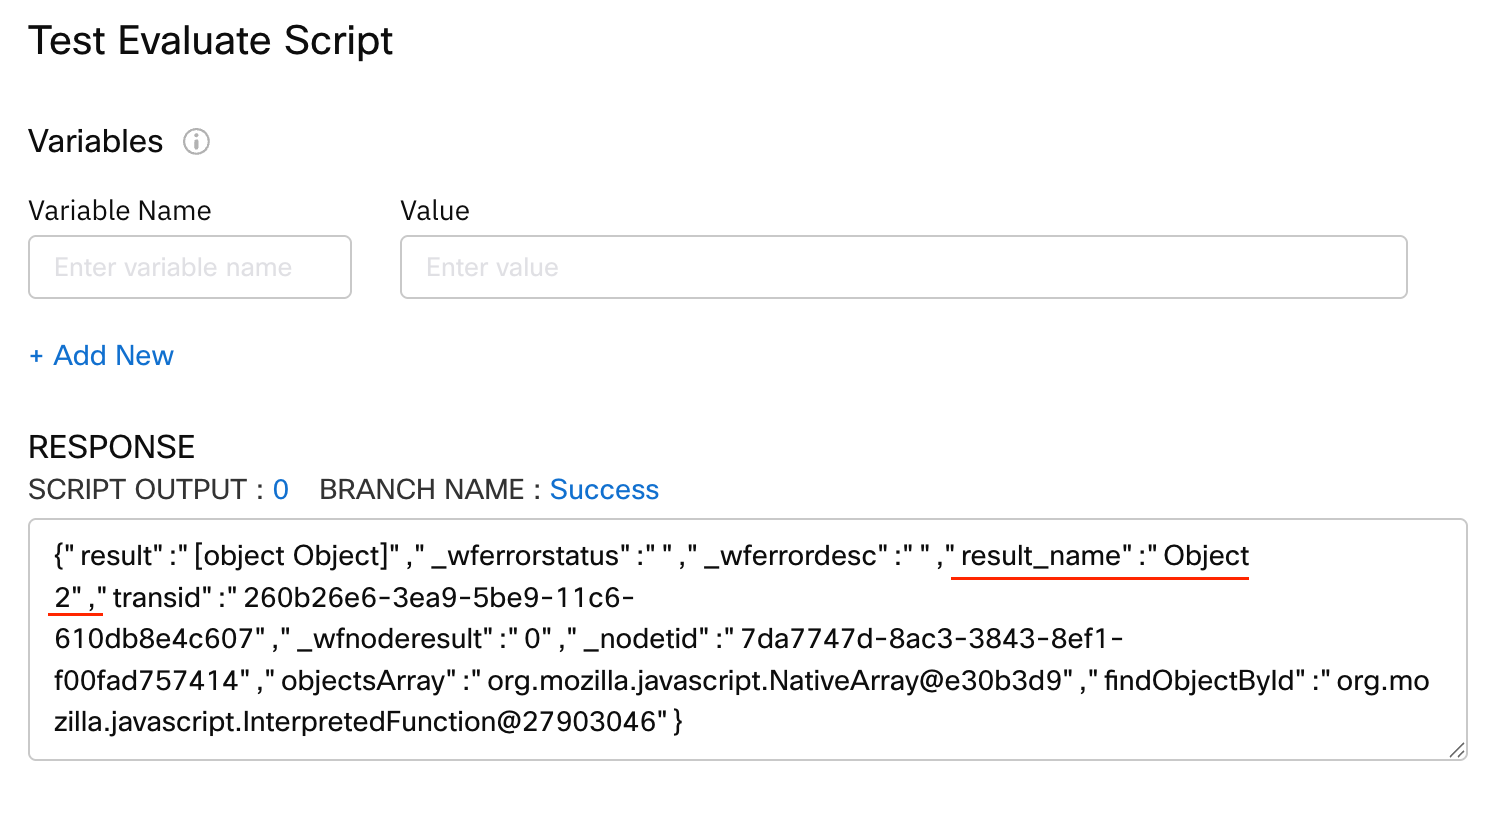
Debug Output Tip
Maybe you’ve seen the output [object Object] in my article, or perhaps you’ve come across it yourself. It’s not really helpful, right? So, here’s a little tip to getting the debugger to actually showing you your objects.
Input Data Deep Dive
This section is an optional read, and if you didn’t read it, you’d still be armed to handle input data just fine.
But if you want to become an expert on the Evaluate node, read on!
Only for custom variables, you can alternatively do it like this:
However, if you try that method for node output variables, you will receive an error, like this:
Therefore, if you want to use node output variables in this manner, use the node’s transition action for “On-Leave” to set a custom variable to the node’s output variable, so that you can reference the custom variable instead.
In this example, I wanted to work with the transaction ID for the flow execution, so at the start node, I set my custom variable transaction_id upon leave.
![]()
And then I can refer to it in the script like so:
![]()
In fact, so far I have only referenced the custom variable in a way, that sets it to another variable, but you can just use the custom variable, as if it were a regular Javascript variable (e.g., like let, and not like const)
Now, interestingly, this tells us that the environment is actually exposing some variables to our Javascript, in a scope we can access, but we cannot see it. It stands to reason then, that there’s more things in our scope, we can refer to, or that will clash with our work.
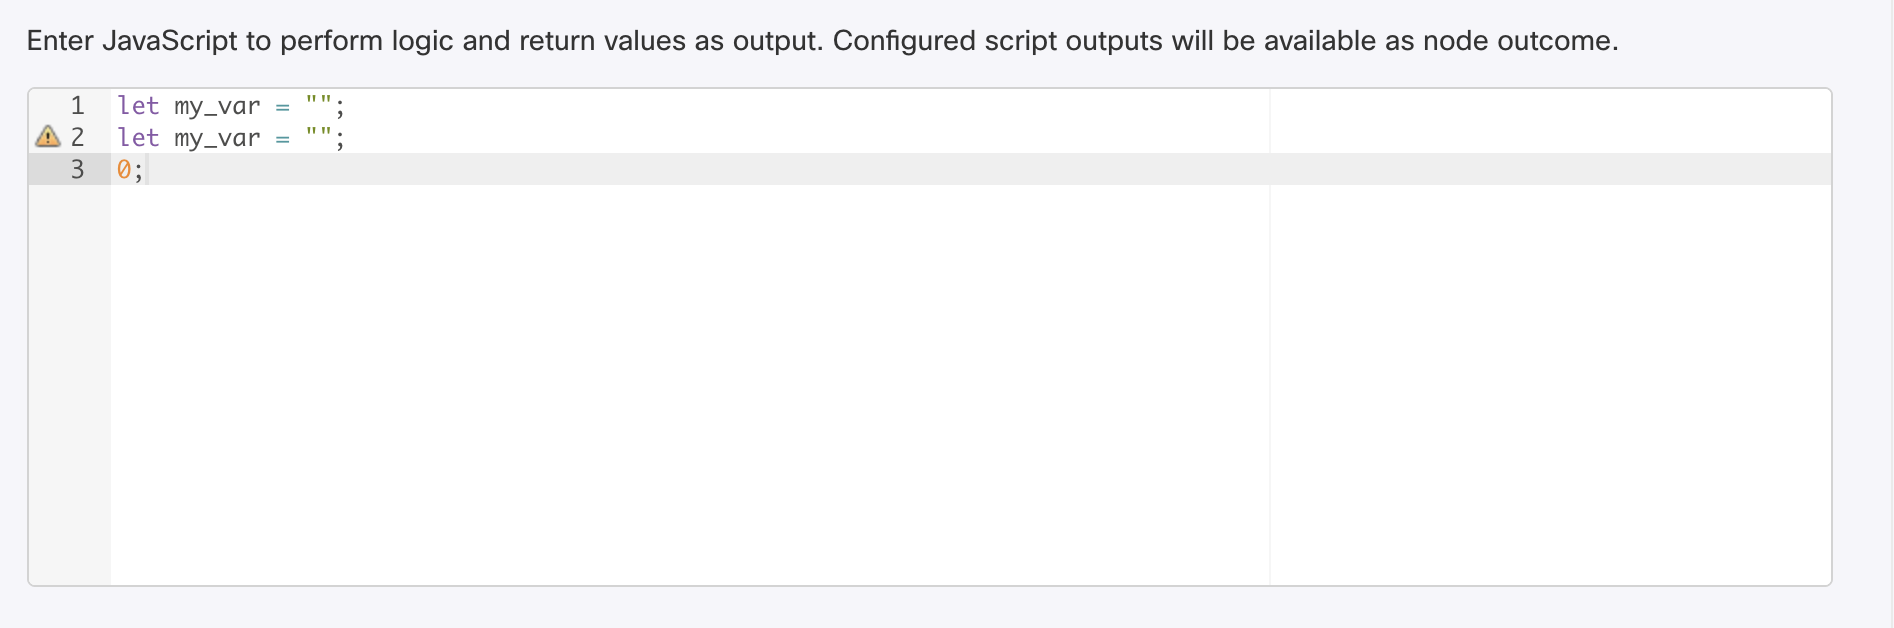
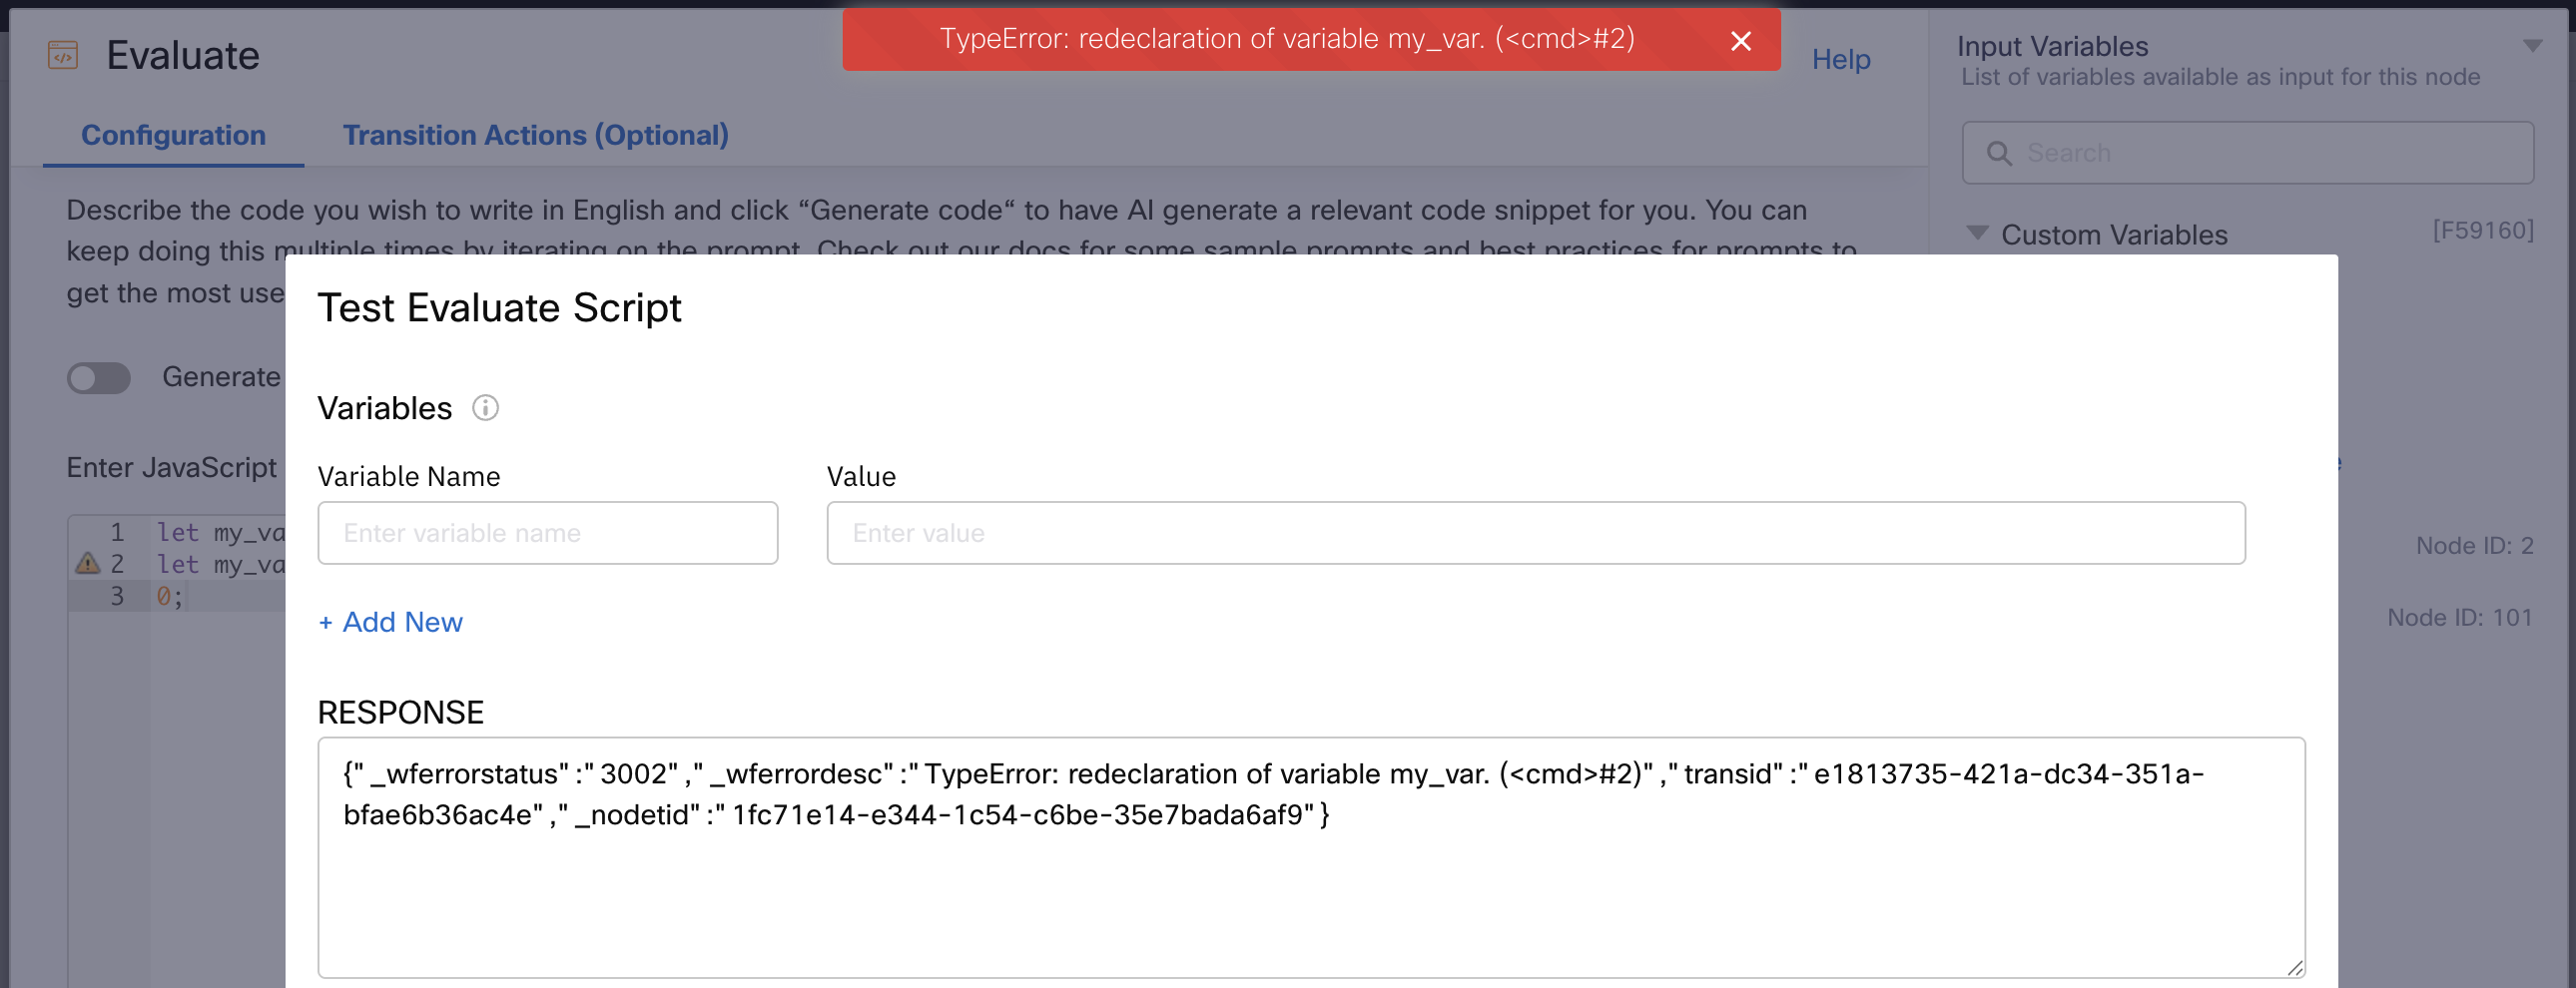
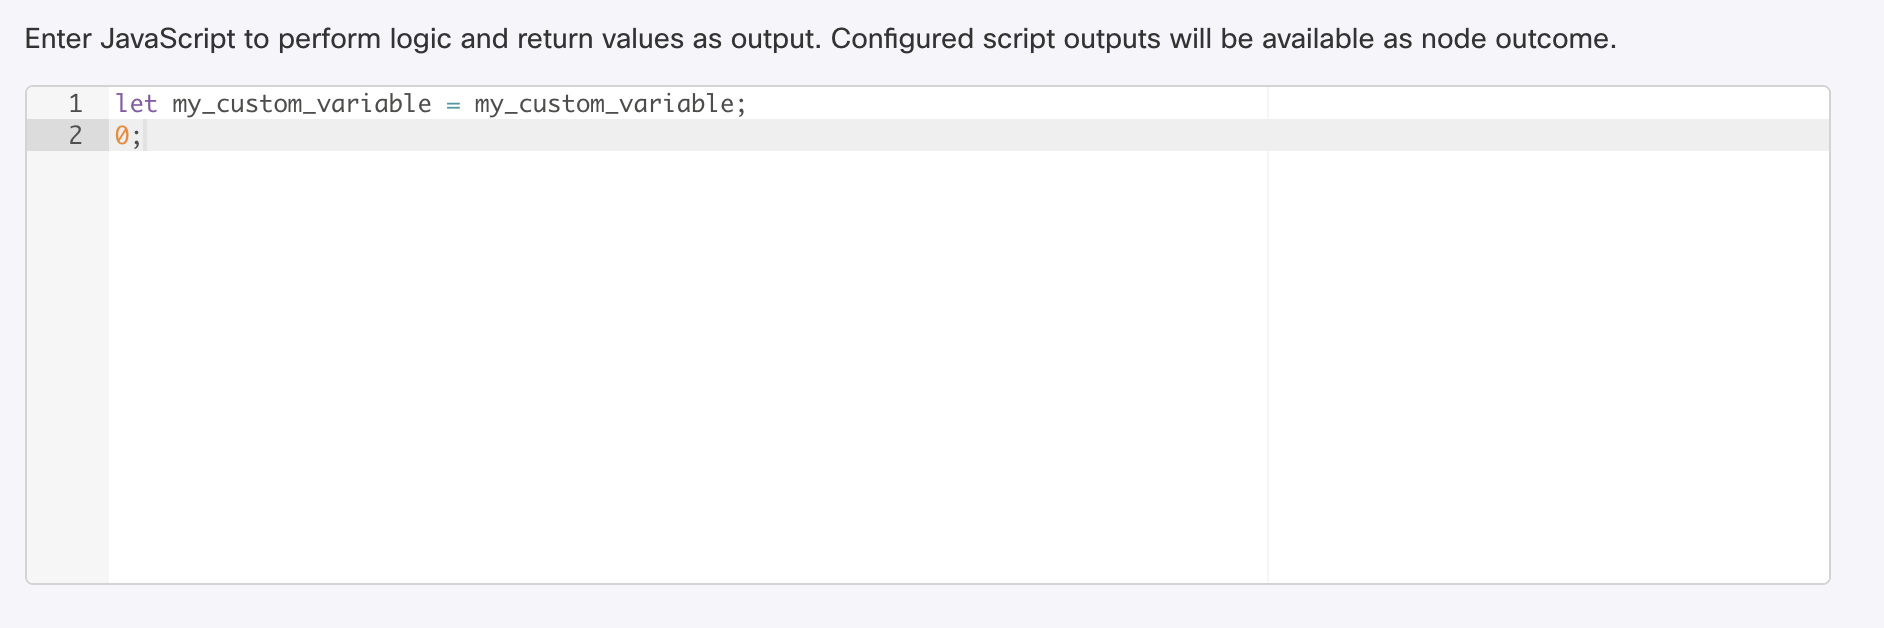
Before I get too far, let’s recall that using let or const is something you can only do once per scope. This is a Javascript specific behavior.
For example, this fails to execute:
So, if custom variables are already delcared, what happens when we re-declare them, like this? Spoiler: it works. Why? Scopes!
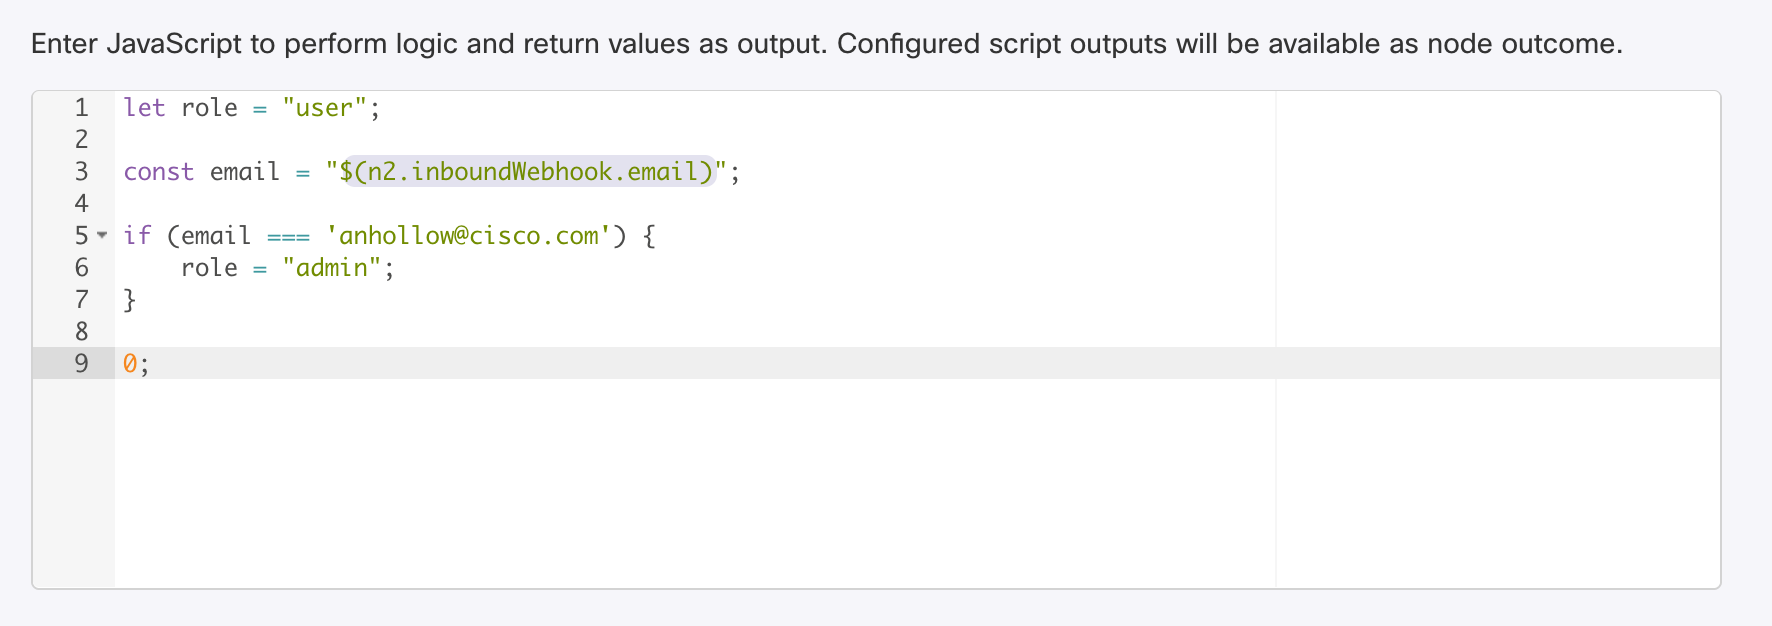
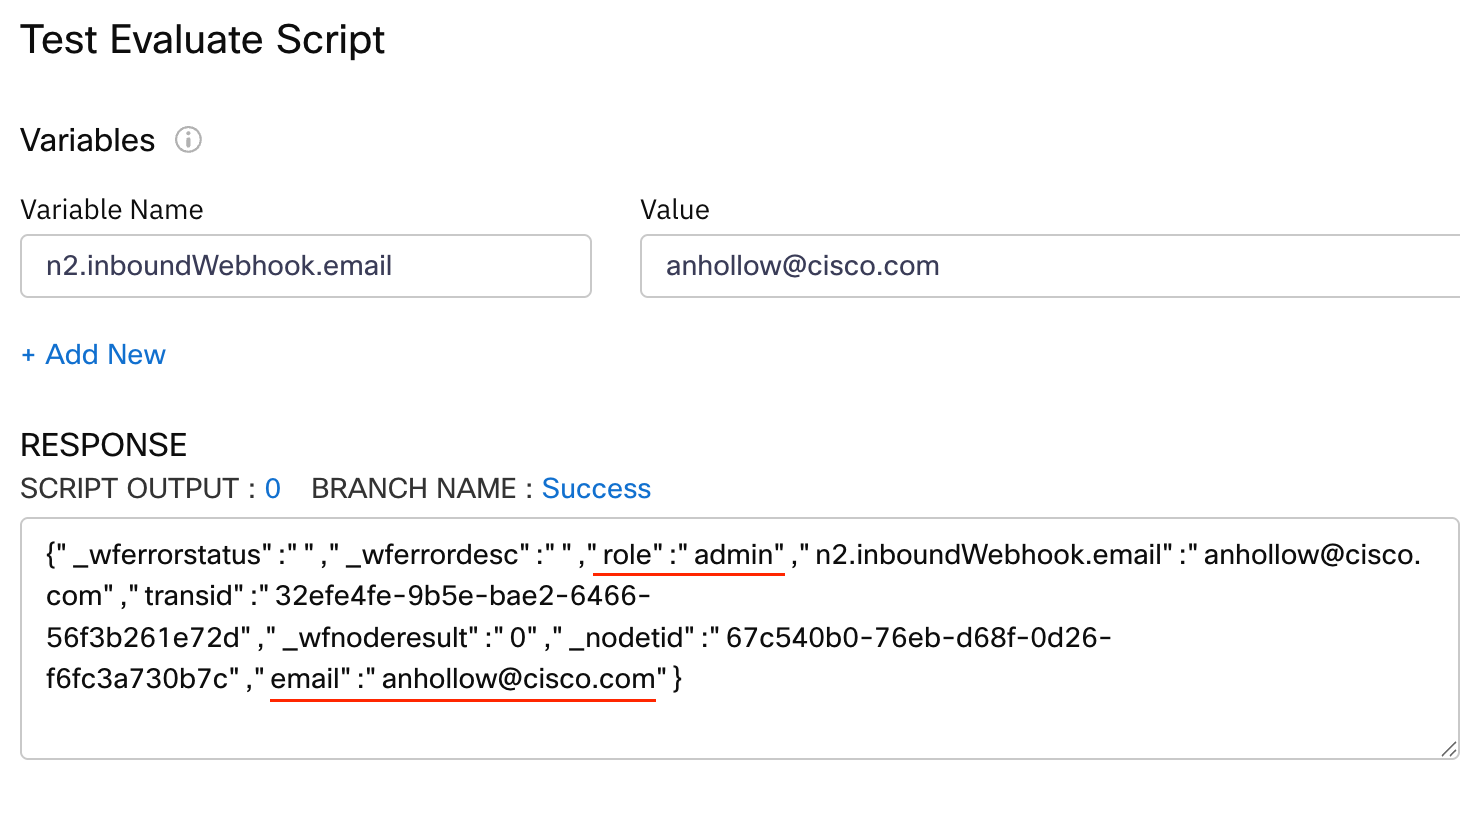
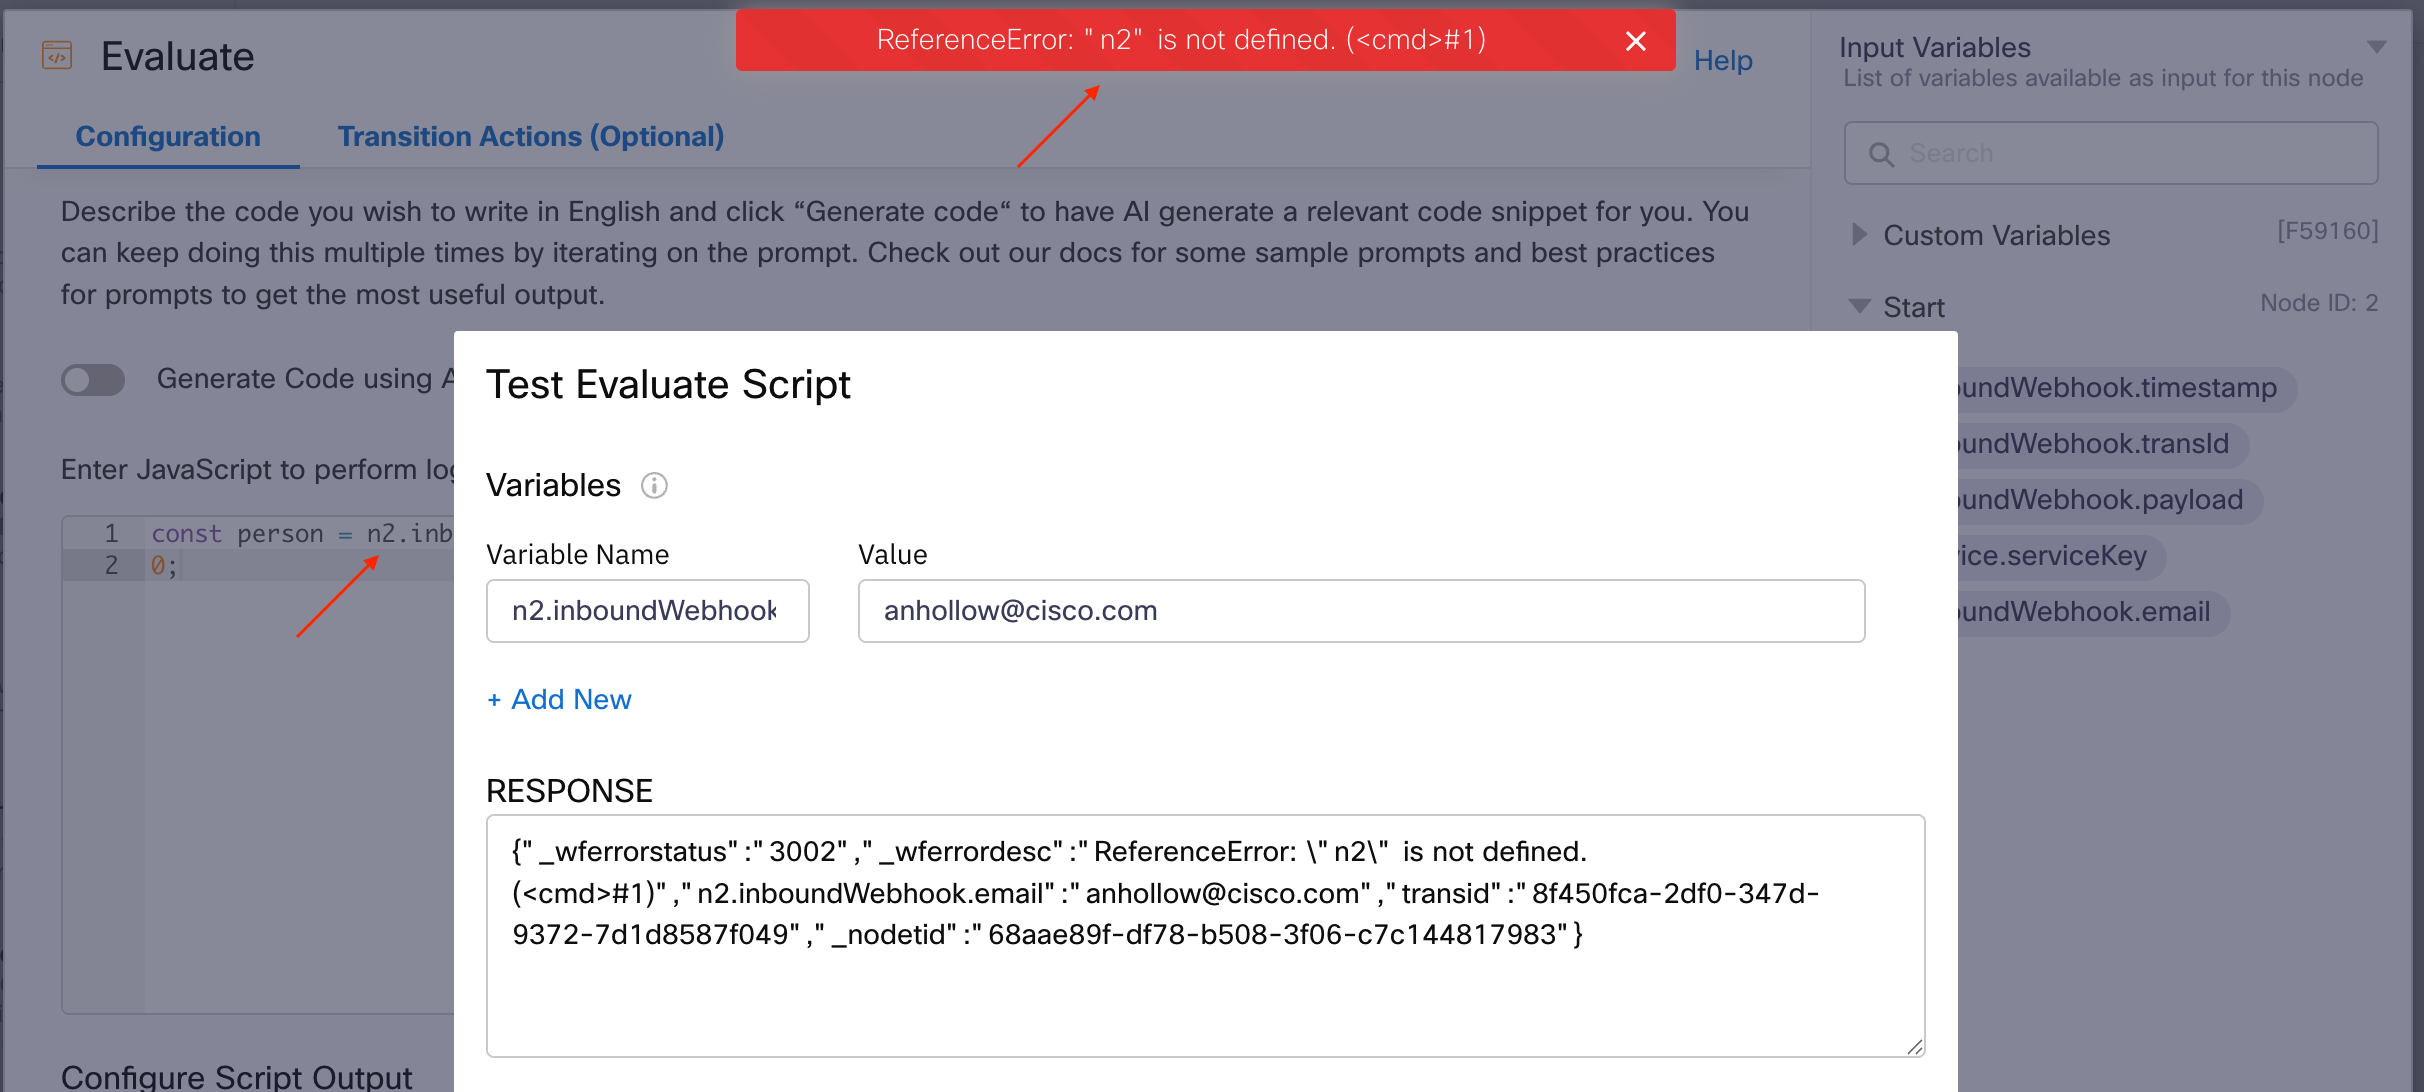
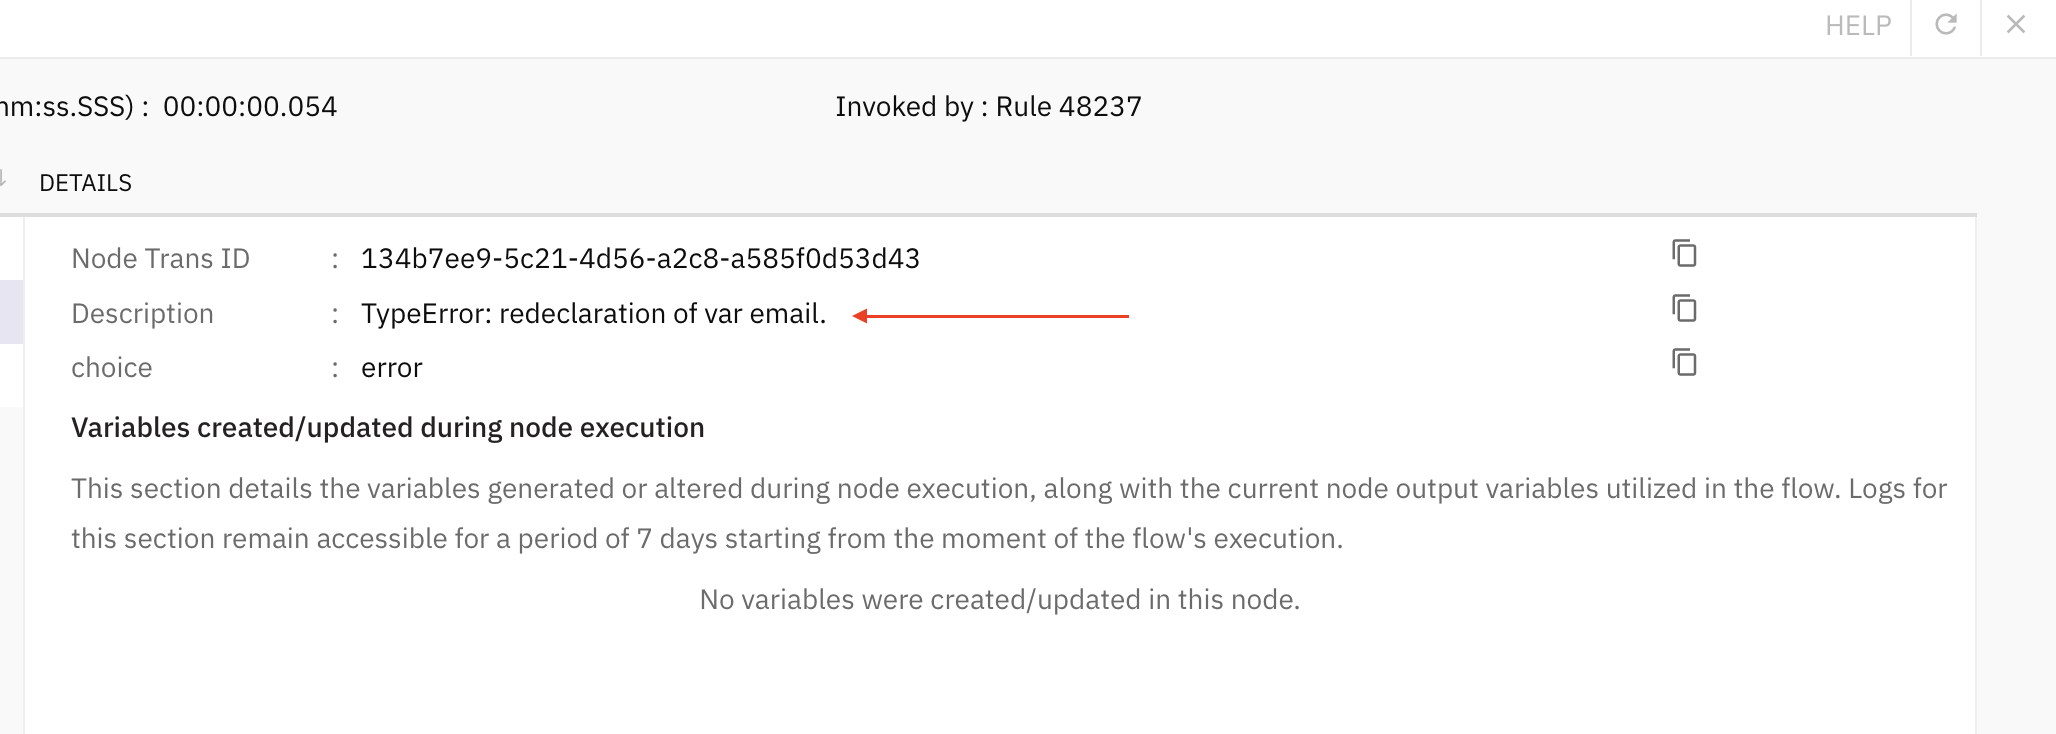
But it’s not always that way. If my inbound webhook has defined that I will receive an email address as JSON input, then Webex Connect will make the variable email available to our Evaluate node, but in a way which clashes with our scope.
Therefore, this example will cause an error:
As you can see here in the debugger:
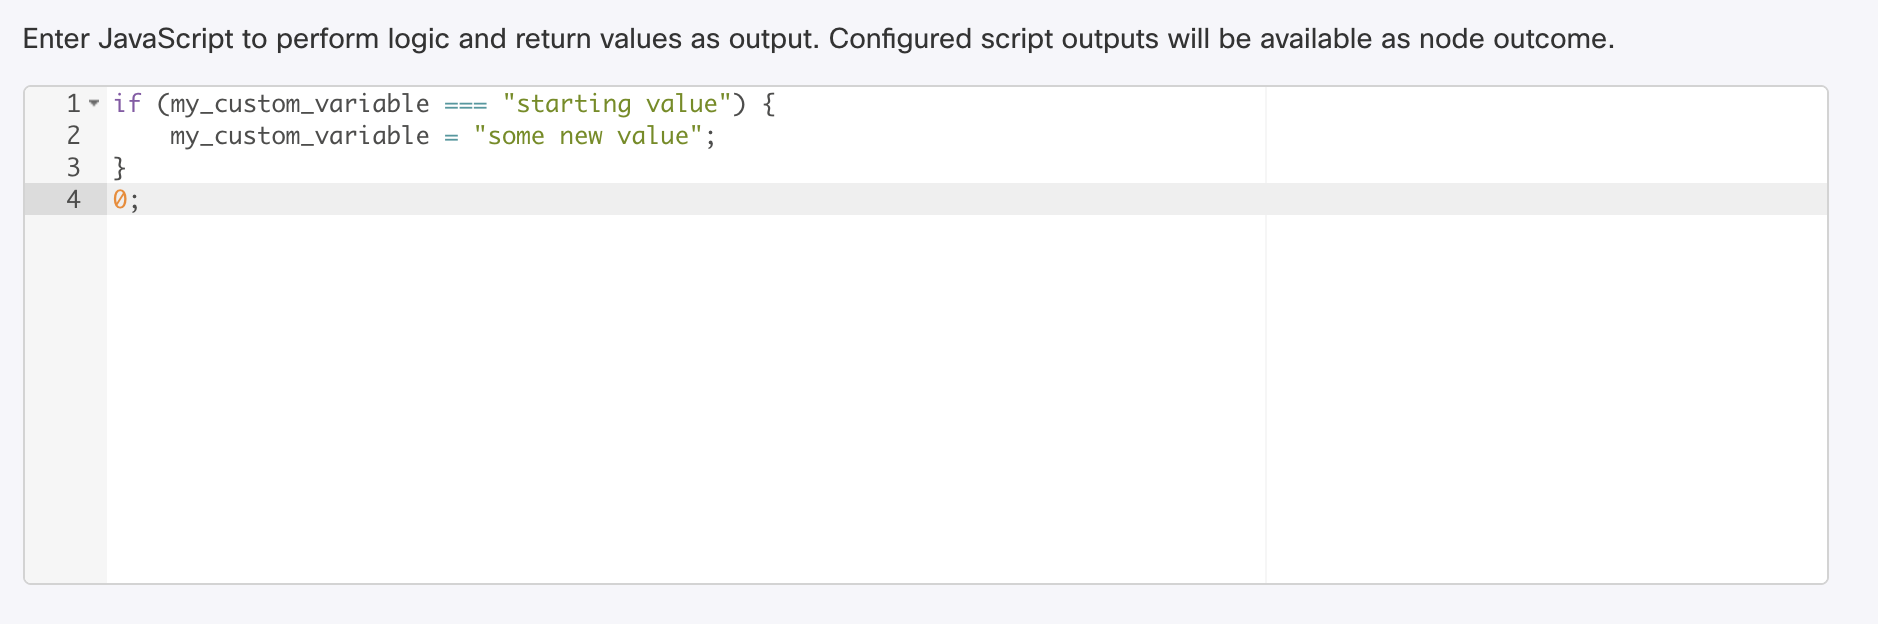
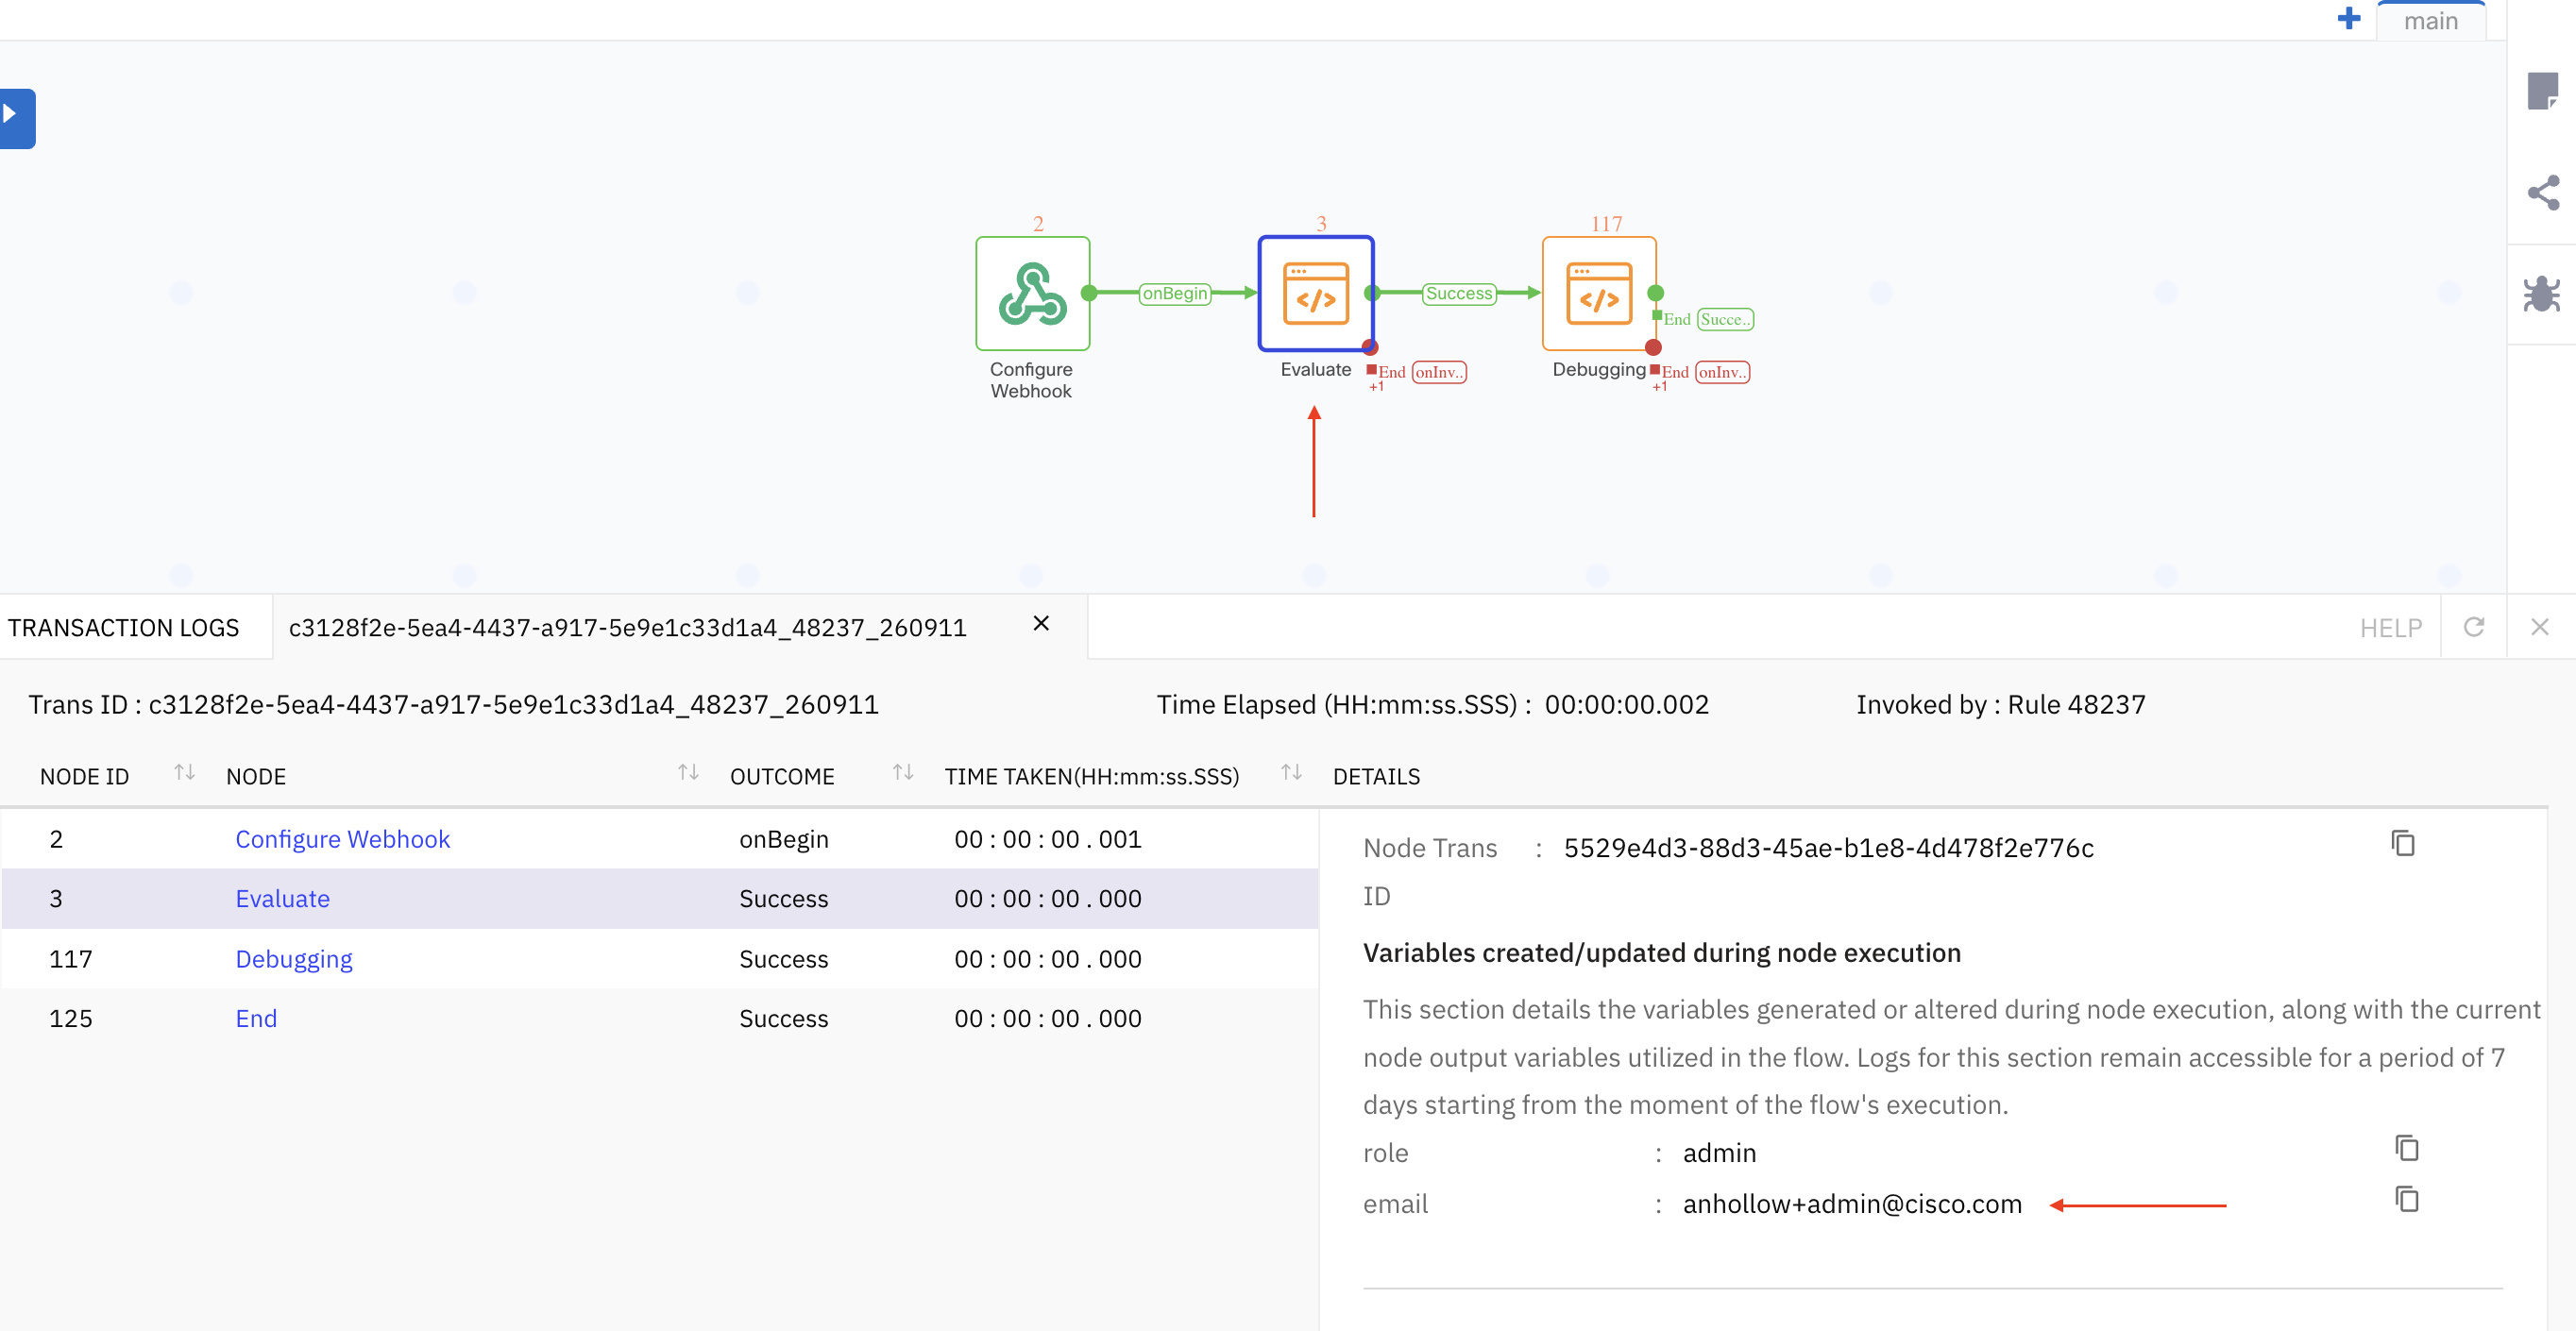
You would be forgiven then, if you thought that you could also change this variable, to affect the node’s output variable down the line in your flow, like this:
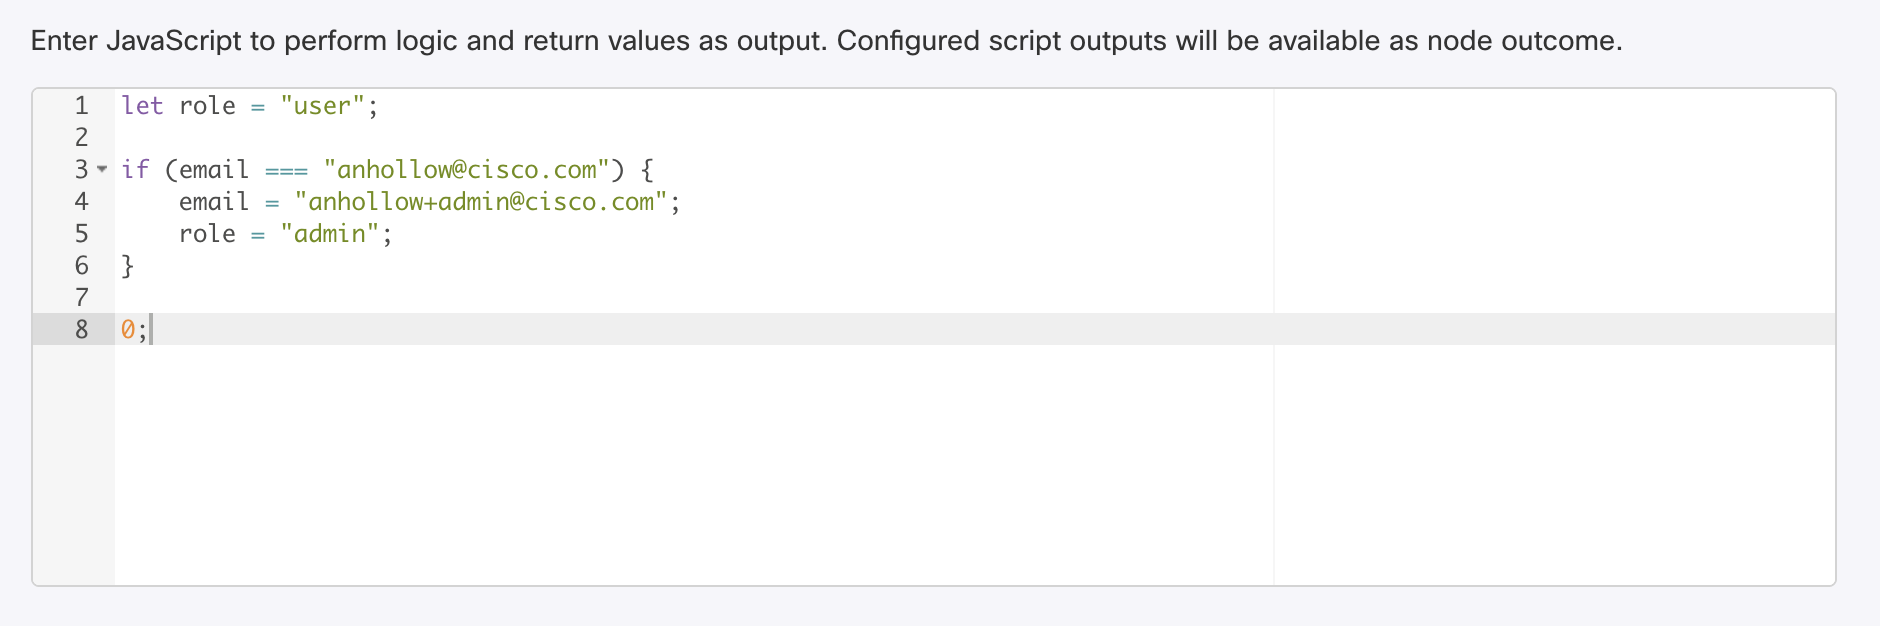
But as you can see from my testing, the results are not as you would have expected, and the change is only temporary, while in the Evaluate node:
And that’s it. I hope you enjoyed this article. If you have any questions or comments, feel free to reach out to me. I’m sure you’ve seen my email address (also used in Webex app), several times in this article by now.