Configure Basic Call Flow
Webex Contact Center Initial Setup & Basic Flow Build
Important Links:
Webex Control Hub: https://admin.webex.com
WxCC Agent/Supervisor Desktop:
https://desktop.wxcc-us1.cisco.com/
https://desktop.wxcc-eu1.cisco.com/
https://desktop.wxcc-eu2.cisco.com/
WxCC User Guides : https://www.cisco.com/c/en/us/support/customer-collaboration/webex-contact-center/series.html
Set up users & add Webex Calling licenses
Log into Webex Control Hub: https://admin.webex.com
Create New User:
Under Management on the left, click users, then in the upper right click Manage Users, then click on Manually Add or Modify Users. Follow through the prompts as you would normally to add a Wx/WxC user.
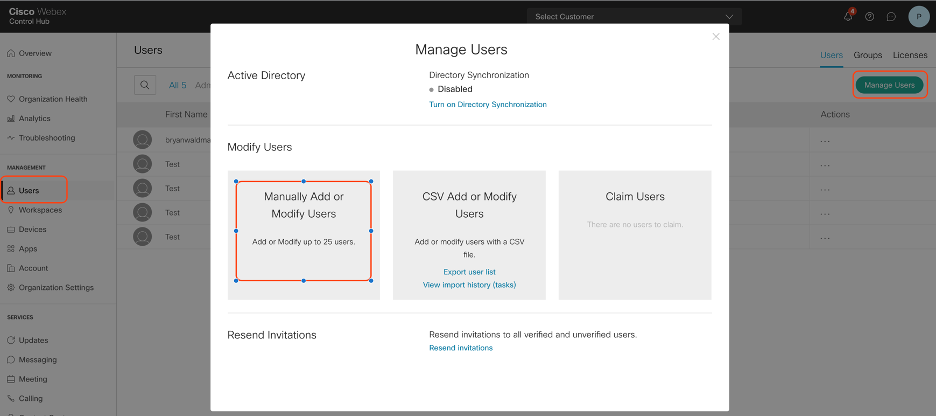
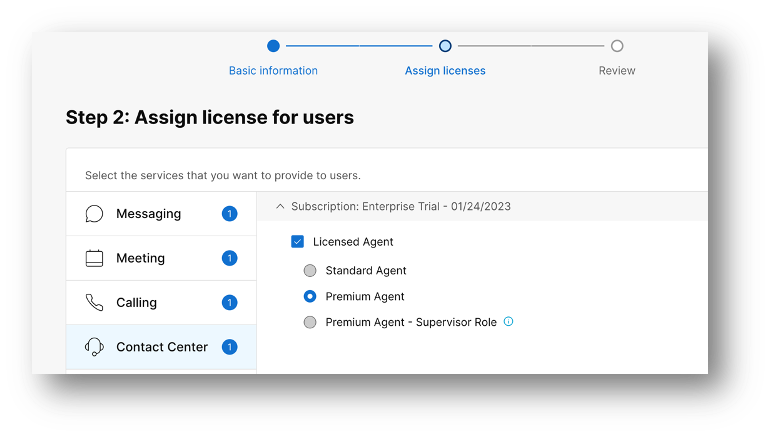
When you get to the license/service selection screen for the user, make sure they are set with the correct licenses. For WxCC Users, make sure they are Webex Calling Professional and select the agent type (Standard, Premium, Premium with Supervisor).
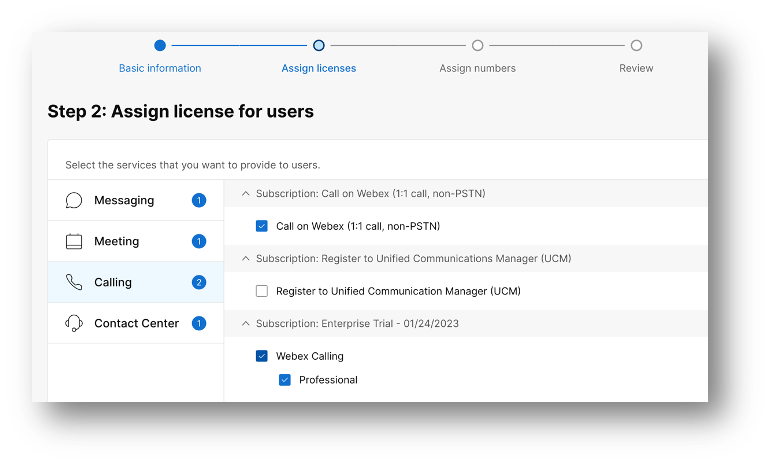
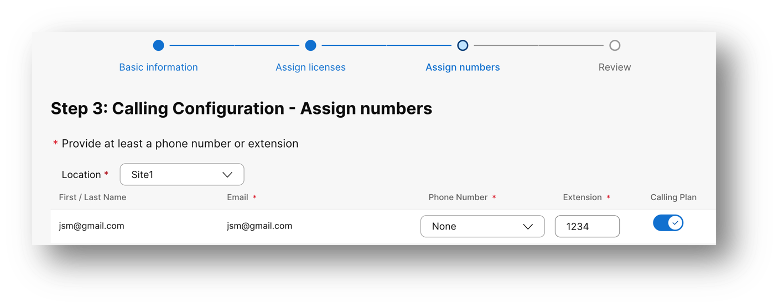
On the next screen, make sure the agent has an extension, or a phone number, or both and Calling Plan is selected.
Existing Users: Edit Licenses to add WxCC
If a user whom WxCC services are to be added already exists in the org, simply edit their license to add the features. Click on the user under the user list, when the user details load, click “Edit Licenses”. Follow the same steps as above to make sure the user has WxC Professional and WxCC Premium Agent, with either agent or supervisor and then click save. You may have to assign an extension/phone number to the agent if they didn’t have one already.
Activate Users
Users who are added in Control Hub will not show up in WxCC until they are activated, even if you hit the Synchronize Users button.
To activate, the user must click on the email they received and create a password if not on SSO. This is only applicable to new users in Control Hub.
Access Contact Center Configuration
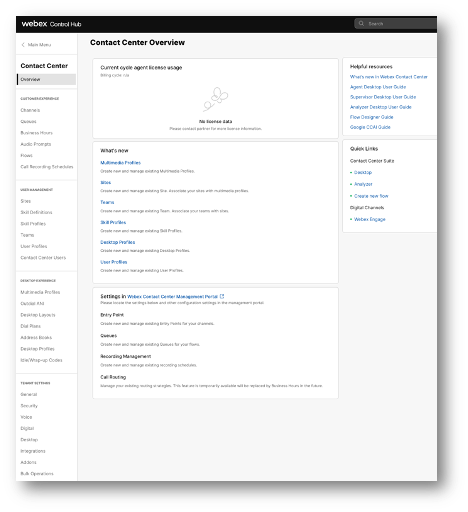
Webex Contact Center configuration is accessed from Control hub. Once you log into Control hub at https://admin.webex.com simply navigate to Contact Center under the left hand menu under Services. This will bring you to the Contact Center Overview landing page.
Note about Multimedia Profile
The default profiles that exist in this section will be sufficient for getting started. Additional profiles can be created, or the existing profiles can be modified to fit the needs of your environment.
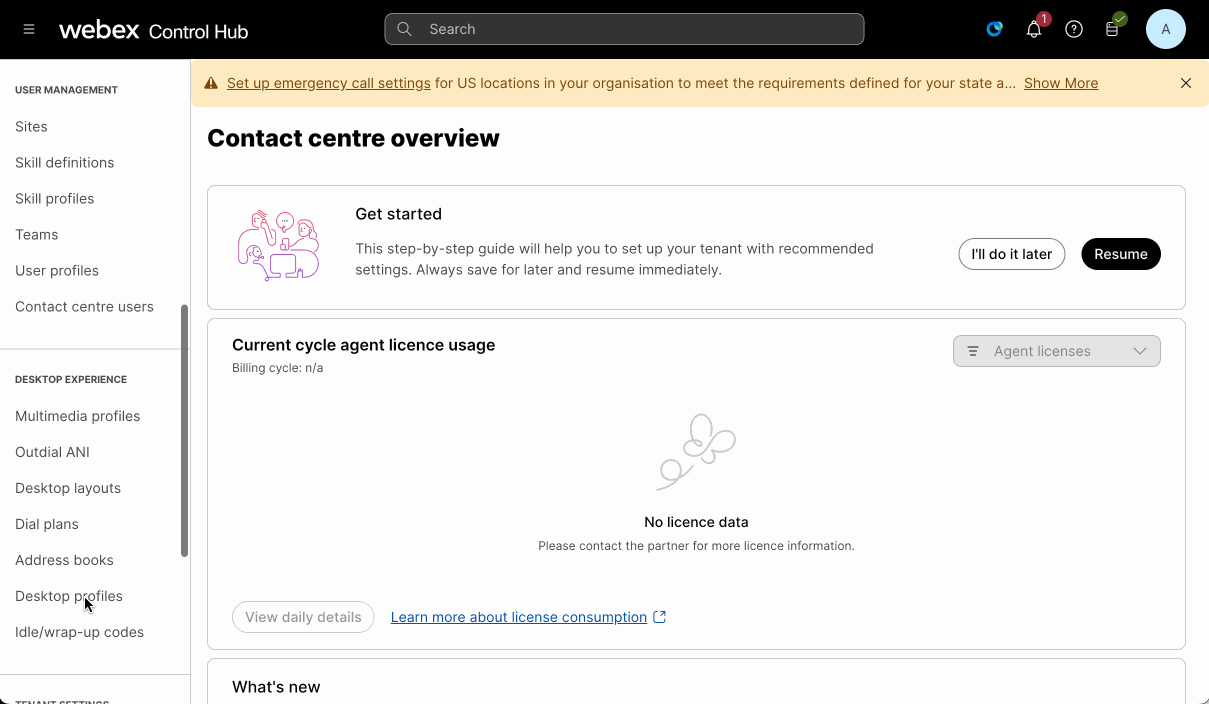
Note about Sites
In WxCC, you can optionally create a new site to section off users (generally for different physical locations). For the purposes of this documentation, we recommend keeping all of your users located in one site. There are certain features and functions that do not cross site boundaries. For example, a user must be tied to ONE site and a team must be tied to ONE site. If user Amy is tied to site Chicago, and the team Helpdesk is tied to site Denver, Amy can NOT be associated with the team Helpdesk.
Create Skill Definitions & Skill Profiles
Skills will be integrated into a skill profile, and these can be used to define who gets a call initially, when/if the call is relaxed, etc.
Skill Definitions
- Under “User Management” click Skill Definitions
- Click on Create Skill Definition
- Name the skill something meaningful
- Add a more detailed description
- Set the type – For the example, we will use Proficiency
- Service Level Threshold is not necessary, but feel free to set it to any value for reporting
- Click Create
- Repeat as needed

Skill Profile
- Under “User Management” click Skill Profile
- Click on Create Skill Profile
- Name the skill profile something meaningful such as Agent-A-Skills
- Describe the skill profile
- Select the skills & the values for each skill. For Proficiency, 0 is low skilled, 10 is Expert
- Click Create
- Repeat as needed
Create Idle/Wrap Up Codes
Codes are used for reporting purposes. Create as many as needed. Idle codes are for when an agent is not available, and wrap up codes are tied to interactions once they are complete.
- Under Desktop Experience click Idle/Wrap-up Codes
- Click Create Idle/Wrap-up Code
- Name the code (i.e. Lunch Break)
- Describe the code
- If this is your default code, select the button for Make it Default
- Select Code type from the drop down box
- Click Create
- Repeat as needed
Modify existing Desktop Profile
Desktop profiles are assigned to agents so that they can have the correct Aux Codes, DN Validation, Outdial, etc. The existing profiles are sufficient to begin with. If you wish to make changes to one of the existing profiles, follow these steps:
- Under Desktop Experience click Desktop Profiles
- Click on the profile you wish to modify
- Go thru the various tabs and make the changes you wish to adjust
Create Teams
Teams are groups of agents that can be assigned to a call queue. The more complex of an environment may mean more teams.
- Under User Management click Teams
- Click Create Team
- Name your team (i.e. ACME-Anvil-Experts)
- Describe your team
- Select Parent Site
- Make sure to select Agent Based radio button – Capacity Based Teams are legacy
- Select the appropriate skill profile, Multimedia profile, and the agents who are part of this team (Skill & Multimedia profiles are optional and can be assigned directly to agent)
- Click Create
- Repeat as needed
Enable Users for WxCC
NOTE User Intervention Required This step cannot be completed until the users have activated their Webex accounts. You may need to wait until the user has performed this step.
Log into Control hub, go to Contact Center, click on Contact Center Users under User Management. From here, you can see the status and contact center status of the user. To use WxCC, the user will need to have WxCC enabled. Click on a user - this will bring you into the user settings.
Edit each user and change the following settings:
- Verify Contact Center is set to ON
- Site should be Site-1 or appropriate site
- Verify the correct Desktop Profile
- Verify the correct Multimedia Profile
- If using skills, select the appropriate Skill Profile
- Select the appropriate team(s) they will be a part of
- Click Save
- Repeat for all users as needed
Create a Queue
Queues are virtual containers for contacts to be held until they can be answered by an available agent. Calls can be routed either by Longest Available Agent, or Skills Based.
Queue Routing Type cannot be changed once a queue is created. If you need to adjust the type later, you will need to create a new queue.
- Under Customer Experience click Queues
- Click Create Queue
- Name your queue
- Describe your queue
- Select Queue Type Inbound Queue
- Select the channel type Telephony
- For Queue Routing Type select Skills Based or Longest Available Agent
If SBR, for Agent Selection select Best Available Agent or Agent available longest
- Add groups of agents by clicking Create Group
- Select Team(s) to participate in then press save
- Select options from advanced settings.
- Permit Service monitoring for supervisor monitoring
- Service Level Threshold can be set to
120 - Max Time in Queue can be set to
86400 - Default Music on Hold set to
defaultmusic_on_hold.wav - Click Create
- Repeat as needed
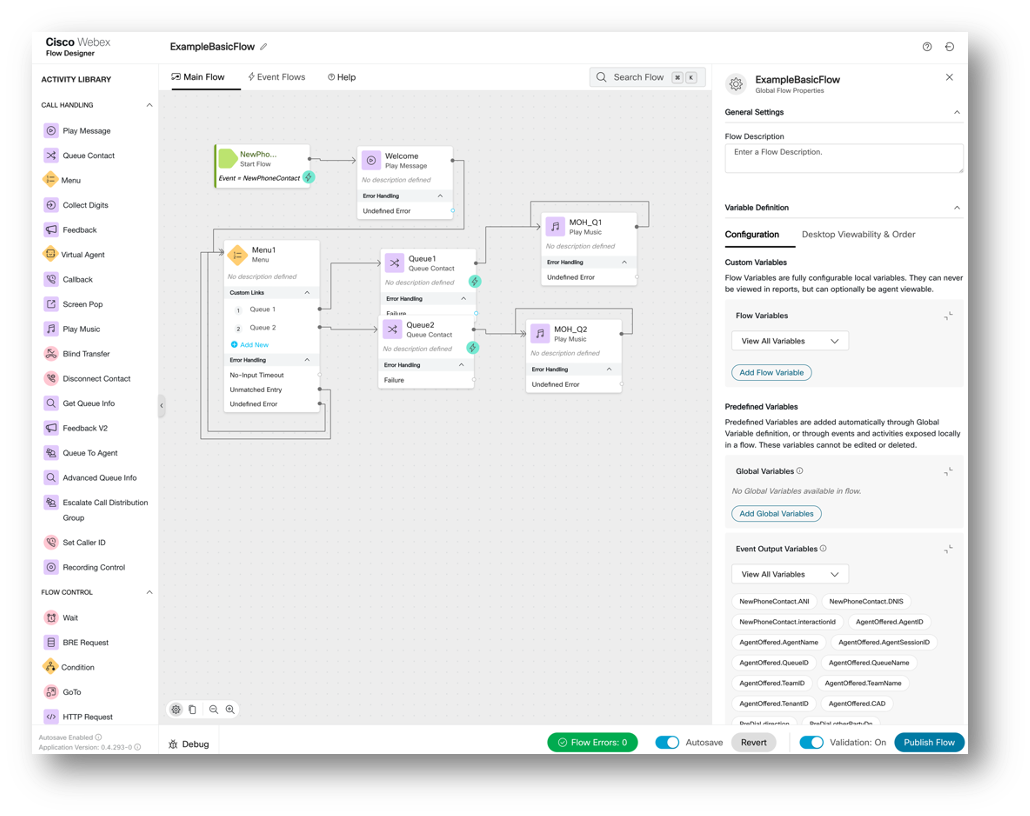
Create a Flow
A flow is essentially a call script and will dictate where the call goes once it enters the system. This work will be done from the flow designer.
- Under “Customer Experience” click Flows
- Click “Manage Flows” drop down and “Create Flow”
- Click “Flow Template”, select “Simple Inbound Call to Queue” and click Next
- Name your flow to start building it (ex. CCEPInboundFlow) and click Create Flow.
- Flow Builder will be opened and you will see new flow. This Flow will be using TTS (Text to Speach) technology to announce messages.
- Select your Incoming Queue in the Queue node
- Validate and Publish your flow

Localization change of Text-to-Speach (TTS) service
To Localize TTS to your county specific language, you will need to check supported languages here
- Add following Global Variables into the flow:
Global_VoiceNameandGlobal_Languageinto the flow - Drag Set Variable Node to the flow and assign variables
Global_VoiceNameandGlobal_Languageaccording to your requirement (in example:Global_VoiceName = en-GB-ColtonandGlobal_Language = en-GB - Select your Incoming Queue in the Queue node
- Validate and Publish your flow
Note
During CCEP Trials, a TTS Connector will be provided for the trial
Feel free to experiment with various flow objects
One of Flow examples that you might get:
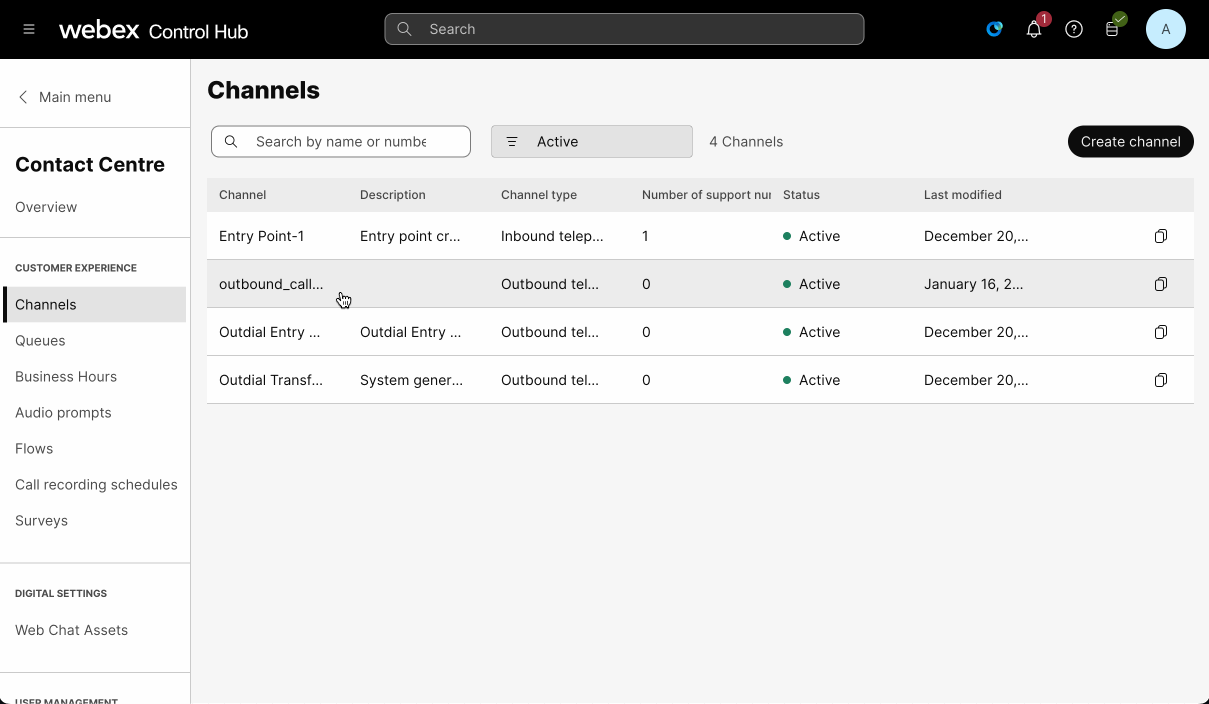
Create Channels (Entry Point with phone number mapping)
Channels (Entry Points) are points where calls enter the CC. A support number will point a phone number/DID to the Entry Point
- Under Customer Experience click Channels
- Click Create Channel
- Name your entry point (ex. CCEP)
- Describe your entry point
- Select Channel Type as Inbound Telephony
- Set Service Level Threshold to
120 - Select the Routing Flow you had created earlier in the drop down (ex. CCEPInboundFlow)
- Select Version label as Latest
- Select Music on Hold as
defaultmusic_on_hold.wav - Under Support number, press Add
- Select Webex Calling Location and Select Support Number. Click check mark
- Click Create
Testing your configuration
- Log your agent into the WxCC Agent Desktop according to the location of your tennant: US based tennant: https://desktop.wxcc-us1.cisco.com/ EU based tennant: https://desktop.wxcc-eu1.cisco.com/
- Select the correct extension/phone number and team from Station Credentials
- Once logged in, change status to “Available” (Green)
- Call the phone number of your entry point mapping that you configured earlier. This should deliver the call to the agent if all is configured correctly.
Additional Notes
For time-of-day routing, please use the business hours object. This is configured in Control Hub, under Contact Center - Business Hours
Once you have a Business Hours list created, you can utilize a “Business Hours” object in the flow designer. It is located at the bottom of the Flow Control Objects menu
Routing strategies should no longer be used for Time of Day routing.